Chapter: 11th 12th std standard Textiles And Dress Designing Cloth stitch Higher secondary school College practical steps methods Notes
Types of Sleeve
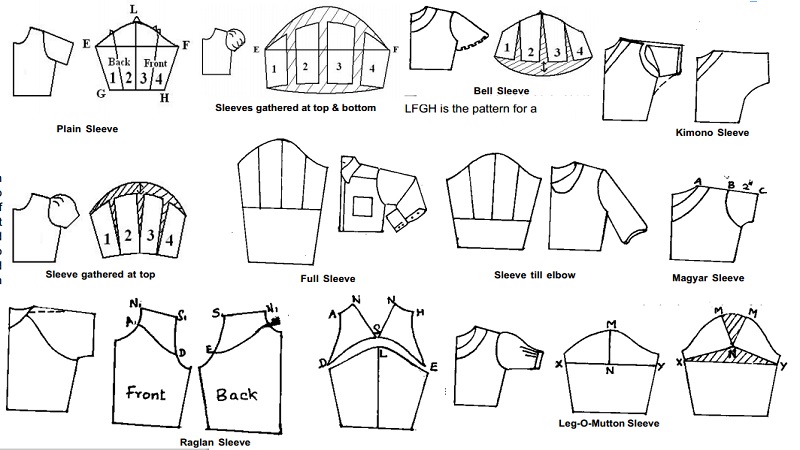
SLEEVES
INTRODUCTION:
These are part of a garment which covers the arm of the body and are usually attached to armhole of bodice pattern. Today's garments are designed with a wide variety of sleeves, which differ greatly in look and in method of construction. It is possible to develop a variety of sleeve styles from the plain sleeve pattern. By choosing a sleeve style that suits the figure of wearer, design of the fabric, design of the dress and current fashions, you can enhance the appearance of the dress. The instructions on making patterns for a variety of sleeve styles are given below.
SLEEVE TYPES:
There are different types of sleeve. These can be applied to the garment according to the taste of the wearer, and design of the garment. Some of the types are
1. Plain sleeve
2. Sleeve with gathers at top only
3. Sleeves with gather at top and bottom
4. Bell sleeve
5. Leg-o-mutton
6. Raglan sleeve
7. Kimono Sleeve
8. Magyar sleeve
9. Sleeves till elbow
10. Full Sleeve.
1. Plain Sleeve:
This type of sleeve has no fullness at lower edge or top edge and is commonly used on sari blouses. ELFGH is the pattern for a short plain sleeve. HG is the lower edge of the sleeve. EG and FH are side seams. ELF is the top edge of the sleeve (sleeve cap seam line) which is attached to the armhole edge of the bodice. This pattern can be used to develop various sleeve styles. The vertical lines drawn within the sleeve pattern are the lines through which the sleeve can be slashed or cut to develop it into other types of sleeve styles.
2. Sleeve with gathers at top only:
This type of sleeve is sometimes used in dresses. The lower edge of this sleeve has no fullness, but the top edge has fullness in the form of gathers. To prepare the pattern, take the basic short sleeve pattern and draw slash lines as explained earlier. Now slash along these lines from top to almost near the bottom edge. Keep the slashed pattern on another sheet of paper and spread open the upper edge, the required amount of fullness as shown in figure. You may spread the sleeve so that E to F is about 17' (i.e. 1' less than half width of dress fabric so that two sleeves can be cut from one length of sleeve). Increase the length of the sleeve by 1' to 2' as shown for puffing. Draw the outline of the new sleeve on the new sheet of paper. (The top edge is shown with dotted line).
3. Sleeve with gathers at top and bottom:
This is the most common type of puff sleeve. The sleeve is finished with a band and with a frill. To prepare the pattern, draw the straight line EF and then cut right through all the slash lines. Spread apart the different sections keeping the sleeve cap line EF on a straight line. Redraw adding 1' to 2' extra length at top and bottom as shown in figure. This pattern can also be used to make a sleeve with gathers at top edge but with fullness at lower edge is gathered and finished with band.

4. Bell Sleeve:
This is cut with flare at the lower edge with extra fullness left as such. To prepare the pattern, slash from bottom upwards and spread open the lower edge. The lower edge must not be gathered.
5. Leg- O-mutton Sleeve:
This sleeve is tight fitted at bottom and puffed with gathers. Prepare a sleeve pattern and draw line XY. Now draw MN through middle of sleeve. Slash along XY and MN and spread the top edge apart and prepare a new pattern.

6. Raglan Sleeve:
This is used where shoulder seam and armhole seam are not needed. These sleeves are more comfortable than other sleeves. These are used in sports wear, kid's wear and T-Shirt. On the back bodice pattern, mark D 1' above underarm point. Mark A, to 1' away from N. Connect AD and draw a gentle curve line ABD over it. Mark a matching notch on this curved as shown. Following the same procedure, draw curved line EH on the front pattern and mark a double notch on this curve. Cut away raglan sections from the bodice patterns by cutting along ABD and EFH. Trace the sleeve pattern on a large paper and mark L, mid point of sleeve cap seam line. Keep the cut out raglan sections over the top of the sleeve with shoulder tips S touching L, and points D and E resting on sleeve cap line. NSNI forms a large dart. The original sleeve pattern with this extension added will be the pattern for the raglan sleeve. The finished appearance of a raglan blouse is shown in the figure. The seam for the seam runs from neckline to armhole line.
7. Kimono Sleeve:
The shoulder seam and armhole seam is absent in the sleeve runs from side seam of sleeve to side seam of bodice. This sleeve is used where more comfortability is needed. This is used in Dance costumes, sports wear, kids wear skirt top and Ladies Top. This can be decorated with embroidery stitches at the edges
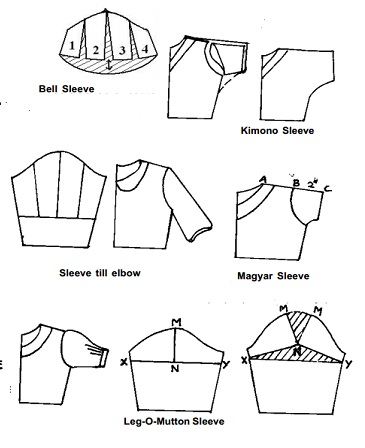
8. Magyar Sleeve:
Take the bodice pattern extend the shoulder line 2' from the tip of the shoulder. According to lower arm circumference draw the line perpendicular to bodice pattern and attach the edge to bodice pattern.
9. Full Sleeve:
The pattern preparation for this is similar to �th sleeve preparation. But the height must be extended till wrist and circumference can be changed accordingly. These are mostly used in Gents shirt, in which the lower edges finished with a cuff.
10. Sleeve till elbow:
This sleeve are used in Kameez Tops and Kid's wear. To make this pattern extend the Hem line of Plain Sleeve according to height and circumference of wearer elbow. These are sometimes gathered or left as such and finished with or without band.
Gusset:
A Gusset is a small fabric piece inserted into a slashed opening, usually under the arm of a close-fitting Kimono sleeve, to provide case for comfortable fit. Although gusset shapes vary, there are basically two gusset types, one piece (usually diamond shaped) and two-piece (usually triangular). The one-piece type is the more difficulty to insert because the entire gusset must be sewed into an enclosed slashed opening after underarm and side seams have been stitched. In the two piece gusset, each piece is separately inserted into a slashed opening on each bodice piece underarm, both gusset sectors and side seams me then stitched in one seam.
Gusset placed in underarm position is called as arm gusset. A gusset placed in different position is named accordingly as Gusset placed to conceal the placket edge is called as opening gusset, Gusset placed in knickee or bottom is named as Knickee or salwar gusset and a gusset placed at the edge seam is called as seam gusset.
Related Topics