Chapter: 11th 12th std standard Textiles And Dress Designing Cloth stitch Higher secondary school College practical steps methods Notes
permanent stitches
PERMANENT STITCHES:
These stitches are made permanent on the fabric and need not be removed later like Temporary stitches. Some of permanent stitches are 1. Running stitch 2.Back stitch 3. Run and back stitch 4. Hemming stitch 5. Whipping stitch.
1. Running Stitch:
This is the simplest form of hand stitch which is used for permanent sewing stitched using same color thread. Hand made seams, darning, gathering and finishing edges can be done with this stitch. It is similar to even basting, but the stitches are much smaller, straight, fine and evenly spaced. It is comparatively easy and can be worked fast.
2. Back stitch:
The is strong and sometimes substituted for machine stitch. It takes much time. Care must be taken while stitching, since stitching is done on the right side of the fabric. On the wrong side of the fabric the stitch is similar to stem stitch. Stitches should be about 1/8' long on the Back Stitch right side. To make the back stitch, push needle up through the material at a point on the stitching line about 1/8' from its right end. Take a stitch inserting the needle 1/8' back of the thread at the beginning of the stitching line and bringing it out an equal distance in the front of the thread. Repeat this way, keeping stitches uniform in size and fairly firm.
3. Run and back or Combination stitch:
This stitch is similar to back stitch. This is used whose back stitch is not compulsory. A back stitch and two running stitches are combined and used for working plain seam done by hand. This stitch is faster than back stitch and stronger than the running stitch.
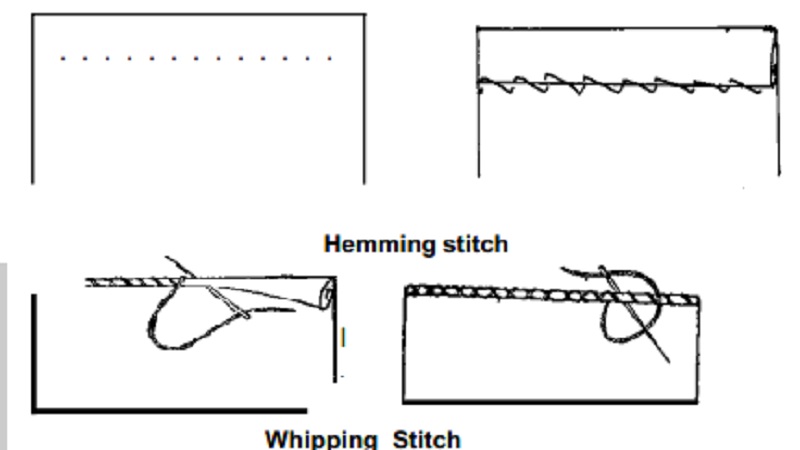
4. Hemming stitch:
This is used to finish the raw edge of the garment usually referred as the hem. Hemming must be fine, evenly spaced and must be inconspicuous from the right side of the garment. Start the hem with a tiny knot and finish with the same. Hemming must be as invisible as possible on the right side. Of the garment do slanting stitch on wrong side, close enough to hold the hem securely, picking one or two yarns of the fabric. Usually this stitch is seen in all types of garments. Improperly hemmed garment may show problem as:
Hemming stitch
1.Stitches straightly formed
2.Puckered hem
3.Stitches not evenly spaced
4. Knot prominently shown on right side
5. Attached thread shown on right side
This stitch is used for finishing sleeve edges, handkerchief, skirt, hemline, neckline edges, piping, pillow covers and other edges also.
5. Whipping stitch:
This stitch is used to finish raw edges of fabrics and also in sleeves, collar of kid's wear. The other name for this stitch is overcasing and rolled hem. Whipping produces slanting stitches taking stitches over the rolled fabric edge with needle in a straight position.
Do stitching from right hand side of the fabric till the left end. After completing, start from the left end, inserting the needle on the same point where the stitch is already formed. Continue the same way from the left to right end. The finished fabric gives continuous 'X' shape stitches. On both the sides stitches appear similar in shape.
Related Topics