Chapter: 11th 12th std standard Textiles And Dress Designing Cloth stitch Higher secondary school College practical steps methods Notes
Decorative Stitches
DECORATIVE STITCHES:
Embroidery is one of the decorative stitches. Embroidery is the art of working ornamental designs on cloth, leathers, etc., with decorative stitches. There are different kinds of embroidery which are known by special names such as cut work, drawn thread work, appliqu�, smocking etc. For successful embroidery work, it is essential to learn the basic stitches, acquire the ability to choose the right type of stitches, designs, color combinations suited to the type of fabric, the purpose and use the garment or article on which the embroidery is to be made.
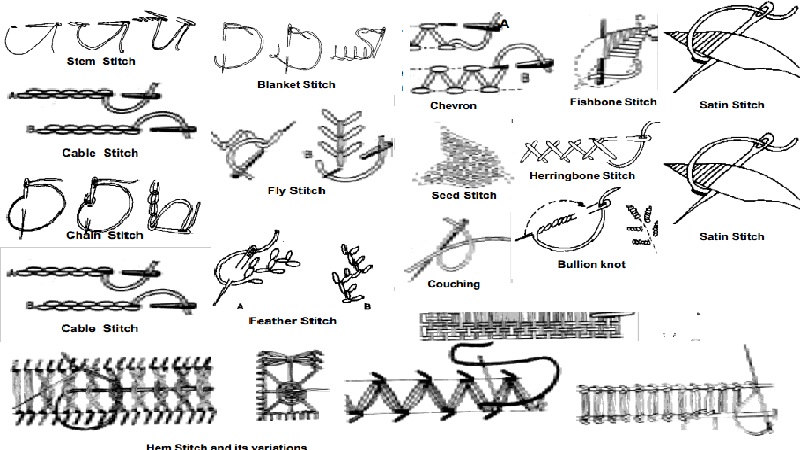
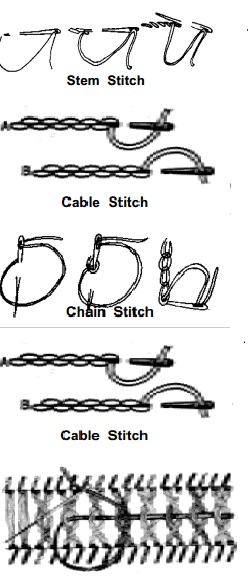
1. Stem Stitch:
This is a line stitch used for outlining designs, especially stems and leaves. It can also be used for filling small designs by working several lines side by side. Work should be done from the bottom upwards each time taking a stitch almost vertically down, but with a slight slant. While working the stitches thread should be held down with your thumb away from the stitching line.
2. Cable Stitch:
This stitch is worked from left to right. Bring the thread through on the line of the design. Insert the needle a little to the line and bring the needle out to the left midway between the length of the stitch, with the thread below the needle. Work the next stitch in the same way but with the thread above the needle. Continue in this way, alternating the position of the thread. This stitch may also be worked on evenweave fabric.
3. Chain Stitch:
This is done side by side to fill large shapes or can be used to work single lines.
Work the stitches towards you starting from the top of the line. Bring the thread out to the right side of fabric. Insert needle in fabric at the same point, holding the thread down with your left thumb. Bring the needle point out a short distance ahead and pull it through, keeping the working thread under the needle. The result is a loop. In starting the next stitch remember to insert the needle just inside the loop.
4. Lazy daisy stitch:
This is an elongated chain stitch used to work petals of small flowers and small leaves. Bring the thread out on the right side near the base of one petal. Take a long stitch of the length of the petal and pull the needle through fabric, looping the threads under the needle. To hold the end of the loop in place insert the needle down over the thread which forms the loop. Bring out the needle again near the base of the next petal and repeat the same procedure as given above.
centre line with a thread held under. Pull the needle through, and take the next stitch from the left of the line with the needle slanting down and to the right. Continue working stitches alternately on the right and left, keeping them evenly spaced and of equal length and slant. Make double or triple feather stitch by making two or three slanting stitches on one side and then a similar number on the other side.
5. Chevron stitch:
This stitch is worked between double line. Bring the thread through on the lower line at the left side, insert the needle a little to the right on the same line and take a small stitch 5. Magic chain stitch:
This stitch is worked in the same way as chain stitch, but having two constrasting threads in the needle at the same time. When making the loops, pass one color under the needle point and let the other color lie on top. Pull through both threads. Work the next loop with the other color under the Magic Chain needle.
6. Straight stitch:
This is a single spaced stitches worked either in a regular or irregular manner. Sometimes the stitches are of varying size. The stitches should be neither too loose nor too long.
This stitch may also be worked on even weave fabric. This is also called as single satin stitch.
7. Blanket stitch:
This stitch is used as an edging for blanket and other articles or as part of a design for which the blanket stitch makes the border. It is also used in cut work and applique work. It is worked between a pair of lines (usually parallel). The work should be done from left to right, stitching towards you. Bring thread out on the lower line, insert needle in position on upper line and take a downward stitch with the thread under the needle point. Draw out the thread. Stitches may be of the same size at regular distances apart or grouped and spaced according to the effect desired. To make scalloped edge using blanket stitches, outline two rows of scallops with running stitch and work blanket stitches between the two rows. Trim fabric away close to scallops after the work is completed.
8. Fly stitch:
Bring the thread through at the top left, hold it down with the left thumb, insert the needle to the right on the same level, a little distance from where the thread first emerged and take a small stitch downwards to the centre with the thread below the needle.
Pull through and insert the needle again below the stitch at the centre and bring it through in position for the next stitch.
This stitch may be worked in single or in horizontal rows or vertically in two rows.
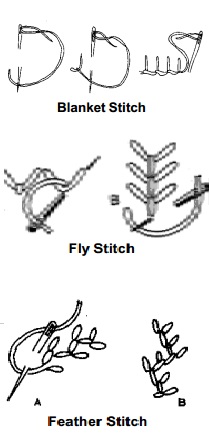
9. Feather stitch:
The working of this stitch is similar to that of the blanket stitch, but the stitches slant towards a centre line from either side. First mark a line lightly to indicate the centre line.
Working from top to bottom, bring needle out at the beginning of the marked line. Hold the thread down along the centre line. Starting from the right of the line take a stitch with the needle slanting downwards, and bring it out on or near the to the left emerging half-way between the stitch being made.
Next, insert the needle on the upper line a little to the right and take a small stitch to the left. Insert the needle again on the same line a little to the right and take a small stitch to the left, emerging at centre as at B. Work in this way alternately on the upper and lower lines. This stitch may also be worked on evenweave fabric.
11. Seed stitch:
This simple filling stitch is composed of small straight stitches of equal length placed at random over the surface. This stitch is used to fill small spaces.
12. Couching:
Lay a thread along the line of the design and with another thread, tie it down at even intervals with a small stitch into the fabric. The tying stitch can be of contrasting color to the laid thread if desired.
13. Fish bone stitch:
This stitch is useful for filling small shapes. Bring the thread through A and mark a small stright stitch along the centre line of the shape. Bring the thread through again at B and make a sloping stitch across the central line at the base of first stitch. Bring the thread through at C and make a similar sloping stitch to overlap the previous stitch. Continue working alternately on each side until the shape is filled.
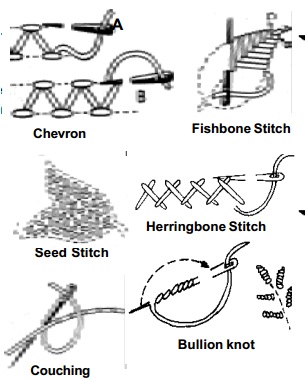
14. Herringbone stitch:
This is used as a decorative stitch as well as for finishing hems and raw edges of seams. Stitches are worked from left to right along two parallel lines. Bring out the thread at the bottom left hand corner of the work. Insert the needle on the top line at a point farther to the right and take a short stitch through fabric from right to left so as to get a slanting stitch. Now take a short stitch through fabric from right to left on lower line to get another slanting stitch crossing the first one at point little below the top line. Take care to make stitches of even length at regular distances apart. On the wrong side two rows of running stitches are seen. When worked closely this stitch can be used to do shadow work.
15. French Knot:
This resembles a knot and is usually applied to the centre of a flower. Bring out the thread to the right side at the point where the knot is to be worked. Hold the thread tight with left thumb and wind three to four times around the needle. Now holding the thread firm, insert needle in fabric close to where it first emerged. Pull thread to wrong side and bring out the needle to the point where the next knot is to be worked.
16. Bullion stitch:
Bring the thread out on the surface of the cloth and insert the needle a short distance away from that point according to the length of stitch required.
Bring the needle up through the first point and wind the thread round the needle for a distance equal to the length of the stitch.
Hold left thumb on the coiled thread and pull out the needle through it. Now insert the needle at the end of the knot. This is mainly used for embroidering roses.
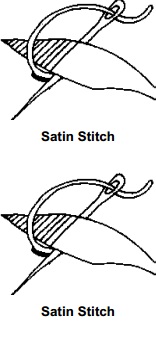
17. Satin stitch:
This is a filling stitch used to cover regular or irregular shaped spaces. Bring the needle out at the starting point on the right side and take a stitch
carrying the thread across the design and bringing the needle back very close to the starting point. Continue in this manner keeping the stitches even and very close together. When a raised effect is desired pad the space to be covered with small running stitches worked perpendicular to the direction in which the satin stitches are to be applied.
18. Cross Stitch:
This stitch is also called as counted thread embroidery work because this embroidery is done over a counted thread fabric (fabric made out of basket weave, also called as matty cloth). Make a row of slanting stitch through the holes seen in the fabric. Complete this way the whole design and work on the opposite direction by stitching over the already made stitch. Various geometrical designs can be done through this embroidery. Six strand of thread should be used for this stitch. used for this.
19. Hem stitching:
This is a simple stitch used in drawn thread work. It is worked from left to right on the wrong side of the fabric usually above a hem. First, draw out the required number of threads above the hem marking and tack the hem close to the first pulled-out thread. Bring needle out through the hem at the left edge. Then pick up the desired number of threads on needle, passing needle from right to left under the threads and bringing it up. Insert the needle under the hem just to the right of the threads you have encircled and bring it up. Pull the sewing thread tight around the drawn threads. Again pick up another group of threads and continue stitching until the row of hem stitching is completed. This is a single hem stitching. To do double hem stitching turn the work around and repeat hem stitching along the other edge, grouping together the same threads as before. Variations of the hem stitch can be made by grouping threads in different ways.
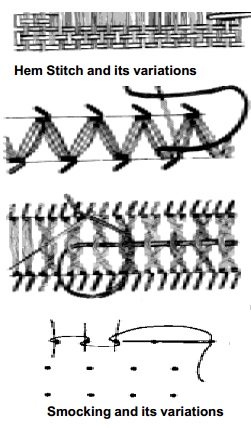
20. Smocking:
This is an attractive method of distributing fullness at necklines, yoke lines and sleeves of children's dresses. The amount of material required for smocking is two to three times the width of the finished article. To do smocking, the first step is to mark on the fabric several rows of evenly spaced dots about �'. The dots in the different rows should come directly under each other. This can be done by the use of transfers with dots available in shops or by using a home-made cardboard gauge pricked with small holes at the intervals required. The card can be moved along on the fabric until all the dots are marked by inserting a pencil point through the holes.
To gather or pleat the material, work basting stitches picking up a few threads of the fabrics under each dot. On finishing the basting of each row cut the thread, leaving a loose end. On dotted or checked materials, this basting stitch can be worked without marking dots. The threads are pulled up to gather the material into evenly spaced pleats. The decorative smocking stitches are then worked on the right side of the fabric on top of the pleats. Gathering threads are removed after smocking is done. The commonly used smocking stitches are : Out-line stitch, cable stitch, wave stitch, diamond or chevron stitch and honey-comb stitch.
Related Topics