Chapter: 11th 12th std standard Textiles And Dress Designing Cloth stitch Higher secondary school College practical steps methods Notes
Placket and types of Placket
Plackets are finished opening constructed in order to make it easy to put on or take off a garment. When the garment is in use plackets are kept closed (for good fit) with the aid of fasteners such as zips, buttons and buttonholes, press buttons, hooks and eyes etc.
They are used at waist lines, neck lines, wrists and other snug fitting parts of the garments.
PLACKETS:
A placket may be made in an opening left in a seam, in slash or cut in a garment.
The placket made in a seam is stronger and gives a better finish when completed. The following points should be kept in mind while making placket.
A good placket should be as inconspicuous and flat as possible. It should not be bulky, puckered or stretched. Fastenings should hold securely and there should be no gapping edges.
Neck openings must admit the head easily, pass over. The position of the placket should be such that it is easily accessible and convenient to operate.
Openings are subjected to certain amount of strain during wear and should be strengthened at the closed ends, lower end or neck and skirt openings, upper end of wrist openings etc. For plackets in seams to be durable, the garment seam should be at least 5/8' wide. Seams should not be trimmed or clipped too close.
The type of placket used should be suitable to the kind of garment on which it is used, its position in the garment, texture of the fabric, age and sex of the wearer and current fashion must be kept in mind while choosing placket.
Placket types:
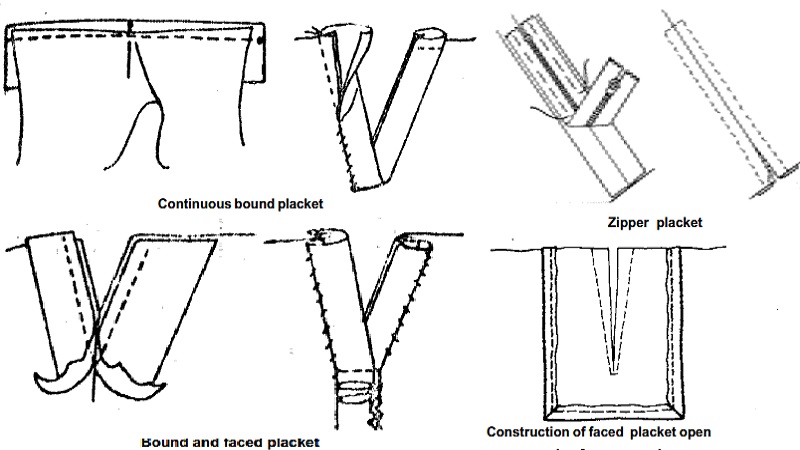
1. Continuous bound placket:
This is also called one-piece placket and may be made in a seam or slash. It is suitable for children's dresses, undergarments like sari petticoat, and for sleeve openings
where a cuff or band is used. Do not use this placket on curved seams and on bulky fabrics.
To make a placket in a slash, cut a strip of fabric on the lengthwise grain. 1�' to1�' wide and one inch longer than twice the length of the openings. Keep the centre of a long edge of the strip to the end of the slash, with right sides of garment and strip facing each other. Pull back the tip of the slash about �' from the edge of the placket strip and pin. Spread the placket edges apart almost into a straight line and attach to the strip by a line of tacking worked �' from the edge of the strip from the garment side, machine over the tacking line from one end up to its midpoint. Stop the machine at this point with the needle in the fabric, raise the pressure foot and move the fullness backward out of the way to prevent catching a pleat. Make sure that the garment edge is caught in the seam. Lower the presser foot and stitch to the opposite end of the opening.
Press the seam edges towards the placket strip and fold under the free edge of the strip �' and crease. Then fold the strip over the seam edge and hem it along the stitching line. Fold the strip under on the overlap section and tack it at the seam. Tacking can be removed after the fasteners are fixed.
2. Bound-and faced placket or two-piece placket on a seam:
This is used in the left seam of skirts or petticoats and back seam of dresses. The underlap side of this placket is finished with a binding and the overlap with a facing. For this two separate strips of fabric are used, one of width 1�' for the overlap and a wider one (2�') for the under lap. Both the strips should be 1' longer than the placket opening. Stitch the narrow strip to the overlap side (front part of the skirt) and the wide strip to the under lap side of garment (back part of the skirt), right sides facing and seam lines matching.
The seam allowance used for attaching the strips should be the same as that of the seam on which the placket is to be fixed (about �'). This is to ensure that the stitching line on the strip comes on line with the stitching line of the seam. The one inch extra length of the strips should extend below the placket opening. To finish under lap, crease the strip back over the seam, bring its free edge to the wrong side of garment, turn under �' at the free edge and hem the fold to the stitching line. This forms the bound side of the placket and should be �' to �' wide.
For finishing overlap section of the placket, make a �' or wider fold to the wrong side of its free edge so that distance from the stitching line to the fold line is the same as the width of the binding on the under lap. Now turn the strip over completely to the wrong side of the garment (as for a facing) and hem or slip stitch the fold to the garment. Work a line of stitches at base of placket catching the under lap and overlap together. This can be done by hand from the wrong side in such a way that no stitches are visible on the right side.
3. Miter Placket:
It is also called Tailored Placket. This placket is used for beauty and also to add strength. This is commonly used on men's shirts, sleeve opening and on neck openings in jibbas and children's garment. When used on children's and ladies dresses, the strip used for placket may be of contrasting material for decorative effect.
For the under lap, prepare a straight grain strip 1�' wide and exact length of the silt (5'). Keeping one end of the strip exactly in line with the end of the slit and with right side facing. Stitch a �' seam joining the edge of the strip to the correct edge of the sleeve opening. Now fold �' under on the free edge along the strip and hem or machine this folded edge along the stitching line. The under lap strip tacked to the wrong side of garment and figure shows the finished appearance of the under lap binding.
Construction of Miter Placket
The overlap for this type of placket is usually shaped to a point at the end and is about 1' wide when finished. For this cut a strip 2�' wide and 1�' longer than the slit Trim off the strip and mark the seam lines (dotted lines) �' inside the outer edge as This placket is used for beauty and also to add strength Keep the right sides of the strip facing the wrong side of garment and tack the short side of the strip to the free side of the placket opening on the seam line. Machine stitch and bring its overlap strip over to the right side of the garment. Turn under the seam allowance and adjust the position of the strip so that it will overlap the under lap binding. Tack in position. Top stitch the strip to the garment upward, then around the point and downward till sleeve opening. Now stitch across the overlap twice to hold the under lap in position. Note that the stitching has caught the under lap from under the presser foot and machine the overlap section alone without catching the garment.
Note : Remember to cut overlap strips as well as under lap strips in pairs (for a pair of sleeves) from fabric folded with right sides facing.
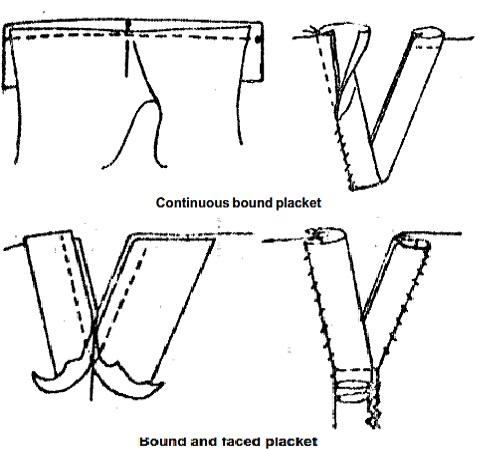
4. Zipper Placket:
Zippers are usually attached with tapes and available in different sizes. These can be selected depending upon the size & color of the placket. Garments with zipper are more attractive & comfortable to the wearer.
Cut the opening in garment fabric and select the zipper accord to the opening size. Toward the end of the cut make a short slit �' wide diagonally on both the sides. Turn all the three raw edges to the wrong side and do a row of tacking. Take a square piece of
Tape & Stitch its raw edge. Attach this to the end of the placket opening with the hemming. Over this, place the Zipper & stitch through the edges holding the fabric edge. Then take another square piece of Tape and stitch its edge and place it covering zipper edge & finish it with hemming.
Zipper must be carefully opened and closed, because if the pull tab slips away from the teeth or rail, it will be difficult for the wearer to operate it. This can be used in skirt, frock, shirt, handbags, decorative purses and other garments.
5. Faced Placket open:
This is a simple neck finish used on infants, children's clothes and night dresses.
To make this, slash the opening down from the neck at centre front or centre back and apply fitted facing to the opening. Place facing piece right sides facing the garment, do a row of stitch catching the garment more. Turn the facing to the wrong side and top stitch.
Finish the facing by turning the edge and hemming.
Related Topics