Chapter: 11th 12th std standard Textiles And Dress Designing Cloth stitch Higher secondary school College practical steps methods Notes
Dress Designing : Pattern Alterations For combine of Basic Fit Problems figure and irregularities
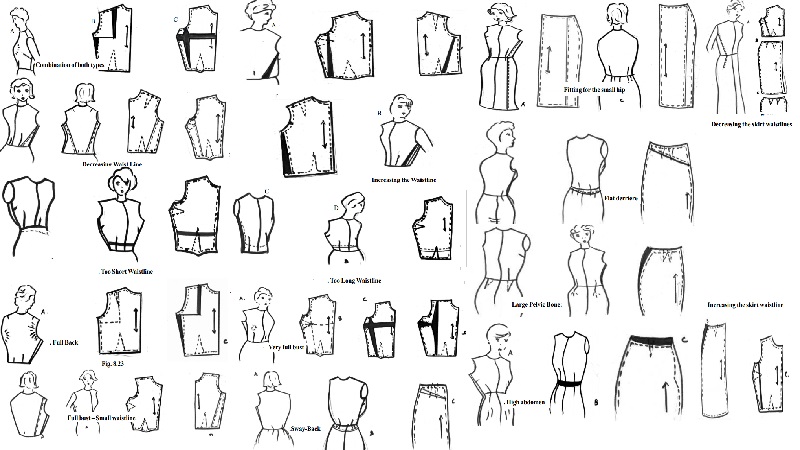
Combination of both types -
The overweight or matronly figure may have a combination of these figure problems. The bust may be too low and full, although and the shoulders are narrow. The back may be fleshy and rounded through the shoulders (Fig.A). Choose a pattern that provides a high armhole and alter for the broad back (Fig.B) and low full bust (Fig. C). For the low bust, lower the side darts. Mark these darts before you slash your pattern to alter for the full bust.(Figure)
1. Decreasing the waistline
Before adjusting the waistline for size on your muslin, check the underarm seam-line. It must be straight up and down, pulling neither to front nor back. If the waistline is too big, take a dart on both the back and front bodice from waistline towards armhole, to give a sung fit (Fig.A). Pin the dart in back and front bodice pieces at the same points. The dart shapes toward the armhole but does not alter the armhole size (Fig.B) (Figure).
2. Increasing the waistline
To increase the waistline or add width of the pattern at the waist. Since you have two front seam edges and two back seam edges, divide the amount you need to increase the waist line by four and add it at the side seams of the back and front waist (Fig.A). Add this amount at the waistline of the skirt as well. There are additional waistline adjustments that have to be made, depending upon your particular figure faults.
For instance, if the underarm seam of the bodices pulls toward the front, it means that the front of the figure protrudes and the increase in must be made only on the front waist (Fig.B).
To make this alteration, slash your basic pattern from the waistline lengthened, as is often the case, continue cutting from the point of dart straight across the front of the pattern and lengthen as needed, shape the dart to fit correctly (Fig.C). If the waist needs enlarging, spread the pattern at the waistline slash.
For the extremely full-busted figure slash the pattern to the shoulder and spread.Usually, with this adjustment, the shoulders have to be narrowed with a tuck from the center shoulder towards the bust (Fig.D)(Figure).
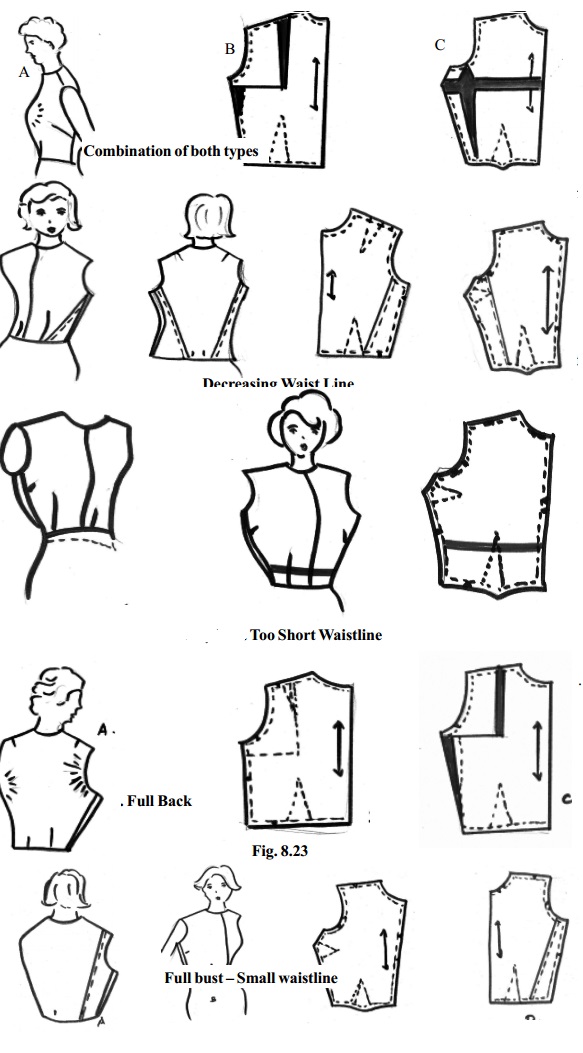
Full Back
Generally, the pattern is too small at the back, although the rest of the pattern fits properly (Fig.A). You need only to broaden the shoulders for a comfortable fit.
To make an adjustment, slash across under the armhole and up through the shoulder, moving this piece out on the shoulder to give the necessary fullness across the back (Fig.B). The back shoulder must be made broader because the figure is round shoulders. Extra fullness is needed across the shoulder blades but not at the top to ensure keeping the correct armhole and neckline (Figure).
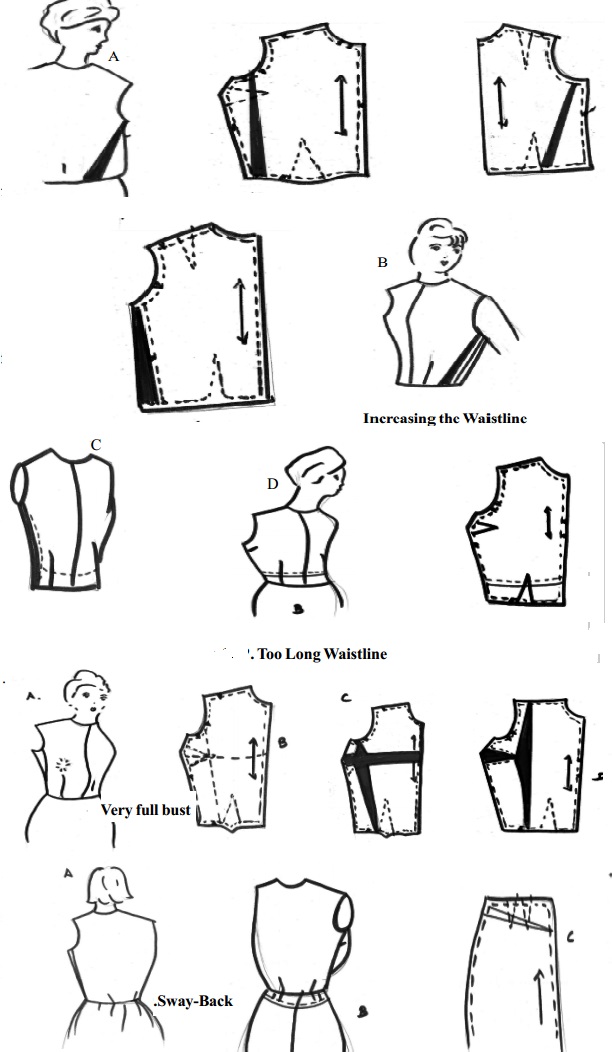
Very full bust
Usually, all the patterns are designed according to bust measurement, but when bust fullness is extreme, a pattern made by this measurement would be much too large at the neck and armhole. Therefore select a size that gives the best fit at the armholes, regardless of bust measurement. This smaller pattern will probably fit will except across the bust, where it will be too tight for your figure (Fig.A).
Make the bust size larger by slashing the pattern from waist line to armhole and from the center of the bust dart towards the point (Fig.B). By spreading the pattern here you get more fullness for the larger bust. The dart becomes larger and deeper.
If the waist line also needs to be lengthened, as is often the case, continue cutting from the point of dart straight across the front of the pattern and lengthen as needed. Shape the dart to fit correctly (Fig. C). If the waist line is also needed to the armhole, insert the amount needed at the front to correct the under arm seam (Fig.B).
If the back is full, the seam will pull towards the back. Adjust this the same way (Fig.C). If the waistline is to be increased more than two inches, it is advisable to slash the back and front pieces to make the adjustments, within the basic pattern rather than on the outside seams (Figure)
Full bust - Small waistline
With the small waist line and full bust, the waist adjustment can also be used to give a better bust fit. The back waist line is made smaller by taking a dart at the side of the waist, from the waist line towards, the armhole (Fig.A). Make the front waist line smaller by taking a deeper waistline dart. Fit the dart on the outside edges of the dart line (Fig.B). On the pattern mark + the front dart deeper only on the outsides line of the dart, so that the bodice and skirt darts will line up (Fig.C). Adjust the back pattern (Fig.D). Never take back darts in deeper, because the back bodice will appear to bulge the figure will look round shouldered (Figure).
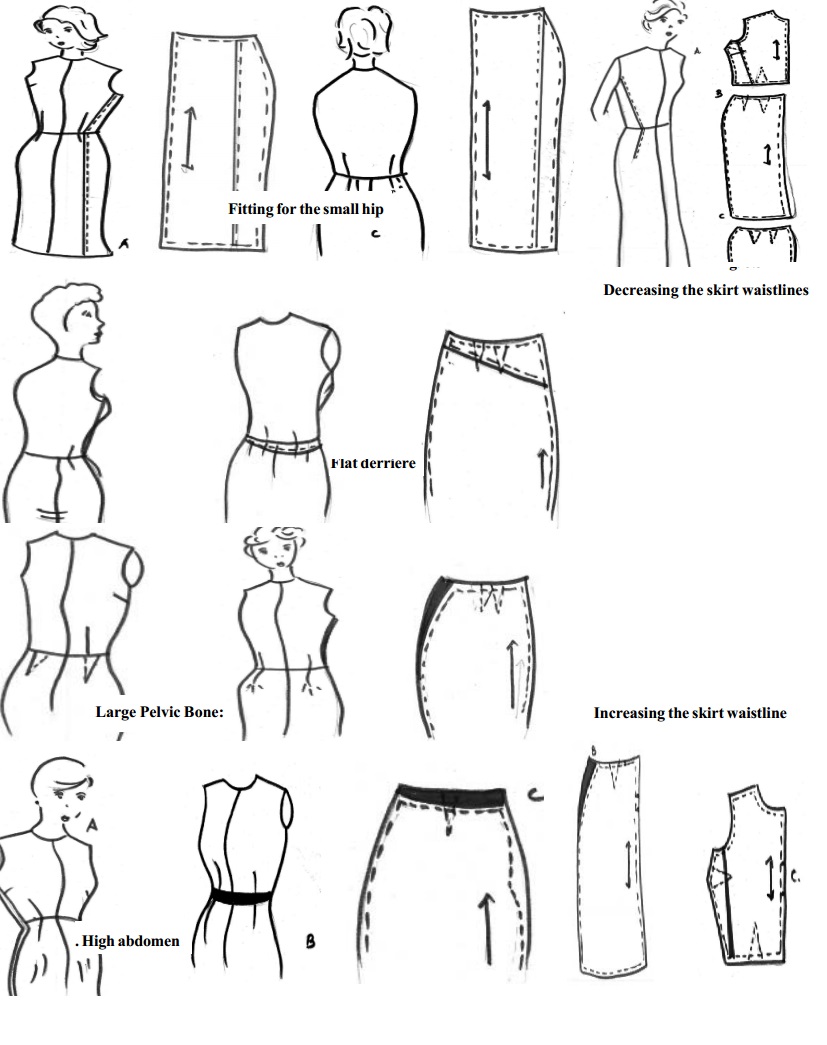
Fitting for the small hip
One must match the bodice and skirt darts. The darts towards the center on the front and back bodice must always flow on a continuous line. Thus the darts must be taken in or let out only on the outside line.
When the waist and hip are both smaller than the pattern, a tuck can be taken the whole length of the pattern then folded into the pattern at the same point (Fig.A and B). When only the hips are smaller and need adjusting, fit out the excess fullness at the side seam of the muslin. You can fold this same amount of the pattern before it is cut, or you can fit it out and leave it in the seam of the finished garment.
If the front or back of the skirt has a puff below the darts that can't be fitted out, the darts are to deep, giving more shape than is needed (Fig.C). (Side skirt at the fullest part of the hip, taper the darts from nothing at the side seam toward the slash to shape the skirt). Make the adjustment by adding this amount to the top of the skirt pattern to correct for this figure fault, giving a good fit at the waist (Fig.C) (Figure).
Flat derriere
When the figure is flat in back, the amount of shaping for the full derriere, is not needed (Fig.A). To eliminate this open the back darts and make them small. Pin the excess fabric out at the side seams. sometimes with this figure, the skirt also has a tendency to sag at the back. This can be eliminated by fitting a dart across the top of the skirt under the waistline, as for the sway -back figure (Fig.B). To adjust the pattern, re-mark the back darts making them smaller on the outside line only. Fold the dart across the pattern under the waistline as you did for sway - back (Fig.C). To remove the excess fullness across the skirt, pin a tuck the length of the skirt close to the side seam (Figure ).
Large Pelvic Bone:
This is almost exclusively a fault of the junior figure. The hip bone protrudes, causing a bad fit at the side seam and ward the center back. Do not make the skirt front fitting darts deeper, except when fitting for large pelvic bones. Altering bodice darts is exactly the reverse. The front darts of the bodice can be made deeper for a better fit to the bust when making the waist line smaller, but back darts are never made deeper, as this makes the figure appear to be round - shouldered (Figure).
Sway-Back
Usually with this figure fault, folds appear across the top of the skirt just below the waistline (Fig.A). Pin the fold across the top of the skirt, tapering it to nothing at either side so that it fits correctly (Fig.B). Check the grain line, making sure it runs evenly around the fullest part of the hips. Make the adjustment in your pattern at the same point(Fig.C) (Figure).
High abdomen
With this fault, the skirt rides up a center front (Fig.A). To correct, open the skirt at the center-front waistline and drop it until it hangs smoothly (Fig.B). It may be necessary to add fabric here to give even more length at the waist line seam dart across the side skirt at the fullest part of the hip. Taper the dart from nothing at the side seam toward the slash to shape the skirt.
Make the same adjustment in the pattern (Fig.C) as on the basic pattern (Figure).
Increasing the skirt waistline
The skirt waist size is increased by adding at the side seam of the pattern (Fig.A and B). The skirt is never slashed to adjust the waist size as is sometimes done to alter the bodice waist line (Fig.C). Increase the skirt waist size by the same amount and at the same point as the bodice waistline has increased, that is, on the front skirt piece only, on the back skirt piece only, or on both front and back pieces (Figure).
Decreasing the skirt waistlines
To decrease waist size, fold a dart from the waist line toward the hip. Alter the skirt the same amount as the bodice (Fig.A and B). If the waist is very small in proportion to the hips, alter the skirt back waist by making fitting darts, slightly deeper.
Adjust the darts only on the side to make them smaller by cutting out on the outside line of the dart. Remove the excess from the waist and hip size by taking the tuck along the length of the pattern. Correct the pattern in the same way.
Generally, this adjustment is needed only in the back, except when the stomach is also flat. In that case, further adjustment will be necessary (Figure) .
Fitting for the full hip
When the hips are wider than the pattern size, let out the seams of your muslin and, when cutting your dress, add the necessary amount at the same places. If a large amount has to be added at the hip and not at the waist, the pattern can be slashed from the hem to the waist about 4 inches from the side seam. Spread the muslin the amount needed for the correct hip size and pin a piece of fabric here to hold (Fig.A).
To adjust the pattern, add the same amount, at the side seam (Fig.B). The amount spread at the full part of the hip should be the same as at the hem line. Remove the extra flare pin, so that it fits over the hip bone. Then make it deeper so the fit is smooth. This may mean enlarging the front waistline. It is done by adding extra fabric at the waist seams (Fig.B). To adjust the pattern, re-mark the waistline darts at the correct point. If the waist size has to be increased, add the extra amount onto the outside waist seams (Fig.C) (Figure) .
Related Topics