Chapter: 11th 12th std standard Textiles And Dress Designing Cloth stitch Higher secondary school College practical steps methods Notes
Belts and Types of belts
INTRODUCTION
Belts are used for finishing waists of dresses and are often worn to hide the waist joint of bodice and skirt. The style of belt must be in keeping with the design of the dress. Contrasting or suitable blending colours can be used effectively.
Belts made of material from the garment serve both utility and decorative purposes. They may be made soft or with stiffening, wide or narrow plain or intricate, depending upon the garment and the trend of fashion. Stiffening applied as a facing or interfacing keeps the belts in shape and gives it a tailored effect. Muslin, belting cross grain ribbon or leather may be used. The belt is usually fastened with a covered buckle or a novelty buckle. Faced, interfaced, tie belts and skirt bands are cut on length wise grain, while sash belts are on the bias.
How to check belt length:
To start with, the belts length must be checked and noted. It must be about 7" longer than is required to reach around the body. Many persons make a belt 7" longer than their waist measurement and find to their disappointment that the belt is small. For this reason, the pattern to the width must be checked on the body before hand.
Types of belts:
The detachable waist belts are of two kinds :
1. Soft or unstiffened
2. Stiffened to give a firmer finish.
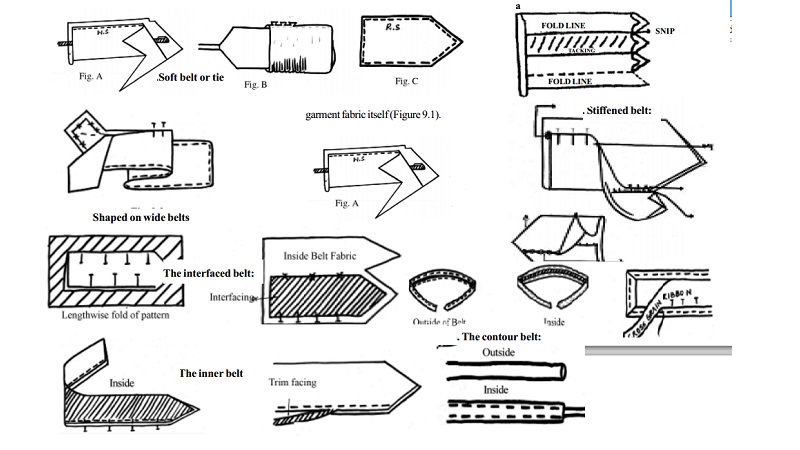
1. Soft belt or tie
A length of tape is tacked to the right side of the pointed end, but clear of the stitching in order to pull the belt inside out after it is machined. The tape must be tacked before the two sides of the belt are fixed in position. Right side facing . Machine round the pointed end and one or both long sides are necessary. Leave the square short end unstitched for turning through. Trim even the belts. Snip of the pointed edge fairly near to the machine to avoid bulk when turned through. Pull end of tape and work the belt inside out. Remove tacks of tape, work out seam edges, especially the point, tack these in position and press wrong side. Turn in the short square edges to face each other and slip stitch them together. This belt is simple to construct, at the same time it can be made of the garment fabric itself.
2. Stiffened belt:
The stiffened belts are made using a stiffening material, inorder to hold the belt in place.One must be careful while choosing stiffening material according to the kind of material used for the belt.
For construction, cut the stiffening to the exact size of the pattern without turnings ie. exact size of finished belt.
Then lay the stay or stiffening piece to the center fitting lines of the belt on the wrong side. Tack into position and ship the turnings of the pointed end as shown in Fig. For flatness when turned, fold these turnings on the wrong side of the fitting lines. Pin and tack both these and the turnings of the short square end into position. Turn one long side, over on to the stiffening material keeping it quite flat, pin it into position, then catch-stitch the raw edge to the stay only. Fold over the remaining long side of the belt turning under the raw edge. Pin and tack this in place, and slip-hem the fold into position. Machine stitch in even rows on the right side of desired or leave quite plain. Attach a buckle to the square end if required. These belts give an enriched look. They also can be made with the garment fabric itself.
3. Shaped on wide belts
These belts are shaped to add beauty. To construct this , first cut the interfacing of pre-shrunk canvas or pillow. Use a weight of interfacing suitable for the fabric. Trim off all seam allowance on interfacing. Pin to the outer belt fabric. Pin, turn and baste the fabric edges over the interfacing, clipping the curved edges if belt is shaped. Pin the turning to the belt, turning in the edges, clipping where necessary. Baste, slip and stitch the folded edges of the lining to the belt. The belt may be edge- stitched from the right side as desired.
4. The interfaced belt:
The interfaced belt is the softest belt used by those persons who require comfort. It has the disadvantage of folding over, when worn, and might become rope- like. It is not the most desirable belt from the fashion point of view as many prefer stiff belts. The stiff belt is easy to make. One must be careful in selection in the case of washable belts.
To construct this , first fold the belt pattern in half -length wise and cut the interfacing fabric at the fold.
Then pin the interfacing to the wrong side of the belt, with the cut edges even, as shown in Fig. Catch stitch the long edge of interfacing to the center line of the belt.
Then, fold belt in half- length wise, right sides together, and stitch the pointed end along the edge of the belt. Trim corners and turn belt right - side out.
To finish, turn under the seam allowance. Pin the opening edges together with the end of belt. Baste finished edges of belt and Press it.It can be top-stitched near the long edges if desired. Attach buckles, and finish.
5. The belt with belting as backing
This belt is professional - looking because it resembles closely the belt with a leather backing used on purchased garments. The stiff belting keeps it from folding over and becoming rope - like, and so this belt construction is the only desirable one. These directions differ from those usually described in the instruction sheet, and therefore additional notations are required. Pre-strink the belting and cross grain ribbon to be used if the belt will be washed.
For construction first carefully shape one end of the belting as desired.Cut off a piece of belting to the necessary length to reach around the body with an overlap of about 7 inches.
Then cut a strip of matching fabric (lengthwise) one inch wider and 1" longer than the belting.
Hold the belt in a curved position as it will be on the body when you wear it. Lap one edge of the belt fabric � inch over the belting and baste in place firmly.
Holding the belt in a curved position, wrap the fabric around the belting. Keep it firm and evenly tight so that the cross wise threads are not pulled off-grain. Pin it in place over the belting and baste the remaining edge in place.
From the outside,machine-stitch the edges of the belt, using slightly longer stitch than used for the seams of the garment. Personal preferences will determine how close to the edge these stitches must be. Don't make them closer to the edge. These stitches must be at least closer than 1/8 inch, far- to- far stitching may not hold the belting. Usually �' is perferred. To finish the raw edges on the underside, pin cross grain ribbon in place with hand stitches about � inch apart.
This belt is also made wider as waist bands, for many of young girls skirts.
6. The contour belt:
The contour belt is shaped to the body so that is will rest quite naturally at the waist line, dipping down at the back. It is usually slightly wider at the back. If it is a wider belt, the contours show up more than on a narrow belt, where the contours are hardly check when worn. This belt takes more time to make than the straight belt with belting as a backing.
It is constructed by cutting an interfacing, facing and the stiff, in a cross grain to hold the belt properly in position. The belt is inter - turned and finished in the same way as interfaced belts.
7. The inner belt
This belt is usually made with the inner material at the waistline for extra stiffness. This is cut in a cross grain ribbon, and finished at the inner part of waist band which hold the skirt. This belt enriches the natural shape of the human figure.
To conclude, we find that belts play an important role in garments. Every finish to a belt is a baste and press, after which buckle and eyelets are attached. Belts are of different types and each one is good in its own way. They could be changed according to the pattern.
Related Topics