Chapter: 11th 12th std standard Textiles And Dress Designing Cloth stitch Higher secondary school College practical steps methods Notes
Dress Designing : Pattern Alterations For Basic Fit Problems
PATTERN ALTERATION
INTRODUCTION
Patterns are made according to standard measurements which are based on average sizes. Few figures are fortunate enough to be a perfect average. It is necessary for most women to ensure the pattern in one or more places to ensure a good fit. Fitting can be eliminated or greatly simplified by accurately adjusting the pattern to the correct body measurement before cutting the garment.
In pattern alteration, preserve the pattern out line wherever possible. This is best accomplished by using slash and spread or fold method, and the result is a permanently altered pattern that can be used over and over again.
IMPORTANCE OF ALTERING THE PATTERN
If the pattern is altered before the fabric is cut, there will be no adjusting in the final fitting. Make each adjustment necessary in the flat pattern tissue to save time and avoid ripping later.
Keeping records of pattern alterations and their effectiveness is the way to perfect individual requirements. If this is done for several garments accurate requirements will be established to such an extent that one need not go through any of the pattern measurement steps.
STANDARDS FOR ALTERED PATTERNS
1. Original grain-lines are preserved.
2. Patterns are kept in proportion and balance.
3. Change is created only where needed and is not obvious.
4. Designer's lines are preserved.
BASIC RULES
The first basic rule: All corresponding pieces must be altered to correspond with the alterations on the major piece.
The second basic rule: Additions or extensions must be made by taping an extension strip to the edge involved.
The third basic rule: Altered patterns must have the same character as the original pattern piece.
The fourth basic rule: Correct distortions on altered pattern to give the altered line the same character as the original line.
The fifth fundamental rule: The altered pattern must be perfectly flat, like the original pattern piece.
Pattern Alterations For Basic Fit Problems
Some of most common fit problems are increase or decrease in height and width. Alterations in these problems increase the life of the garment.
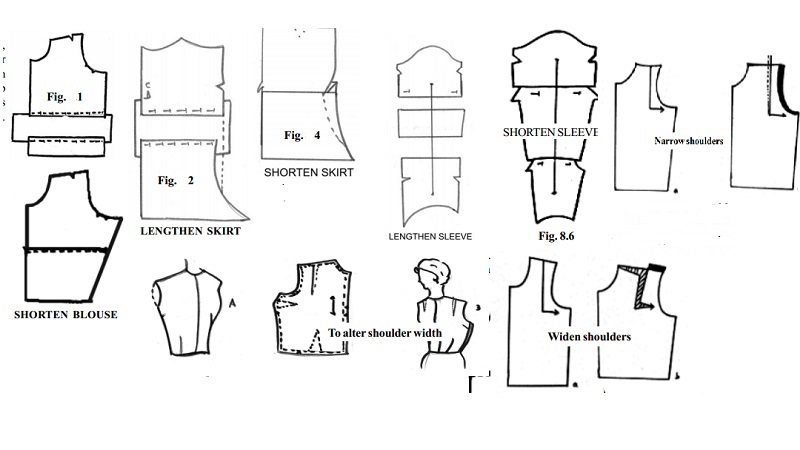
1. To lengthen blouse:
Draw a line across the front and back sections, half way between the underarm and waist line. Place a strip of thin paper under the pattern and pin just above the line. Slash and separate the pattern sections the needed length. Pin the lower sections to place on the paper. Keep the center front and back lines straight. Trim the side cutting edges even across Fig. the alterations. Length must never be added to the lower edge of a blouse.
2. To shorten blouse:
Draw a line across the pattern sections as instructed above. Measure the amount to be taken out and draw a parallel line. Fold the pattern on the lower line and pin to the upper line. Pin a small piece of paper under the fold at the side edge and mark the cutting edge as shown by lines in the illustration.
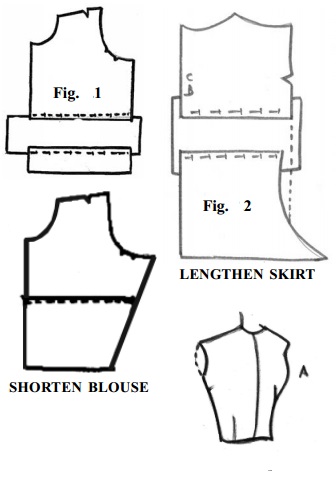
3. To lengthen skirt:
Draw a line across the skirt back, well below the hipline, at right angles to the straight grain. Slash the pattern and separate the necessary amount. Pin the slashed edges, to a strip of thin paper, keep the center grain-line straight. Mark the cutting line on the side as shown by the dotted lines.
Make the same alteration on the skirt front section. When a skirt section is not to be cut on a fold of the fabric, be careful to keep the grain- line straight. Mark new cutting lines on both sides of each pattern sections.
If increased width is desired around the lower edge of skirt; add the needed length at the hemline. To lengthen on extremely flared skirt, add the necessary length at the hemline. The skirt will hang properly because the increased fullness is in proportion to the added length
4. To shorten skirt
Draw two lines across the skirt back sections, well below the hip line, indicate the amount to be shortened, keep these lines at right angles to the center fold grain-line. Pin or tuck across the pattern by bringing the two lines together.
Shorten the skirt front in the same manner. Trim the extended edge of the pattern below the fold as shown by the dotted lines. To shorten an extremely flared skirt, cut off excess length at the hemline. This will reduce Fig. the width of the skirt, but the original hand of the skirt will remain the same.
The original width around the hem line of a flared or circular skirt can be retained by shortening the skirt just below the hipline.
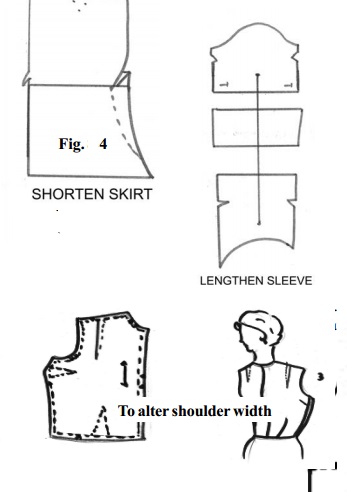
5. To lengthen sleeve
Draw an extended line through the straight grain perforations and mark the position of the elbow opposition the center dart. Compare the individual measurements to those of the pattern from shoulder to elbow, and elbow to waist, to determine the amount needed above and below the elbow. Separate the pattern pieces the necessary amount and pin to strips of paper. Trim the cutting edges even.
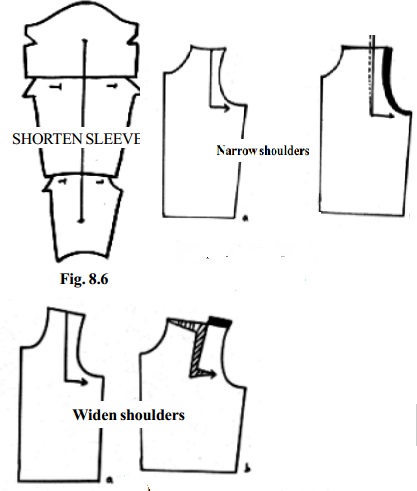
6. To shorten sleeve
Mark the position for alterations and compare individual measurements, to determine the amount of adjustment. Take stitches across the pattern, decreasing the sleeve the necessary amount. Keep the grain line straight. Mark the cutting edge as indicated by the dotted lines.
Two piece sleeves and straight full sleeves can be shortened or lengthened across the elbow in one alteration.
7. To alter shoulder width
The width of the shoulder is determined by the location of the armhole line, which is the arm hole seam if the garment has a sleeve or the seam-line of the garment is sleeveless. The ideal location of armhole line is difficult to establish because there is no well defined line on the figure to indicate a precise division between shoulders and arms. The ideal location can be identified. The armhole line at a point, where the sleeve is comfortable and provides proper freedom of movement and, at the same time, creates a pleasing dividing line between the shoulders and arms. If the garment is sleeveless, the armhole line must be visually attractive, revealing neither too little nor too much of the bare arm.
Women with very wide or very narrow shoulders are well aware of their figure irregularities, but these with slight problems may be unaware that a small alteration would be helpful. Shoulder width can be adjusted during fitting, shoulders can be narrowed quite easily at that time, and they can be made wider by cutting out some of the seam allowances on the garment sections.
The amounts of alteration in shoulder width are relatively small one can consider �' of alterations will be required for a small figure and �' alteration can be considered for a large figure, and an alteration of as much as �'for an unusual figure.
8. Widen shoulders
To widen the shoulder the following steps must to be followed.
Draw a line across the back bodice pattern and cut within shoulder line on back parallel to center back up to1 inch below bust line, then cut straight, almost to under arm seam.
Place back pattern on new paper and spread cut section to desired shoulder width and pin into position.
Draw a line from neck edge to shoulder tip for new shoulder line. The front of the pattern must also be made wider to care for the shoulder width, so the same width alteration must be made on the front pattern to match the back alteration. Repeat exactly the same alteration on the front jacket, in the same position from armscye
9. Narrow shoulders
Narrow shoulder can be modified by drawing a line within shoulder line on back parallel to center back to one inch below bust line, then straight out almost to under arm seams.
Place on new paper and overlap, cut the marked section on back to desired back width and pin into position. Draw line from neck edge to shoulder tip for new shoulder line.
Repeat exactly the same alteration on the front bodice pattern. Draw new shoulder line from neck edge to shoulder tip. Fill in or cut away surplus seam.
10. Widening waist back
Slash waist pattern from waist line but not through the shoulder seam. Then slash cross to the armhole notches. Spread the vertical slash till the desired amount. But don't spread at waistline. This causes the edges of the crosswise slash to overlap and shortens one side of the lengthwise slash to correct waistline seam.
In order to check if the basic alternation namely lengthening, shortening, widening and narrowing are correct, one can identify the characteristics of the patterns.
Related Topics