Chapter: 11th 12th std standard Textiles And Dress Designing Cloth stitch Higher secondary school College practical steps methods Notes
Dress Designing : Marking and Cutting
Marking
Marking is the process of transferring the pattern lines and details like darts on to the fabric. It can be done using different methods like red and blue pencils, tailor chalks, pencil and carbon paper.
Points to be considered while Marking
Check if all the pattern details are marked.
Check if there is sufficient material for the garment
Select suitable method of marking Eg. Tailor's chalk for patterns with cutting lines only, pencil and carbon paper to mark patterns for beginners, because sewing line can be marked.
Don't mark using lead pen because it leave black marks on the pattern.
1. Red and Blue Pencils
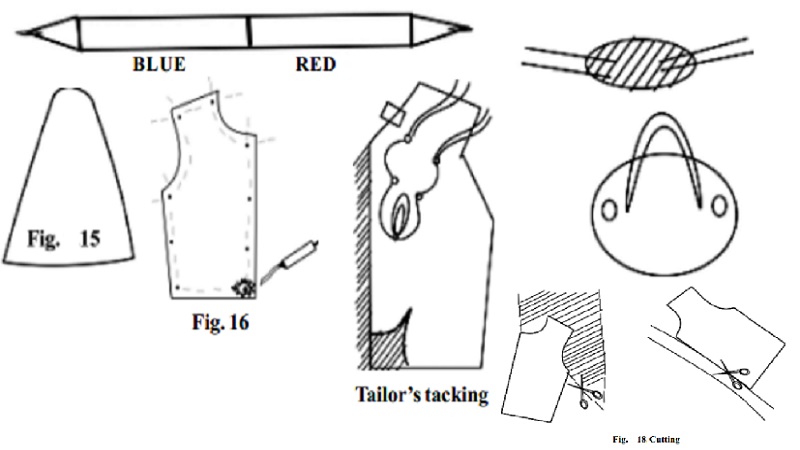
A mark pencil, which is half red and half blue is normally used to mark the patterns. The red lines are used for front patterns and blue lines are used for back patterns. The patterns are placed on the fabric and out lines are marked along the edges. It is the simplest and easiest method of marking. The main disadvantage is the pattern details, like darts, sewing lines can not be marked (Figure).
2. Tailor's Chalk
This is one of the easiest and simplest technique of transferring the pattern details on to the fabric. Tailor's chalk is a triangle coloured wax available in dark and light colours, namely white, blue, red and yellow. Red and blue chalks are used on light coloured fabric , white and yellow are used on light coloured fabric. The pattern is placed on the fabric and the out line is drawn using the tailor's chalk. The main disadvantage of this techniques is that the pattern details, sewing lines cannot be marked (Figure).
3. Pencil and Carbon Paper
This is an oldest tmethod of marking the patterns where a carbon paper is placed in between the pattern and fabric.Then the pattern outline and details are drawn using an ordinary pencil. In this techniquethe sewing linea and dart can also be transferred.
4. Tracing Wheel and Dressmaker's Carbon Paper
Professional dressmakers often use tracing wheel and dress maker's carbon paper. This carbon paper comes in yellow, red or white . It does not get rubbed easily. White is best to be used, red or yellow can be used for marking on white or cream coloured fabric. A tracing board is required to mark patterns with a tracing. This board is a heavy unglazed cardboard. It can be purchased or homemade with help of a carpenter. It can also have a scale marked along one edge toenable us to place the fabric straight. Beginers can use pins to pin their pattern on to the board. Tracing are available in markets. It is a six inch long device with a wooden or plastic handle at one edge and a small one centimeter moveable wheel at the other. The wheel is designed with finely shape points.
To mark the patterns, one should place the fabric firmly on the tracing board. Confirming the position of the patterns, insert the dressmaker's carbon slowly in between the pattern and the fabric. Move the tracing wheel over the cutting and sewing lines neatly. Small dotted lines are marked on to the fabric (Figure).
Tips for Effective Use of the Tracing Wheel
Mark each corner as true angles by tracing the adjoining seams with separate strokes clearly out to cross each other.
Never remove patterns, if the carbon is insufficient. First trace the lower pattern part. Then move the carbon hold ing the pattern with a thumb.
Long, straight lines can be marked by placing a scale on the line and moving the tracing wheel smoothly.
Notches can be marked with a centimeter long slash.
5. Tailor's Tacks
This type of marking the patterns are suited for thin and delicate fabrics like silk. It is of great help to beginners because it marks the right and left sides and the right and wrong sides at the same time and at the same location. It is fairly permanent and visible from both sides. It can be described as long tacks or running stitches along the pattern lines through the pattern and fabric to hold the both together. Contrast colour cotton thread are used for tacking (contrast colour means if the fabric is light colour darker colour threads). For example to tack a pattern on a red colour fabric, pink, yellow, orange, blue, black or white colour threads can be use. This thread should be conspicuously seen on the fabric. (Figure).
Tailor's tacking can be done following the steps given below:
Place the fabric on a flat smooth surface.
Check the patterns and place it in the most economical manner.
Take a long double contrast colour thread on a fine needle.
Prick the needle through the pattern into the fabric and make small running stitches.
Leave long loops between the two stitches made.
Move around the pattern and tack the whole pattern neatly.
After all patterns are tacked, cut the threads or loops between the stitches.
Remove the patterns gently. Care should be taken to leave the cut threads at the points where stitches are made.
These threads act as dotted lines showing the pattern on the fabric to be cut.
Open layout and combination layout can be marked using tailor's tacks.
Cutting
Cutting is the method of piecing the fabric into suitable sizes, such that can be sewed together to form a neat garment. Cutting requires sharp shears (Figure).
Steps involved in cutting a fabric are:
Keep the ends and sides of the material parallel with the table edges while cutting, so that the grain never shifts.
Hold the fabric firmly in the left hand at the point where it is cut and cut using right hand.
Cut the fabric using long, smooth strokes to the full length of the shears.
Don't lift the fabric very high from the table.
Try to move around the table and cut the fabric.
If the fabric is pulled, the grain of the garment pattern will change.
Cut on accurate lines
Notches should be cut whereever necessary. Cut it outwards.
Do not remove the pattern until you have all patterns cut.
Discard small scraps and collect those you wish to save in a neat bundle. Clean up the table and floor.
Related Topics