Adobe Pagemaker - Creating a New Document | 12th Computer Applications : Chapter 2 : An Introduction to Adobe Pagemaker
Chapter: 12th Computer Applications : Chapter 2 : An Introduction to Adobe Pagemaker
Creating a New Document
Creating
a New Document
To create a new document,
1. Choose File
> New in the menu bar. (or) Press Ctrl + N in the keyboard. Now Document Setup dialog box appears.(Figure
2.3)
2. Enter the appropriate settings for your new
document in the Document Setup dialog box.
3. Click on OK.

Now a new document called Untitled - 1 opens on the screen as shown in Figure 2.4
A document page is displayed within a dark border.
The area outside of the dark border is referred to as the pasteboard. Anything
that is placed completely in the pasteboard is not visible when you print the
document. You can use the pasteboard to temporarily hold elements while designing
your document.
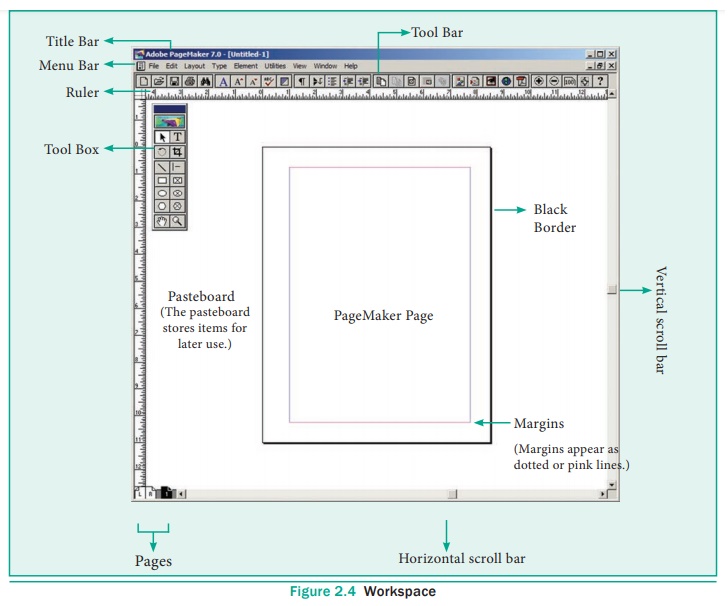
The main components of the PageMaker window are Title bar, Menu bar, Toolbar, Ruler, Scroll bars and Text area. Let us have
a look at these components.
Title bar
It is the topmost part of the window. It shows the
name of the software and the name of the document at the left, and the control
buttons (Minimize, Maximize and Close) at the right.

In Figure 2.5 we can see the name of the software
(Adobe PageMaker 7.0) at the left. It is followed by the default name of the
document(Untitled-1) which can be changed when we save the document with a
user-supplied name.
We know that on clicking the Minimize button the
document window is minimised to a small icon and kept in the task bar, Maximise
button is used for maximising the current document window to fit the whole
screen area, and the Close button closes the software itself.
Menu bar
It contains the following menus File, Edit, Layout, Type, Element,
Utilities, View, Window, Help. When
you click on a menu item, a pulldown menu appears. There may be sub-menus under certain options in the
pull-down menus. Refer Figure 2.6

Toolbar
If you place the mouse pointer on a button in the
Toolbar, a short text will appear with its description called ‘Tool Tip’. Refer Figure 2.7

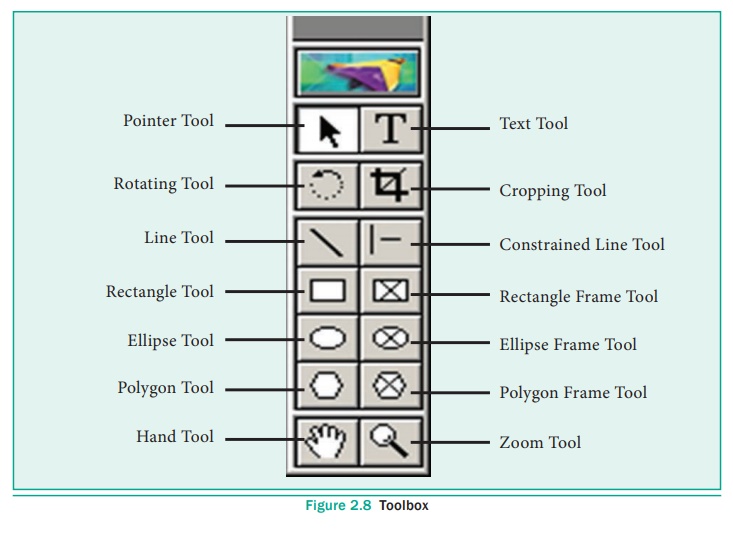
Toolbox
The Figure 2.8 shows the PageMaker toolbox.
To move the toolbox, drag the toolbox by its title bar. Select a tool from the
default toolbox by clicking it.
If the toolbox is not available on the screen, you
can perform these steps to show the toolbox.
1. Click on Window.
The Window menu will appear.
2. Click on Show
tools.
The toolbox appears in front of your document
window. If you want to hide the toolbox, you can perform these steps to hide
the toolbox.
1. Click on Window.
The Window menu will appear.
2. Click on Hide
tools to hide the toolbox.
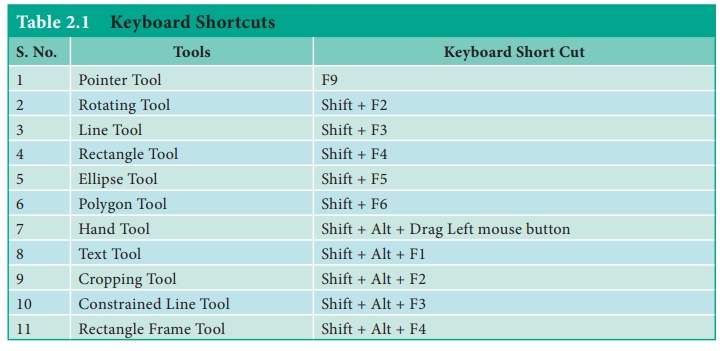
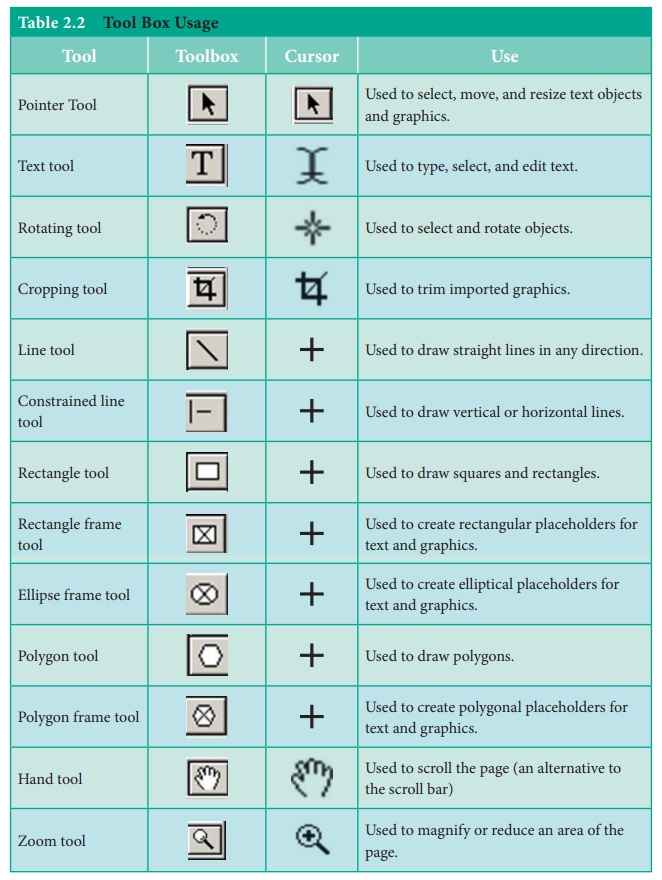
The Keyboard shortcuts and Toolbox usages are shown
in Table 2.1 & Table 2.2
Scroll bars
Scrolling is the process of moving up and down or
left and right through the document window. There are two scrollbars namely
Vertical and Horizontal scroll bars for scrolling the document vertically or
horizontally.
Rulers
There are two ruler bars. One is at the top and the
other is at the left side.
To show
the ruler
1. Click on View.
The View menu will appear.
2. Click on Show
Rulers. Rulers appear along the top and left sides of the document window.
To hide
the ruler
1. Click on View.
The View menu will appear.
2. Click on Hide
Rulers to hide the rulers.
Related Topics