Chapter: 11th 12th std standard Textiles And Dress Designing Cloth stitch Higher secondary school College practical steps methods Notes
Neckline Finishing - Bias piece, Facing, Binding
NECKLINE FINISHING:
The neatness with which the neckline is finished, is of vital importance, for it greatly effects the final appearance of the garment. Besides the neckline under goes much strain duing putting on or taking off the dress. Hence the mode of finish must be such that it allows one to retain the desired shape, pattern and must be durable.
Bias strips are generally used to finish the neckline, because of its stretchability. Necklines are usually curved and hence tend to stretch duing handiling. A stretched neckline can spoil the apperance of garment. So great care must be taken in handling and finishing neckline.
Most necklines are finished in one of three ways-with facings, bindings or with a collar. Regardless of the type a well-made neck finish should conform to these standards:
Neck edges must not be stretched out of shape.
All seams and edges must be as thin and smooth as they can be made, without weakening the garment.
All edges must have good shape with accurate corners and curves.
Facing edges, whether beneath a neckline or collar, must be hidden from view.
Body and stiffness of collar must be sufficient for the design.
Bias piece:
True bias which is otherwise called as cross piece or falls on a diagonal line at 45 o to the lengthwise and crosswise grains. It has the maximum elasticity or in other word it stretches more than any other direction on cloth. True bias is used to finish raw edges. It is useful especially for finishing curved edges such as neckline, sleeveless armholes and scallops. A straight piece of material attached to a curve will look bulky and untidy. The elasticity of bias permits it to stretch or contract and thus takes the shape of any curved edge giving it a flat smooth finish. Bias strips can be applied as facings and bindings
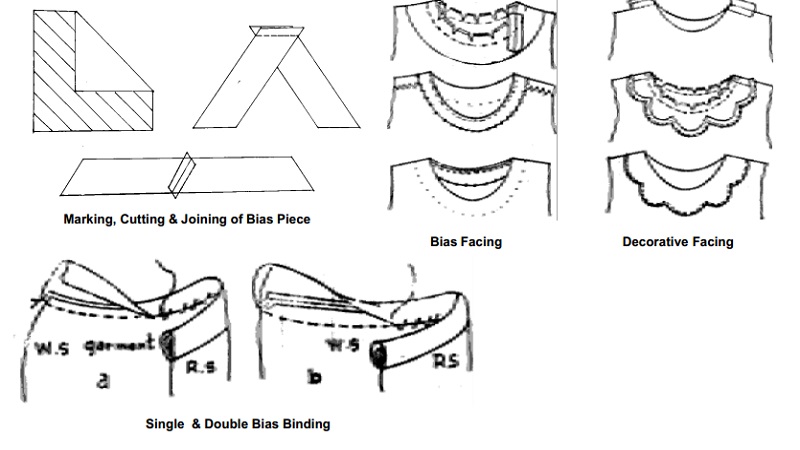
1. Cutting bias strips:
Fold the fabric diagonally so that the lengthwise threads of the folded part fall parallel to the crosswise threads on the rest of the material. (If the grain lines cannot be clearly seen, mark the lines with chalk first). Using a gauge or ruler, measure from the fold to desired width of bias strip (usually 1 to 1�') and draw parallel lines. Cut strips along the marked lines and trim off ends along the warp threads.
2. Joining of bias strips:
Place the two strips to be joined right sides facing and the edges of the cut ends coinciding. The strips will now be at right angles to each other. Shift the top strip �' beyond the other so that the sharp points at the ends of the strips project on either side. Stitch a �' seam joining the points where the sides of the two strips intersect. Press the seam open and trim the seam projection showing on right side.
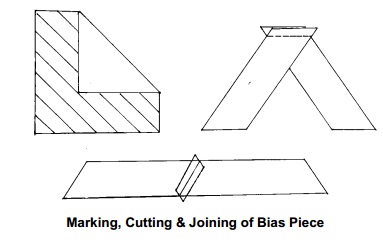
Facing:
These are used to provide a neat finish to the raw edges in a garment and to support the shape of neck line, armholes, collars, etc. When the edge to be faced is a straight line, the facing may be cut in one piece with the garment section. If the shape of the neckline is a curved one a bias piece can be used. Usually facing are applied separately. The color of the facing piece must co-ordinate with the colour of the garment fabric.
Facing appear on the right side of the garment. The right side of the facing must be matched to the wrong side of the garment to ensure that it will be right side out when finished. If this is to be applied to the neck line, shoulder seam of the garment, it should be reverse just inside the outer finished edge of the facing. This is to prevent raw edges of shoulder seam from showing at the neck line. Decorative facing are usually made with scallops, points or other designs along the outer edge. Particular care should be taken to see that the right and left halves are symmetrical in design and shape.
Bias facing can also be applied on the right side of the garment for decorative effects, but no edge designs are possible with this facing because it cannot be made wide enough. The decorative effect has to be obtained by the use of material in some harmonizing color with prints like checks, stripes, dots etc.
Binding:
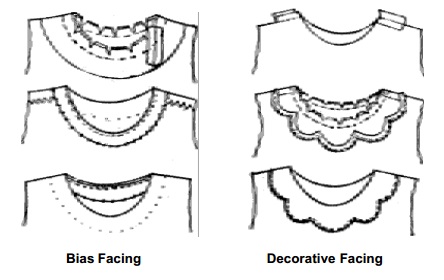
Bias binding is used to finish and strengthen raw edges and to add a decorative trim to a garment. It shows both on the right and wrong side. It is used to finish necklines, armholes, sleeve edges, front closings, collars, cuffs and seams. It can be adapted equally well to straight, curved gathered and irregular edges (like scallops). When finished, bias binding should have uniform width (less than �') and should lie flat and smooth without any stitches showing on the right side of the garment.
There are two kinds of bias binding. Single binding and French binding or piping. Binding may be prepared or may be bought as commerical bias binding.
1. Single bias binding:
Cut a bias strip that is twice the finished width plus two seam allowances. Tack the strip to the garment right sides facing. Remember that bindings are handled in the opposite manner to facings at inward and outward curves. For bindings, stretch the bias on inward curves and ease it on outward curves. Stitch the binding to the garment with a plain seam. Trim the seam as wide as the finished binding. Turn under 1/8' to �' on the outer edge of the bias and fold it over the seam on the wrong side. Now hem the fold to the line of stitching using hemming stitches.
2. French Binding or Piping:
French binding or piping is used on sheer fabrics. For this you must cut bias strip that is six times the desired finished width. Fold the strip in half, wrong sides together and press. Stitch raw edges of binding to the garment on the right side and hem the folded edge to stitching line on the wrong side. It is also called double binding.
Related Topics