Chapter: 11th 12th std standard Textiles And Dress Designing Cloth stitch Higher secondary school College practical steps methods Notes
How to stay-stitch
Stay
Stitch
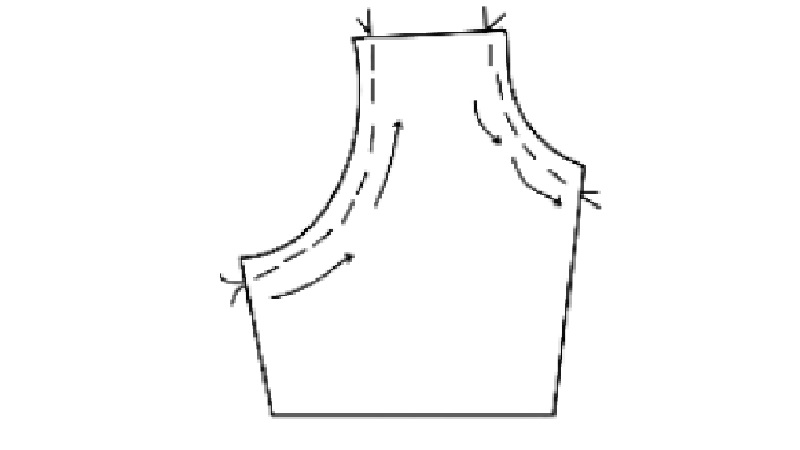
Stay stitch can be defined as a row of regular machine
stitches, done on a single thickness of fabric between the cut edge and the
seam line, about 0.2cm from the seam line. This preserve the lines and grain of
the fabric as cut by the pattern. Generally it is done on curved edges like
neckline, armhole line and collar patterns.
When patterns are cut on to the fabric depending upon the
nature of the fabric, any edge that is cut on the bias line will stretch. This
stretching can be noticed particularly in crepes and other heavy, slippery
fabrics. It happens to some extent on all fabrics except like taffeta and
canvas. The purpose of stay-stitching is to keep the bias edges of a garment
from ravelling in other words, to ensure the exact measurements of the pattern.
One of the characteristics of lengthwise and crosswise
threads of fabric is that they will not stretch; however, any slightly diagonal
line is a bias line and will exhibit characteristics stretching. Such bias
edges of a garment include: front and back armholes, front and back shoulders,
front and back neck edges, and many other edges, depending on the design.
However, there are exceptions-edges which need not be or should not be stay-stitched.
Seam edges which will fit the body snugly must be stay-stitched; edges which
will hang free from the body need not be stay-stitched. Stay stitching saves
time for beginners.
There are several edges which need not be stay-stitched.
They are:
Edges cut on the lengthwise or the
crosswise threads.
Outer edges of facings (unnotched
edges).
The cap of the sleeve.
How to
stay-stitch: As soon as the garment is cut,
either just before or just after the tailors tacks are made, remove one pattern piece at a time and prepare to
stay-stitch the necessary edges.
Stay-stitches are made through only one thickness of fabric.
The stitches are done by machine with a stitch long enough to pull up if it
becomes necessary to draw in the fabric to make it return to the size of the
pattern. At the same time the stitch must be short enough to serve the purpose
of holding the edge firmly. In most fabrics, except the heaviest of wools, this
stitch should be about 1/10 inches long (10 stithes per inch). In heavy wools,
the stitch might have to be 1/8 inch long (8 inches per inch) in order to be
long enough to pull up.
Use thread that matches the garment . The reason for this is
that stay-stitches do not need to be removed after the garment is finished and
a matching color will make the garment look more attractive from the inside.
The
stay-stitches must be placed outside the seamline, in the seam allowance. They
may be placed any where from 1/8 to 1/12 inch from the cut edge. Most
authorities give 1/8th inch as the correct placement because of this
advantage: if you should have to let out the seams of the garment, these
stitches would not show and would not have to be removed. The 1/8th
inch measurement works very well on fabrics that are too limp and slippery.
Stitches 1/2 inch from the cut edge have the great advantage of giving control
very close to the seam line, where control is badly needed at the seam line.
Since the stitching done through one thickness of the fabric and since the
machine is keyed to stitching through at least two thicknesses of fabric, and
since a longer stitch than usual is being used, the fabric is apt to pucker.
This can be counteracted by a firm gentle pull on the fabric as it comes
through the machine. How much to hold it and whether to pull it slightly
depends on the fabric. To find out, stay-stitch one edge of a piece, holding
the material so that it comes out of the machine with no puckers. Then lay the
pattern piece back on the fabric and see if that stay-stitched edge is just
like the pattern. If the fabric is now shorter than the pattern, then hold it
more firmly as it moves through the machine; if the fabric is longer than the
pattern, hold it less firmly.
Stay-stitch each edge of the fabric with separate threads,
leaving just short ends of thread at each corner.
Always put every pattern piece back on the fabric and check
every edge to see that it has retained the same measurements as the paper
pattern. If an edge is too long, pull up the bobbin thread until that edge
measures exactly the same as the pattern. If an edge has been drawn up and is
too short, loosen the stitches and break them if necessary in order to achieve
an exact copy of the pattern. (Figure).
Related Topics