Chapter: 11th 12th std standard Textiles And Dress Designing Cloth stitch Higher secondary school College practical steps methods Notes
Draping - Adhesive Paper Dress Form
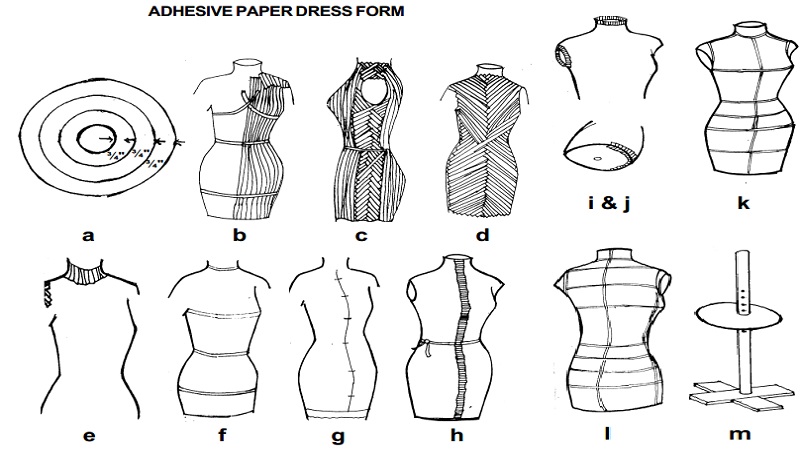
Adhesive Paper Dress Form:
As because it is difficult for a person to fit herself, and a fitter is not always available a dress form, the exact duplicate of one's figure is almost essential. One that is made on the individual is more satisfactory and less expensive than the commercially made form. For that reason, the instructions for making a form have been included.
Materials needed:
Two shirts of thin knit material such as T-shirt. Thin muslin cut on the bias, and about 5 inches wide, to build up a neckline, or gauze tubing shaped to the figure; or a packaged dress form kit, which will contain all necessary material. Two rolls of medium weight adhesive papers, one inch wide.
Eight yards of colored scotch tape, � inch wide stiff, corrugated, large enough to cut out a base for the largest hip size, and a neck size pieces, other materials; two sponges, two small basins for water, needle, thread, sharp scissors, surgical scissors if available, pencil, yardstick, rule, tapeline, sharp razor blade with one cutting edge only, shellac, small paint brush.
Method of Proceeding:
Four persons are necessary to construct the form quickly; two to moisten strips and two to paste strips to person, one working on the front and one on the back. Allow one hour for making the form on the figure, and one hour for finishing it after it is removed from the figure.
The person should wear a tight fitting garment which gives desirable style lines. She should stand so that her hands may be placed on the back of a chair or rest on the edge of a table for support.
To cut the paper, hold the roll with edge extending over a table edge, and cut through the roll with a razor blade. All strips should be cut before starting to make the form on the person. Keep separate on table each group of strips is cut from the two rolls of tape to prevent confusion and to speed up the operation.
Diagram showing the depth each group of strips is cut from the two rolls. Each group should be labeled as it is cut.
First group of strips is cut � inch from outside of both rolls and are approximately 15 to 12 inches long. These strips are used from shoulder to waist on first layer, and diagonally from neck down front and back on the second layer.
Second group of strips, around 12 to 9 inches is cut � inch from outside of each roll. These strips are used on the first layer form waist to lower hip edge and on the second layer down from the neck in front and back.
Third group of strips, around 9 to 5 inches, cut � inches, from outside edge of roll. These strips are used diagonally under the arm. On both first and second layers in making the form.
Cut around 2 fifty, 3 inch strips for finishing edges of form and for joining the two sections.
Put the shirt: or substitute, on the person and sew edges together so that the shirt fits smoothly and firmly on the figure. It should run up onto the neck to form a neckband, extend out over appear to form a smooth Armscye, and extend well below the widest hips. Pull the shirt down smoothly from shoulder, and paste a long strip of moistened tape closely around the normal waistline, overlapping tape ends to prevent slipping. Paste another strip of tape closely below the widest hip. Paste stripe curving under each bust to preserve contour.
First layer of strips, 12 to 15 inches. Begin at center front and back, paste moistened strips on the figure from neck and shoulder edges to taped waistline, over lapping strips �' of the strip width. Let strips curve to body contour as they will, and f too long tear off excess length. Continue pasting strips to armscye edge, overlapping strips at top of shoulder. Repeat for second side of front and back. From waist to lower hip edge, paste 9 to 12 inch strips at right angles to waist, joining tape ends to those above the waist. Paste 5 to 9 inch strips diagonally from underarm to lower hip edge, allowing strips to overlap front and back. Repeat for second side.
Second layer of tape. Above the waist use 9 to 12' strips. Start just below the neck, paste ships diagonally across front, alternating strips from right and left side, having strips overlap at top of shoulder. As you continue downwards, the end of strips should touch and form the upper Armscye. Continue the crossed ships down the body to lower hip line edge, using 12 to 15 inch strips below the waistline. this should form a smooth surface over the entire figure, especially at the waist where joining had occurred on the first layer. The second layer from underarm to lower hipline is reinforced with 5 to 9 inch strips the same as in c, the first layer.
Reinforce around Armscye to form a good shape, using 3 to 5 inch strips. Some persons may wish a short sleeve cap. This is formed from 1 to 3 inches beyond armscye at shoulder tip, using short 3 to 5 inch strips building a smooth upper arm curve, allowing strips to follow the arm curve when pasting on. (It ids difficult to put on and remove garments with an extended sleeve cap). Finish the neck with one layer of 5 to 9 inch strips around the neck to form a good shape until dress form is removed from person. The neck can be reinforced more sturdily when form is removed.
Measure and mark the following from the form before removing-Neck, Bust, Waist, Widest hip. Measure from floor up to within 2 or 3 inches below the widest hip and carefully mark for the base of the form.
Mark for removing form from person, down center front and back with ruled line, across front and back at intervals for matching when joining half sectional. To remove form from the figure, cut with a one-edged razor blade down center front and back marked lines. Be careful to cut through paper only. Finish cutting through the fabrics with surgical scissors or sharp pointed shears.
Remove the two sections. Either before the form is made or after is the removed measure the person at the following positions and record in neck, bust, waist, and widest hip. Compute the difference between the person and the form at neck, bust, waist and hip.
Divide by and remove this difference from the two centre front and two center-back edges of from. Cut smoothly along marked hipline which is parallel to the floor. Hold each section up to the light and reinforces on the inside of the form any sport that seam thin.
Join the sections, using 3-inch strips: Place front down on the table with edges and cross markings matching both front and back, and pin a tape securely around the waist. Paste 3-inch strips across cut edges of front, first on the outside and then on the inside. These strips should be closely overlapped to hold edges permanently.
Repeat for back.
Trim neck and armscye edges smoothly and reinforce with 3-inch strips around cut edge.
Trim bottom of form along marked line until it stands evenly on the table. Place bottom of form on paper and also mark around the hips, also mark center front and center back. Repeat the same for the neck. Cut cardboard from paper patterns and cut a 1� inch hole in the center of each. Fit the cardboard flush into the inside edges of the hip and neck and join to the form with 3 inch strips.
k & l. Outer covering. To keep the paper edges from curling, the form should be shellacked and thoroughly dried. A top shirt is tightly and smoothly fitted over form, sewing where necessary, and taping at armscye, neck and under the lower edge of the form. Using � inch colored tape, mark the following measurement positions; centre front, center back, neck, shoulder width, back width, bust waist, Armscye, 3 inch hip, 6 inch hip, widest hip. (m) standard.
m. A stand is needed in order to use the form successfully. This is made, using two 2' x
4' x 18' pieces of wood for base, and a pole 5 to 5 � feet tall and 1�' in diameter with nail holes bored up the length to adjust the height. An oral board cut from plywood should be smaller than the base of the form. Bore a 1�' hole in the center. This oval is slipped on the pole is rest over a large nail and support the form.
Related Topics