Chapter: 11th 12th std standard Textiles And Dress Designing Cloth stitch Higher secondary school College practical steps methods Notes
Construction of a Garment
Construction of a Garment
Construction of a garment is a beautiful art, which requires skill, practice and inborn interest. One has to slowly go through the steps of garment construction and review it often to sew comfortable and well fitted garments.
Steps to be Followed in Garment Construction
The major steps involved in garment construction are (General)
Check if all the patterns are cut
Fold the patterns and keep them safely
Open the patterns only while sewing
Match the notches, before sewing
Check if the curved lines are stay stitched
Collect all the necessary accessories before starting to sew
Eg. Linning material for collars.
Fasteners
Decorative laces, appliqu�s
Check the colour of the machine thread. If the fabric has more than two colours, try to get the dominating colour threads
Fill the bobbins with suitable colour threads
Oil the machine and run it over waste cloth
Check the smoothness of the machine
Clean the machine thoroughly especially the bobbin holder and feed back
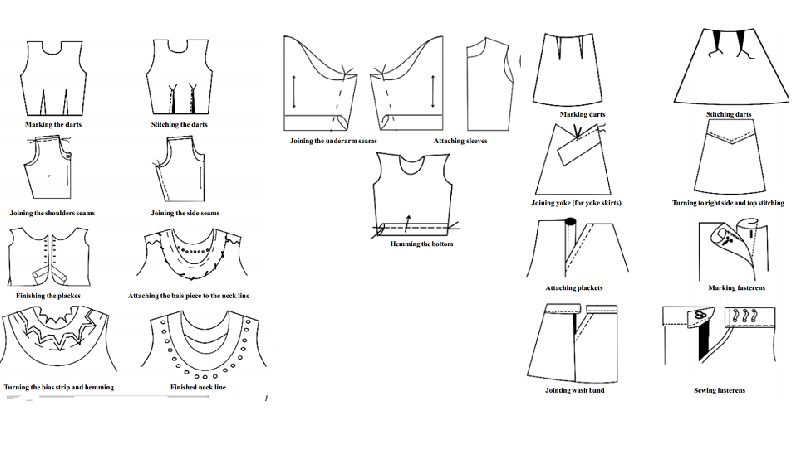
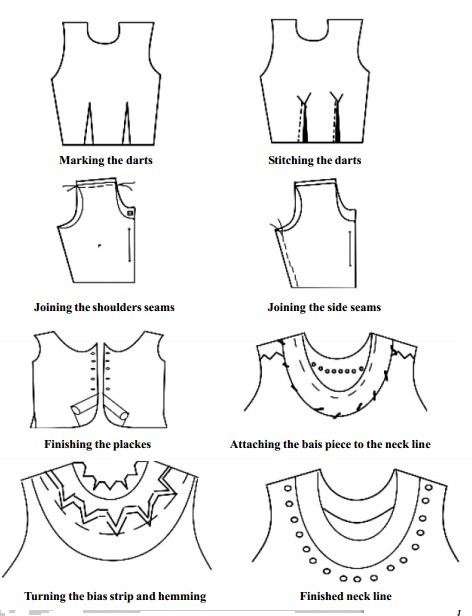
Steps Involved in Construction of an Upper Garment (A bodice Pattern)
In case the pattern has darts, finish it first (Figure 11.1).
Join the shoulders to neck line
Join the side seams
Finish the placket opening
Finish the neck line
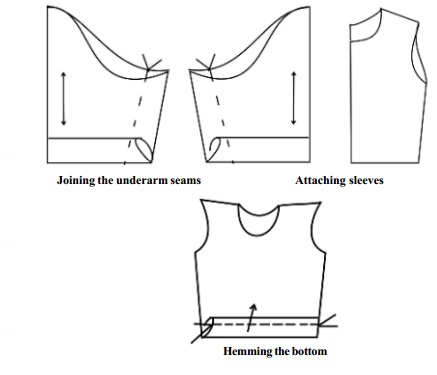
Join the under arm seams of the sleeves
Check front and back sleeve patterns and attach the sleeve to the bodice pattern
Finish the hem lines
Attach fasteners
Press neatly
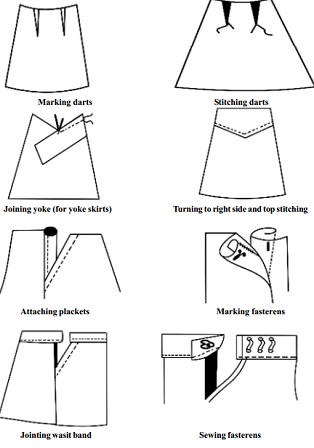
Steps Involved in Construction of a Lower Garment (Skirt Pattern)
Complete the darts
Finish the plackets
Join the side seams
Attach the waist band
Fix fasteners
Press neatly
Finish the front opening placket
Attach yoke to the back (Figure 11.2)
Construction of a shirt
Part of the shirt
Front pattern
Back pattern
Yoke pattern
Collar Band pattern
Main Collar pattern
Pocket pattern
1. Attaching Yoke to the Back
Mark centre notches to the back piece of shirt and center notches to the yoke pattern.
Placing yokes one at front and back, of back shirt pattern.
Make �'stitch from the edge.
Then turn the yoke and give a top stitch
Join the shoulder seams of front and yoke.
Attach collar to the necklines as given in figure 11.3
2. Shirt collar
This collar has two parts (i) the collar band and (ii) the main collar.
Draft the pattern with stand collar combined
Shirt collars are usually finished with an interfacing.
The interfacing should be preshrunk and its corners at the outer edge clipped to avoid bulk when the collar is turned.
Tack interfacing to the wrong side of under collar section and stitch upper and under collars together, right sides facing.
Trim and grade seam allowances, cut off corners and turn the collar to the right side.
Top stitch around the outside edges of collar �' from edge.
Insert the collar between inner and outer band sections matching centre front and centre back markings and stitch on the seam line.
Tack the inner band to the neckline of the shirt and stitch.
Fold seam allowance of the upper band and tack to the seam line. Then top stitch around the collar band
Finish sleeve hems
Attach sleeves to the shirt
Finish side seams from the sleeves to the bottom
Finish hem line
Complete the shirt with buttons and button holes (Figure)
Related Topics