Chapter: 11th 12th std standard Textiles And Dress Designing Cloth stitch Higher secondary school College practical steps methods Notes
Choice of Seams and Types of Seams

INTRODUCTION:
A seam is a method of joining two or more pieces of material together by a row stitch. In garment construction, one of the major step is the joining of different section by seam. This can be done by hand or machine. Seams must be done as flat as possible, neat and evenly spaced. The type of seam to be used will depend on the type of garment, texture and durability of the fabric.
CHOICE OF SEAM:
The type of seam to be used on a garment will depend on various factors. The most important factors are listed below.
1. Texture of the fabric:
When working with a heavy fabric, bulky seams like french seam must be avoided.
2. Design and use of the garment:
When making a boy's sports shirts, a strong seam like flat fell seam should be used.
3. Place where seam in used:
Seams may be straight or curved depending upon the garment design. When joining curved edges, plain seam will give a better finish than any other type of seam. Some parts of the garment which may get stretched during body movement will have to be made with more durable seams.
4. Current fashion:
The modern trend is to use a simple seam which produces a garment.
TYPES OF SEAM:
Seams are of different types. They are:
1. Plain seam
2. Run and Fell seam
3. French Seam
4. Mantua maker seam
5. Piped seam
1. Plain seam:
This is the most widely used seam because it is easy to make, requires less time, is pliable and inconspicuous. It is used on all types of fabrics except on very transparent kinds, and is especially suitable for firm fabrics that do not ravel. To make this seam, place the two pieces of fabrics to be joined together right side facing, matching the seam lines. Insert pins at right angles to the seam line and work a line of tacking following the seam line. Remove the pins and stitch the seam exactly on the seam line. Remove tacking and press the seam open. If the fabric is fine, both the seam allowances can be pressed to one side. Plain seam is used especially for side seams and armhole seams on skirts, coats, petticoats, blouses etc.
2. Run and Fell seam:
This is also called flat fell seam, as it is flat durable seam used on men's sports shirt, work clothes, children's clothes and pyjamas. This can be stitched by Hand or machine.
However it is time consuming and difficult to make on curved edges and on bulky fabrics but suitable for thin fabric. Place the pieces to be joined right sides facing, and stitch on the seam line. Press both seam allowances together in the same direction and trim the under seam allowance to 1/8' and the upper one to 3/8'. Turn under the raw edge of the wide seam allowance so as to make a smooth fold �' wide. Keeping this fold in position with one hand, tack and fold down flat to the garment. Machine stitch close to the folded edge on the right side of the garment. The right side of the seam will show one rows of stitching and wrong side will show two rows of stitching. This is a strong seam.
3. French seam:
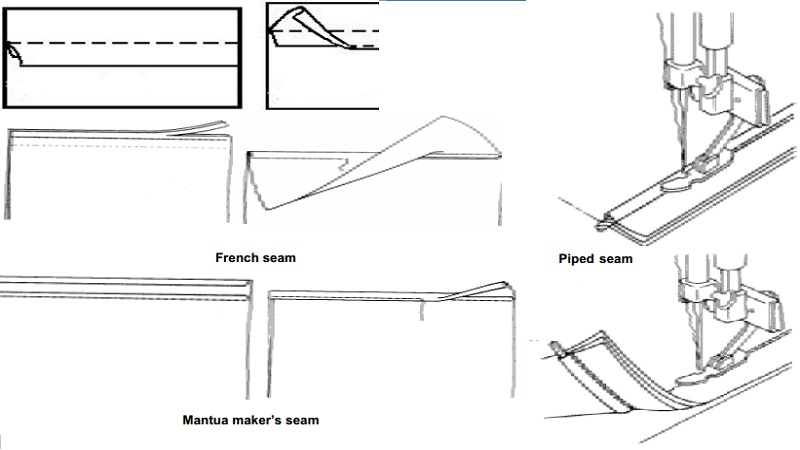
This is also called as double seam and is used on transparent and light weight fabrics, especially on baby clothes and delicate blouses. Such as voile organdy, muslin etc. It is a neat and durable finish, as the raw edges are completely enclosed. Do not use this seam on curves such as armholes and yokes stitched first. Plain seam must be trimmed and then stitched to prevent wrinkles seen on the right side. The two pieces of materials to be joined are placed together with wrong sides facing. Work a row of stitching 1/8' outside the seam line towards the raw edges. After stitching, trim the seam allowances to less than 1/8'. Press the seam and turn the work so that the right sides are together.
Crease the first row of stitching so that it is directly on the edge. Pin or tack and stitch along the seam line about 1/8' from the fold. In this seam, care should be taken to see that there are no ravels visible on the right side.

4. Mantua maker's seam:
This type of seam will not be suitable for bulky fabrics. Keeping right sides facing, tack the garment on the seam line. Trim one seam edge to �' from the tacking line. Make a �' turning on the wide edge so that this edge nearly touches the narrow seam allowance.
Now make a second fold to make the folded edge lie along the original tacking line, machine stitch or hem through all thicknesses and remove tacking.
5. Piped seam:
Sometimes a piping or bias piece is inserted in a plain seam to give a decorative finish to the garment. This types of seam is very often used in the waistline, Yokeline and armhole line of the garment. If a cord is enclosed in bias strip, the seam is called corded seam. Prepare the bias strip, fold it in the middle and tack it to the right side of the pieces to be seamed in such a way that the bias fold extends 1/8' inside the seam line. To be more effective the bias material should be of contrast color.

Related Topics