Chapter: 11th 12th std standard Textiles And Dress Designing Cloth stitch Higher secondary school College practical steps methods Notes
Body measurements - Alterating Pattern
Pattern Alteration:
Successful pattern alteration demands changing size without changing proportions and lines. Correct changes are made by tucking or piecing patterns near their center and without changing the original size. It is not advisable to cut beyond a pattern or turn the edge of pattern since such alterations change its shape as well as its size.
After deciding where the pattern needs to be altered, draw a straight line as a guide for cutting the pattern. For most alterations make the line parallel cut along this line as needed, so that it will spread out flat. If your are lengthening or shortening an entire pattern piece, you will need to cut the pattern all the way across and increase fullness entirely through pattern. Before cutting, draw two short lines a few inches apart, at right angles to and across the cutting line. Then match these lines when you spread and place the pattern, keep the pieces in correct position.
Spread or place, the cut edges to make the pattern larger or smaller, as needed. When you spread the sections apart, lay a strip of paper underneath the cut edges. Check the altered pattern measurements to be sure that they are with the measurements, needed then paste, pin or use gummed tape to fasten the pattern pieces in place.
Sometimes more than one change is also needed in a pattern piece. The best way is to take care of each alteration separately. Try not to change the shape of the armholes, neckline, or shoulders anymore than necessary.
If the alteration is difficult, then make a duplicate pattern made with newspaper, make all markings and notches on the duplicate, and make the necessary corrections on it. It is a good idea to try out the altered pattern in muslin or old cloth to be sure of the fit. Then alter the original pattern in the same way.
Pattern alteration can be best done by a slash and spread method for enlarging a pattern and fold pleat for reducing it. While altering a pattern it is necessary that all grain lines must be straight.
Equipment needed for altering patterns, includes a pair of scissors, some light weight paper, and pins. Heavy paper is not suitable for making alterations, also a ruler and pencil to redraw construction details that are interrupted by your alterations are necessary.
ALTERATING PATTERN:
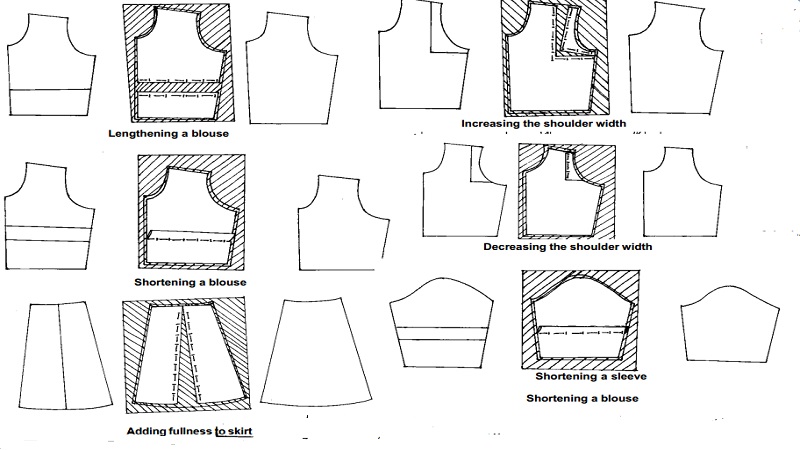
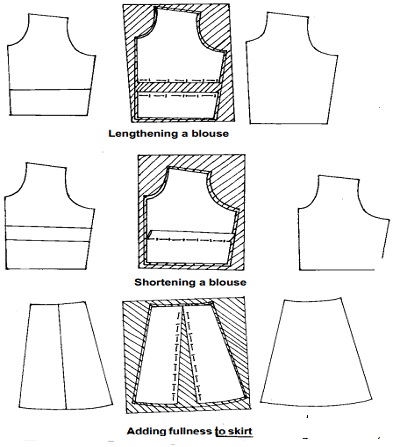
1. To lengthen a blouse:
Cut across the pattern about 2 or 3 inches above the waist line at right angles to the center line.
Spread the pattern to the necessary amount. Pin each edge of pattern to a strip of new paper.
Draw new side seam lines keeping them straight from armhole to waistline.
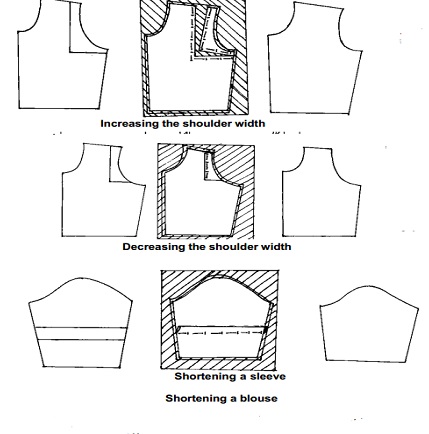
2. To shorten a blouse:
Make a pleat of the correct width across the pattern about 2 or 3 inches above waistline.
Keep it at right angles to the center line and pin a piece of paper.
Draw side seam lines as shown.
3. To increase the shoulder width of a blouse:
Slash from the shoulder downward the armhole, then across almost to the side seam.
Spread the slashed edges to the correct amount and pin to a piece of paper.
Draw new shoulder seams making straight lines from the neck line to the armhole.
4.To decrease the shoulder width of a blouse:
Slash as described above, but over lap the edges of the slash the necessary amount and pin.
5. To Increase the size of a blouse front:
Make slashes crosswise and lengthwise, cutting through the center of any dart.
When there is no dart at the shoulder, slash almost to the shoulder line.
Spread the pattern and pin it to paper, to make the necessary changes in each direction.
Locate new dart points half way between the tops of the separated dart line.
Draw lines from these points to the broad end of the original dart.
Then, draw new seam lines.
6. To lengthen a sleeve:
Slash directly across the sleeve above the elbow and again below the elbow. Separate slash lines and make an insertion with a piece of correct widths.
Straighten seam lines, if necessary.
7.To shorten a sleeve:
Fold out pleats above and below the elbow to keep proportions correct.
Straighten seam lines, if necessary.
8. To Increase the width of the skirt (large hip):
Slash the side piece both front and back between the side seam and the dart position.
Make an insertion of even width from waist to hem on both front and back.
This alteration increases the size of the waist line but that can be adjusted above the hip line by taking up darts and seams, preferably for fitting.
9. Lengthen a skirt pattern:
Cut across the skirt, pattern at right angles to the lengthwise grain of the material, a few inches above the hemline.
Spread the slash the necessary amount and pin to a strip of paper.
Extend the seam lines and the hemline until they meet the necessary measurement.
10. Shorten a skirt pattern:
Fold a pleat of the correct width across each gore a few inches above the hemline. Fold at right angles to the grain line.
Straighten the seam lines by folding back the projecting edges below the crosswise alteration pleat.
Keep each of the folded-back edges even in width.
11. Adding fullness to skirt:
Slash the skirt pattern to the waist line where ever the flare is needed.
Spread for the required extra fullness.
This curves the waist line more and causes the flare to fall from the point of the slash.
Related Topics