Chapter: Modern Analytical Chemistry: Obtaining and Preparing Samples for Analysis
Implementing the Sampling Plan: Solids
Solids
Typical examples of solid samples include large particulates, such as those found in ores; smaller particulates, such as soils and sediments; tablets, pellets, and capsules used in dispensing pharmaceutical products and animal feeds; sheet materials, such as polymers and rolled metals; and tissue samples from biological specimens.
Sample Collection
Solids
are
usually
heteroge- neous, and
samples must be collected carefully if they are to be representative of the target
popula- tion. As noted
earlier, solids come
in a variety of forms, each
of which is sampled differently.
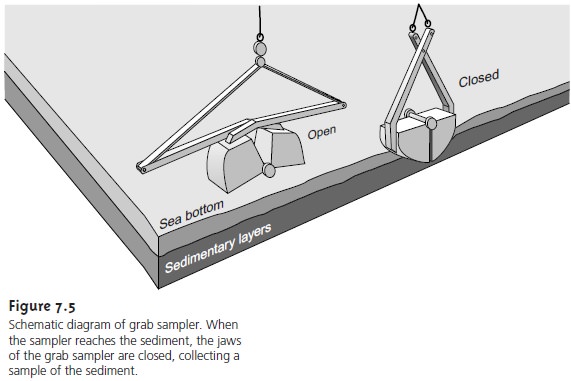
Sediments from the bottom of streams, rivers, lakes, estuaries, and oceans are collected with a bot- tom
grab sampler or with a corer. Grab samplers are equipped with a pair of “jaws”
that close when they
contact the sediment, scooping up sediment in
the
|
|
Disadvantages include the tendency
to lose finer- grained sediment
particles as water flows out of the sampler and the loss of spatial
information, both lat erally and with depth,
due to mixing
of the sample.
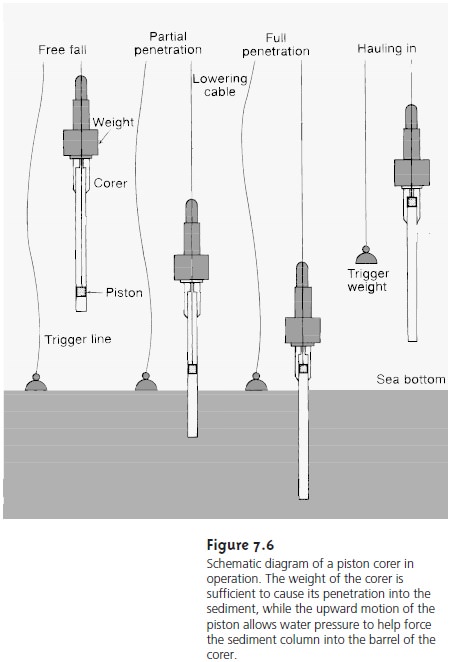
An alternative method for sampling sediments uses a cylindrical coring device (Figure
7.6). The corer is dropped into the sediment, collecting a col- umn of sediment and the water in
contact with the sediment. With the possible exception of sediment at the surface,
which may experience mixing, sam-ples collected with a corer
maintain their vertica profile. As a result,
changes in the sediment’s com- position with depth are preserved. The main disad- vantage to a corer
is that only
a small surface
area is sampled. For
this reason sampling with a corer
usu- ally requires more samples.
Soil
samples
collected at
depths
of
up
to
30
cm
are
easily
collected with scoops or shovels, although the sampling variance is generally high. A better
method for obtaining
soil samples near the surface
is to use a soil punch. This thin-walled steel tube retains
a core sample when it is pushed
into the soil and removed. Soil samples collected at depths greater
than 30 cm are obtained
by digging a trench and
collecting lateral samples
with a soil
punch. Alternatively, an auger may be used to drill a hole to the desired
depth and the sample col- lected with a soil punch.
The sampling of particulate material
is often determined by the size of the par-
ticles. Large particulate solids, such as coals and
ores, can be sampled by randomly
collecting samples with a shovel
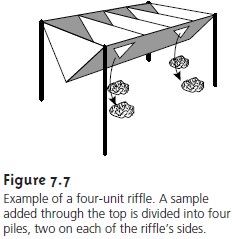
or by riffling. A riffle
(Figure 7.7) is a trough
con- taining an even number of compartments with adjacent compartments
emptying on opposite sides
of the riffle.
Particulate material dumped
into a riffle
is divided into two parts. By repeatedly passing
half of the separated material
back through the riffle, a sample of any desired
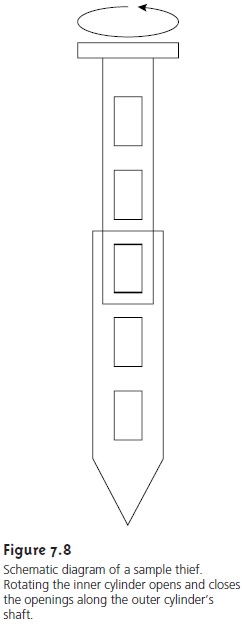
size may be collected. Smaller
particulate materials, such as powders, are best collected
with a sample thief, which allows material
to be collected simultaneously from several locations (Figure 7.8). A typical sample
thief consists of two tubes that are nestled
together. Each tube has an identical set of slots aligned down their length.
Before the sample
thief is inserted into the material being sampled, the inner
tube is rotated
so that slots
are closed. When the sample
thief is in place, the inner tube is rotated to open the slots, allowing
the powder to enter the sample thief through each slot. The inner tube is then rotated to the closed position
and the sample thief withdrawn.
When sampling a metal, it usually is necessary to obtain material
from both the surface and the interior. When the metal
is in the form of a sheet,
random samples can be collected with a metal punch. Samples
can be obtained from a metal wire by
randomly cutting off pieces of an appropriate length. Larger pieces
of metal, such as
bars or bricks, are best sampled by sawing through
the metal at randomly selected points and collecting the “sawdust” or by drilling
through the metal and collecting the shavings. A surface
coating can be sampled in situ or by dissolving the coating with an appropriate solvent.
Sampling of biological tissue is done
by removing the
entire organ, which
is then homogenized before
smaller portions are
taken for analysis. Alternatively, sev-
eral small portions of tissue
may be combined to form a composite sample. The
composite sample is then homogenized and analyzed.
Sample Preservation
Without preservation, many solid samples
are subject to changes in chemical composition due to the
loss of volatile material, biodegrada-
tion, and chemical reactivity (particularly redox reactions). Samples stored at
re- duced temperatures are less prone
to biodegradation and the loss of volatile
mate- rial, but fracturing and phase separations may present problems. The loss of volatile
material is minimized by ensuring
that the sample
completely fills its container
without leaving a headspace where gases can collect. Samples
collected from mate- rials that have not
been exposed to O2 are particularly susceptible to oxidation reac- tions. For example, the contact of air with anaerobic sediments must be prevented.
Sample Preparation
Unlike
gases
and liquids,
which generally require little sample
preparation, solid samples
usually need some processing before analysis. There are two reasons for this. First,
as discussed, sampling
variance is a function of the number of particles
sampled, not their combined
mass. For extremely
heteroge- neous populations consisting of large particulates, the gross sample
may be too large to analyze. For example,
a boxcar containing a load of a Ni-bearing ore with an average
particle size of 5 mm may
require a sample
weighing one
ton to obtain a reasonable sampling variance. Reducing the
sample’s average particle size allows the
same number of particles to be sampled with a smaller,
more manageable combined mass.
Second, the majority of analytical techniques, particularly those used for a quantitative analysis, require that the analyte be in solution. Solid samples, or at least the analytes in a solid sample, must be brought into solution.
Reducing Particle Size
A reduction in particle size
is accomplished by a combina- tion of crushing and grinding the gross sample.
The resulting particulates are then thoroughly mixed and divided
into samples of smaller mass containing the appro-
priate number of particles. The
process seldom occurs
in a single step. Instead, sam- ples are cycled
through the process
several times until
a laboratory sample of
de- sired mass is obtained.
Crushing and grinding
uses mechanical force
to break larger
particles into smaller ones.
A variety of tools are
used depending on the particle’s size and hard- ness. Large particles are
crushed using jaw
crushers capable of reducing particles to diameters of a few millimeters. Ball mills, disk
mills, and mortars
and pestles are used to further reduce
particle size.
Significant changes in composition may occur during crushing and grinding. Decreasing particle size
increases available surface area. With more surface area there is a greater
risk of losing
volatile components, a problem made worse by the
frictional heat accompanying the crushing and grinding. An increase in surface area also means that portions of the sample
are freshly exposed
to the atmosphere where oxidation may alter
the sample’s composition. Other problems include
contamina- tion from the
mechanical abrasion of the materials used to crush
and grind the sample, and differences in the ease with which particles are reduced in size. Softer particles are reduced in size more easily and may be lost as dust before
the rest of the
sample has been processed. This is a problem since
the analyte’s distribution may not be uniform
between particles of different size.
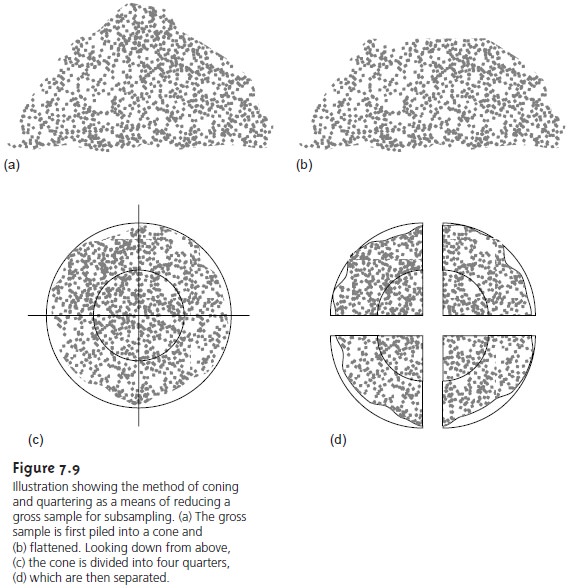
To ensure that all particles are reduced to a uniform size, the sample is intermit- tently passed through a sieve. Processing of those particles not passing through the sieve continues until the entire sample is of uniform size. The sample is then mixed thoroughly to ensure homogeneity, and a secondary sample obtained with a riffle or by coning and quartering. The latter approach is outlined in Figure 7.9. The gross sample is piled into a cone, flattened, divided into four quarters, and two diagonally opposed quarters are discarded. The remaining material is cycled through the process of coning and quartering until the desired amount of sample remains.
Bringing Solid Samples into Solution
If you
are fortunate, the
sample with which you are working will easily dissolve
in a suitable solvent, requiring no more effort than gentle swirling and heating. Distilled water is usually
the solvent of choice for inorganic salts, but an organic solvent, such as methanol, chloroform, or toluene, is used for organic
materials. More often, one or more of the sample’s
components re- sist simple dissolution.
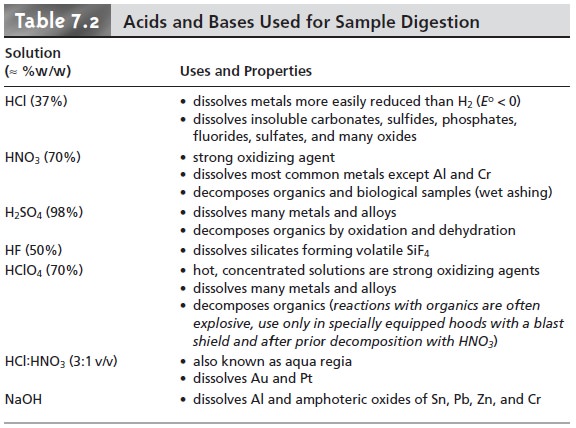
With samples that
are difficult to dissolve, the
first approach is usually to try di- gesting the sample with
an acid or base. Table
7.2 lists the
most commonly used acids and bases and
summarizes their use.
Digestion is commonly carried out in an
open container, such as a beaker, using
a hot plate as a source of heat. The chief ad- vantage of this approach
is its low cost as it requires
no special equipment. Volatile reaction products, however,
are lost, leading
to a determinate error if analyte is in-
cluded among the volatile substances.
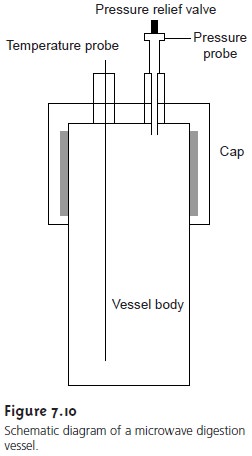
Many digestions are now carried out in closed containers using microwave ra- diation as a source of energy for heating the solution. Vessels for microwave diges- tion are manufactured using Teflon (or some other fluoropolymer) or fused silica. Both materials are thermally stable, chemically resistant, transparent to microwave radiation, and capable of withstanding elevated pressures. A typical microwave digestion vessel is shown in Figure 7.10 and consists of the vessel body and cap, a tem- perature probe, and a pressure relief valve. Vessels are placed in a microwave oven (typically 6–12 vessels can be accommodated), and microwave energy is controlled by monitoring the temperature or pressure within the vessels. A microwave diges- tion has several important advantages over an open container digestion, including higher temperatures (200–300 °C) and pressures (40–100 bar). As a result, diges- tions requiring several hours in an open container may be accomplished in less than 30 min using microwave digestion.
In addition, the closed
container prevents the loss of volatile
gases. Disadvantages include
the inability to add reagents
during di- gestion, limitations on the amount of sample that can be used (typically 1 g or less),
and safety concerns due to the use of high pressures and corrosive reagents. Appli- cations include environmental and biological samples.
Inorganic samples that resist decomposition by digestion with acids or
bases
often
can be brought into solution by fusing
with a large excess
of an al- kali metal salt, called a flux. The sample and flux are mixed together
in a cru- cible and heated till the substances
fuse together in a molten state. The resulting melt is allowed
to cool slowly to room temperature. Typically the melt dissolves readily in distilled
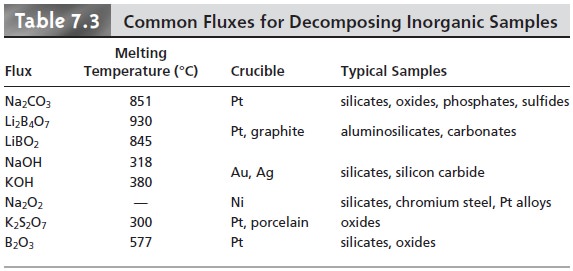
water or dilute acid. Several
common fluxes and their uses are
listed in Table 7.3. Fusion works when other methods
of decomposition do not because
of the higher temperatures obtained and the high concentration of the reactive flux in the molten liquid. Disadvantages include a greater risk of contamination from the large quantity
of flux and the crucible
and the loss of volatile
materials.
Finally, organic materials may be decomposed by dry ashing.
In this method the sample is placed
in a suitable crucible and heated over a flame
or in a furnace. Any carbon present in the sample is oxidized
to CO2, and hydrogen, sulfur,
and ni- trogen are removed as H2O, SO2 and N2. These
gases can be trapped and weighed to determine their content in the organic
material. Often the
goal of dry
ashing is the removal of organic material, leaving behind an inorganic residue, or ash, that
can be further analyzed.
Related Topics