Chapter: 11th 12th std standard Textiles And Dress Designing Cloth stitch Higher secondary school College practical steps methods Notes
Operating The sewing Machine
OPERATING THE MACHINE:
Manufacturer usually supply an instruction manual with each sewing machine they sell. It is essential to read this book carefully and follow the instructions meticulously. When you are learning to treadle, run the machine with the presser foot up and the clutch on flywheel loosened so that the needle does not go up and down. Sit at a comfortable height in front of the machine and place one foot forward and the other foot sightly back on the treadle. Start the machine by turning the flywheel towards you. As the treadle begins to move, start pedaling slowly in such a way so as to continue this motion. Continue evenly, and gradually increase the speed. To stop the machine, place your hand on the flywheel and stop the motion of the feet. Practice to run the machine smoothly at correct speeds.
An electric sewing machine is operated by knee or foot control of an electric motor. A little practice is required to control the pressure needed to operate the machine at any desired speed with an even, regular rhythm.
1. Stitching along lines:
Tighten the clutch or thumb screw and without threading the machine, lower the presser foot and practice stitching on paper along lines of various shapes (straight lines, curved lines, broken lines and lines with corners) until you can control the machine reasonably well. To turn corners, stop with the needle down at the exact corner, raise the presser foot and turn the paper to the desired position, leaving the needle in, then lower the presser foot again and stitch.
2. Selection of thread and needle:
A perfect stitch can be obtained only when the thread is selected to suit the material to be stitched and the needle is of correct size. For stitching on delicate thin fabrics, use fine thread and fine needle. For heavy fabrics, needles and thread size should be larger.
3. Winding the bobbin:
Bobbins wind differently on the various machines, but generally the thread is first placed on a spool pin located below the flywheel and then drawn through the thread guide near the spool pin. Now with your hand wind the end of the thread on the bobbin in clockwise direction and place it on the winder. Turn the bobbin on the winder until the pin like projection on the winder fits into the slot on the bobbin, thus holding bobbin in place. Then press the winding lever down until the rubber ring touches the hub of the flywheel and is held there. Loosen the thumb screw and run the machine holding the thread end loosely. Make sure that the thread winds on the bobbin evenly and that you do not fill the bobbin too full. In most machines the winding will stop automatically when the bobbin is wound about three-fourth full.
4. Needle Clamping:
Machine needles have a flat side and round side. On the flat side there is a short groove (a) are the eye and on the round side there is a long groove (b). When fixing a new needle in the machine, remember that the long groove must always face the side from which the machine is to be threaded i.e., the side facing the last thread guide. Raise the take up lever to its highest point and loosen the needle clamp screw to remove the old needle. Keeping the take-up lever in the same position, insert the new needle upward into the needle clamp as far as it will go and tighten the needle clamp screw. As soon as the needle becomes blunt it can be changed.
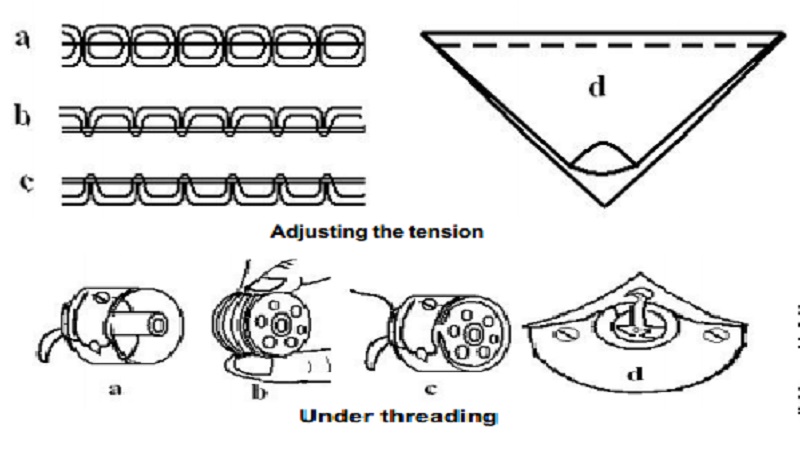
5. Adjusting the tension:
Before regulating the tension disc make sure that the threading of the machine - upper and under threading is correct. When there is a perfect balance of tensions between the upper and lower threads the stitches lock or meet together in the middle of the thickness of the cloth. The stitch will look alike on both sides related to shape and thickness. When the upper tension is too tight, the spool thread lies straight on the top of the fabric and the under thread appears like loops on the upper side of the cloth. If the upper tension is too loose the under thread lies straight on the under side of the fabric and the upper thread appear like loops on the underside. An easy method of recognizing tension is to stitch diagonally across a square of fabric folded on true bias as shown and then stretch the cloth firmly between your fingers until one or both threads break. The broken thread is always the one with tighter tension. If the tensions are balanced both threads break together and require more force to break. If adjustments are needed, it is better to adjust the upper tension. To increase or decrease, upper tension turn the screw on the tension regulator with the presser foot down. In turning the screw remember, that right is tight and left is loose. Usually there will be numbers written on the tension dial. To increase tension you should turn toward the higher numbers and to decrease turn toward the lower numbers. Do not move more than two numbers or a slight turn at a time. Stitch on a sample of fabric to recheck the tension.
Avoid changing the lower tension unless you are sure that the tension cannot be corrected completely by adjusting the top one alone. The lower tension is adjusted by turning the small screw on the bobbin case using a screw driver. Usually the screw is turned to the right to tighten and the left to loosen. Make a very slight turn only, each time.
6. Under threading:
In each bobbin case there is a slanting slot and a spring. Insert the bobbin into the bobbin case so that the thread comes around the bobbin and turns back to lie in the slot. Now guide the thread through the slot and below the spring and pull out a length of thread. Test the tension of the bobbin thread by pulling the thread end gently. There should be a slight but noticeable tension and bobbin should stay firmly in place. Leave a thread end 3 or 4 inches long extending from the bobbin case. Now open the slide plate lift the latch on the bobbin case with your thumb and forefinger and insert the bobbin case into the machine. Close the slide plate.
7. Top threading:
Raise the take-up lever to its highest point before you start threading. The spool of thread is first placed on the spool pin on top of the machine head and the thread end is passed through thread guide to tension mechanism. After drawing the thread between the tension discs and through the take-up spring, pass the end of the thread through the hole in the take-up lever from the side nearest the tension disc. Now thread the remaining guide which leads to the needle and insert the thread into the needle from the side on which the last guide appears.
8. Sewing on fabrics:
Raise the presser foot and turn the flywheel so that the take-up lever is at its highest point. Pull the upper and under threads straight back under the presser foot to prevent them from becoming knotted at the beginning of the stitching line. Place the cloth to be stitched under the presser foot, with the seam allowance to the right of the needle and the rest of the material to the left. Now turn the wheel until the needle enters the fabric at the exact starting point, and then lower the presser foot. Start the machine slowly, guiding the material gently; with both your hands, and then gradually increase the speed of stitching. Do not pull the material forward or backward, but hold the two layers slightly taut and firm at the back and front of presser foot. When you are nearing the end of the stitching line, stitch slowly with right hand on flywheel and left hand on work. Stop the machine in time so that you do not sew beyond the cloth. Have the take-up lever at its highest point to avoid unthreading the needle when beginning to stitch again. Raise the presser foot and pull the material straight back with threads under the presser foot to avoid needle from bending. Cut the threads with the thread cutter or with scissors. Leave several inches of thread extending from the machine to prevent unthreading.
Related Topics