Chapter: 11th 12th std standard Home Science Maintain Basic Knowledge for family life Higher secondary school College
Embroidery Stitches
Embroidery Stitches
Outline Stitches
These stitches are used for outlining the design motifs.
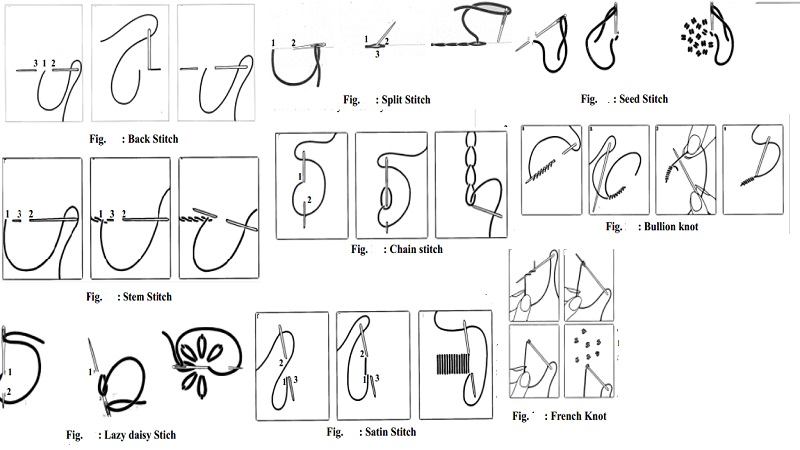
Back Stitch
Backstitch
is most often used as a straight outline stitch. Its simple in line effect.
This stitch also forms the base line for other decorative stitches. Work basic
stitch from right to left. Bring needle out at 1, insert at 2 and exit at
3.Distance between 3-1 and 1-2 should be equal. Repeat sequence for next stitch,
needle entering at point 2 should be made into hole by thread emerging from
point 1 of previous stitch. Keep length of back stitches consistent.
Stem Stitch
Stem
stitch is primarily an outlining stitch, but is often used to work stems in
floral designs as well. Working from left to right, bring needle out at 1.
Insert at 2 and exit a half stitch length back at 3; distance 1-3 and 3-2
should be equal. Repeat sequence. Note that point 3 of previous stitch is now
point 1, and the needle emerging at 3 is coming from hole made by thread
entering at point 2 of the previous stitch. For a broader stem stitch, angle
the needle slightly when entering at 2 and existing at 3 as shown in the last
drawing.
Split Stitch
Split
Stitch is worked like the stem stitch, except when the needle emerges, its
splits the working yarn; the final effect resembles a thin chain stitch.
Although outlining is its most common use, split stitch can be used in solid
rows as well. Working stitch from left to right, bring needle up at 1 and down
at 2. Bring needle back up at 3, splitting center of laid yarn. Repeat
sequence. Note that point 3 or previous stitch is now point 1 keep stitch
length even; when going around curves, however shorten length slightly.
Blanket Stitch
Blanket
stitch is a popular finishing stitch for edges. When worked small, it can be
used for outlining as well. Stitch is worked from left to right. Bring needle
out at 1 on bottom line. Insert at 2 on top line and slightly to the right,
then exit at 3, directly below. Before pulling needle through, carry yarn under
point of needle as shown. Proceed to next stitch. Note point 3 of previous
stitch is now point 1. Work entire row in the same way, keeping height of
stitches even throughout.
Chain stitches
Chain
stitch is one of the most popular embroidery stitches for outlining, or if
worked in close rows, for filling an area. Bring needle out at 1. Insert back
into same hole at point 1 and bring out at 2, carrying yarn under needlepoint,
then pull it through. Point 2 is now point 1 of next stitch. Work all stitches
the same way, always inserting needle into the hole made by the emerging
thread. To end row, take a small stitch over last chain loop to hold it down.
Lazy daisy stitch
Lazy daisy
stitch is a single unattached stitch worked in a circle to give an impression
of petals. Bring needle out at 1 Insert back into same hole at point 1, and
exit at 2, carry yarn under needle point, then pull through. Insert needle at 3
over chain loop, then bring needle out at point 1 for next chain stitch.
Continue this way until all petals are completed.
Filling stitches
Seed stitches
Seed
stitch is one of the simplest filling stitches. It can be used in clusters or
scattered, if worked close together, groups of seeding stitches can even be a
means of shading. Bring needle up at 1 and take a tiny stitch down at 2. For a
heavier stitch, bring needle up at 3 and take another small stitch at 4 close
to the first stitch. If all the stitches are worked in one direction, filling
will be uniform.
Satin Stitch
Satin
stitch is a solid filling stitch that covers the design area with long,
straight stitches placed close together. Care must be taken to keep the
stitches smooth and at even tension. The stitch is usually worked from left to
right. Bring needle up at 1, insert at 2 directly above, exit at 3 close to
point 1. Continue until area is filled.
Knotted Stitches French Knot
French knot is used like seeding stitch, but it is considerably more textured and
raised. Knots can be worked close together to completely fill an area,
producing a hubby effect. Bring needle up at 1. Holding yarn taut with left
hand, warp yarn around needle twice as shown; gently pull the yarn so the
twists are tightened against the needle.
Carefully insert needle near point 1 and pull through, and be sure yarn is
still held taut. Scatter knots as desired with in design area. French knots can
be made larger by increasing number of yarn twists around needle.
Bullion knot
Bullion
knot can be used as a filling or as an outline stitch. Bring needle up at 1.
Insert at 2 and exit at 1 again, but do not pull yarn through. Twist yarn
around needle point five to seven times depending on length of stitch. Then
carefully pull needle through both fabric and twists, take care not to distort
twists. Pull yarn toward point 2, so coil can lie flat. Pull working yarn tight
and use point of needle to pack yarns in coil together evenly. Re-insert needle
into point 2.
Related Topics