Chapter: 11th Computer Science : Chapter 7 : Spreadsheet-Basics (OpenOffice Calc)
Creating a new worksheet - Spreadsheet
Creating a new worksheet
A new spreadsheet can be created through various methods.
From windows, select
Start
-> All Programs ->OpenOffice
-> OpenOffice Calc (or)
From
Star Center (Welcome Screen):
Double-click on “OpenOffice” icon the desktop
Now, a welcome screen appears as
shown in Figure 7.1.

This open screen is called as “Star Center”.
Calc is one of the component of OpenOffice.
So, it may be invoked from the “Star Center” by simply clicking on the “Spreadsheet” icon. (or)
A new spreadsheet can also be
created by selecting File -> New -> Spreadsheet from any OpenOffice
Application. After using any one of the above said methods, OpenOffice Calc
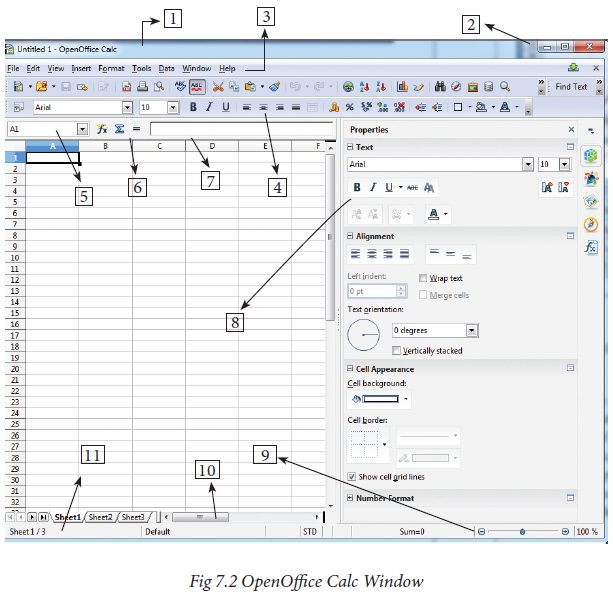
window appears as shown in Figure 7.2. The outline of the window is very
similar to other application windows of OpenOffice. The main area of the Calc
window is called as “Work area” or “Worksheet”.
A worksheet is a grid of cells
with a programmable calculator attached to each cell. When you open a new
spreadsheet, there are three worksheets available by default. You can include
more sheets and organize them.
1. Parts of the OpenOffice Calc Window
Appearance of the Calc window is
very similar to that of the Writer window. The workspace of writer is a big
blank area. But, in calc, the grid of cells is the workspace.
1.1 Title Bar
Top of the window is called the
“Title Bar”. It is used to show the name of the file and name of the
application. In OpenOffice calc, the default name for the first unsaved
worksheet is “Untitled1”. When you save the file, Untitled will change to the
name in which you saved.
1.2 Control Buttons:
In the right corner of title bar,
(1) minimize, (2) maximize / restore and (3) close control buttons are
available.
1.3 Menu Bar
Below the title bar is menu bar.
Most of the menus are very similar to what you learnt in OpenOffice Writer.
File
- menu contains the commands of all file management tasks like,
Create a new file, Open an existing file, Close the current file, Save a file,
Save a file in another name, print file, Export file etc.
Edit
- menu contains the editing commands like, cut, copy, paste, Undo,
Redo, Fill etc., Most of the menu items are similar to Writer Edit menu. But,
for Calc, some special editing options are available under this menu.
View
- menu contains the commends which are used to modify the
environment of calc.
Insert
– menu contains commands for inserting various calc elements
such as cells, columns, rows, functions, charts etc.,
Format
– menu contains the commands of various text and cell
formatting features.
Tools
– menu contains various tools and functions such as spell check,
protect document, insert pictures, macros, etc.,
Data
– menu contains the commands to manipulate data in a
spreadsheet such as sort, filter, subtotal, validity etc.,
Window
– menu shows display options such as New Window, Close
Windows, Split and Freeze.
Help
– menu lists in-built help features available with OpenOffice.
1.4 Tools Bar
Under the menu bar, there are
three toolbars available by default. They are:

Standard
Toolbar –
contains frequently used File, Edit and Data menu commands as icons such
as New Open Save, Send, print, print preview, Cut, Copy, Paste, Sorting,
inserting chart etc.,
Formatting
Toolbar – contains frequently used text
and cell formatting commands as such as changing font style, font size, font
colour, alignments, cell formatting etc.,
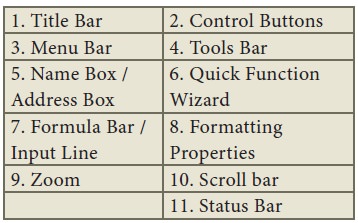
Formula
bar – This is a very important element in a
spreadsheet. It contains Name box, Function Wizard, Sum button, Function button
and Input line (Refer Figure 7.4).
Name
box : It
display the current cell address
Function
Wizard : It is
used to insert function
Sum
button : It is
used to quickly insert sum function.
Input
Line : This
is used to show the contents of the
current cell. It always shows actually what you typed in a cell. It is also
used to edit the contents.
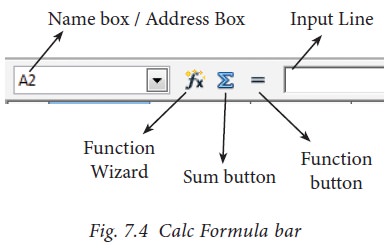
1.5 Scroll bar
Spreadsheet window
also has two sets of scrolling bars (1) Vertical Scrollbar and (2) Horizontal
Scrollbar (Refer Figure 7.5)
Vertical
Scroll bar : It is used to move the screen up and down.
Horizontal
Scroll bar : It is used move the screen left and
right.
Scroll
buttons : used
to move the screen to the relative
distance.
1.6 Row, Column, Cell and Cell Pointer
Below the formula bar contains the
worksheet of work area which consit of grid cells The worksheet has number of
rows and columns, where each column is labelled as A, B, C, D ….. AA, AB, AC
….. and the rows are numbered from 1, 2, 3 …. (Figure 7.6).

OpenOffice Calc version 4.1.5
contains 1024 columns and 10,48,576 rows. Column heading starts from A and end
with AMJ. In the case of Microsoft Excel 2016, there are 16,384 columns (A to
XFD) and 10,48,576 rows available.
Cell
Intersection of each row and
column makes a box which is called as “Cell”. Each cell has its unique address.
Cell address is the combination of
column heading and row number. For example, the intersection of column B and
row 4 makes a cell B4. (Figure 7.7). Every cell is thus identified by its
unique cell address.
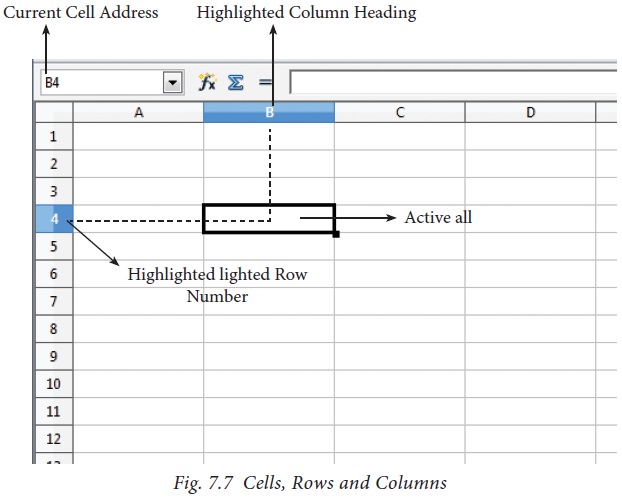
Cell pointer is a rectangle box which can be moved around the worksheet. The cell in which the cell pointer is currently located is known as “Active cell”. When you type anycontent, it will appear in the active cell. The address of the active cell is displayed in the Name box / Address box. Active cell’s column name and row number will be highlighted. Using this visual clue, one can easily identify an active cell. Moreover, the contents of an active cell will be displayed in the formula bar.
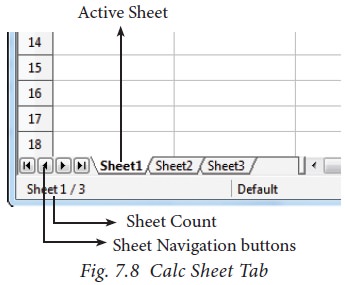
1.7 Worksheet tabs:
At the bottom of the
grid of cells are the sheet tabs. By default there are 3 sheets “Sheet1”,
“Sheet2” and “Sheet3”, (Figure 7.8). When you open a new worksheet, sheet1 is
the default active sheet. Active sheet tab will appear in white colour. If you
click on another sheet, it will become active and its colour will turn white.
Multiple sheets can also be selected by clicking the sheet and press the Ctrl
button (Ctrl + Click). Selected sheets will turn to white colour.
On the left of the
sheet tab, four navigation buttons are used to move between worksheets (Figure
7.9).
1. Move to the First
sheet
2. Move to the previous
sheet
3. Move to Next sheet
4. Move to the Last sheet
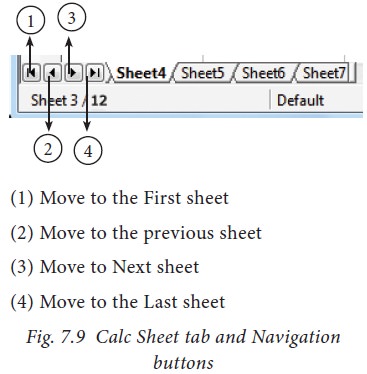
Fig. 7.9 Calc Sheet tab and Navigation buttons
Left corner of status
bar shows the total count of sheets and the present active sheet number. For
example, if the status bar shows sheet 3/12; 3 refers to the serial number of
the current sheet and 12 refers to the total number of sheets available.
Every sheet name can
be renamed. To rename a sheet, just double-click on the sheet, which will show
a small box as shown in Figure 7.10.
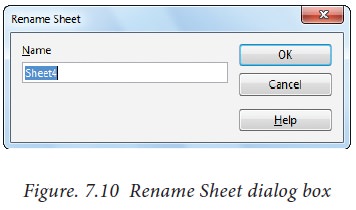
It shows the current
name; delete or overwrite the existing name and type a new name; click OK
button. New name will be displayed on the sheet.
1.8 Status bar
Below the sheet tabs
and horizontal scrolling bar is the “Status Bar”. It shows the current status
of the worksheet (Refer Figure 7.11).
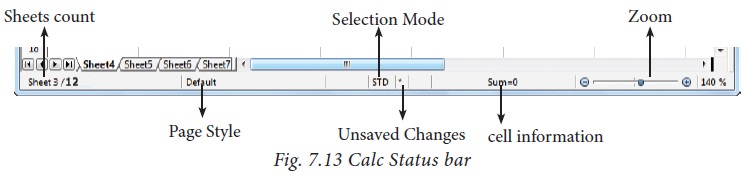
Sheets
count: Displays
current serial number of the sheet / total number of sheets available.
Page
Style: Displays
the page style of the current sheet.
To make changes, just double-click on “Default” and it will show you the “Page
Style” dialog box, which is used to change the margin, orientation, paper size,
inserting header, footer, border style etc.,
Selection
Mode: Displays
the selection mode of the current sheet. There are three modes
available to select the cells of a worksheet. They are, Standard (STD), Extend
(EXT) and Add (ADD).
Unsaved
Changes: An
asterisk ( * ) symbol indicates the
changes made in the worksheet but not yet saved. If you have saved your
changes, it will disappear.
Related Topics