Spreadsheet (OpenOffice Calc) - Auto Fill Feature - Spreadsheet | 11th Computer Science : Chapter 7 : Spreadsheet-Basics (OpenOffice Calc)
Chapter: 11th Computer Science : Chapter 7 : Spreadsheet-Basics (OpenOffice Calc)
Auto Fill Feature - Spreadsheet
Auto Fill Feature:
You have learnt how to
copy and paste a formula from one cell to other cells in the previous section.
The process of Copy and paste can be replaced by a click and drag and it is
called as “Auto Fill”. This is an alternate way to copy and paste.
Auto Fill feature
fills the contents from one cell to all the dragged cells. The content may be a
data or formula. If you fill a relative formula, all the addresses of filled
formulae will be changed.
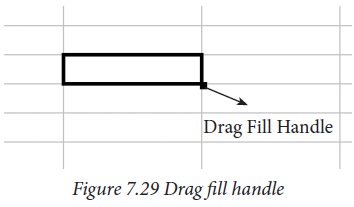
Cell pointer’s “Drag fill handle”
is used to auto fill. Just click and drag this handle to fill the contents. It
can be dragged towards right or down. Same can be achieved by Edit oFill -> Down
(or) Edit -> Fill -> Right.
1. Auto Fill Series:
Auto Fill is also used to generate
a series of values. For example, if you want to generate 1,2,3……. up to some
length; it can be done by a simple click and dragging over.
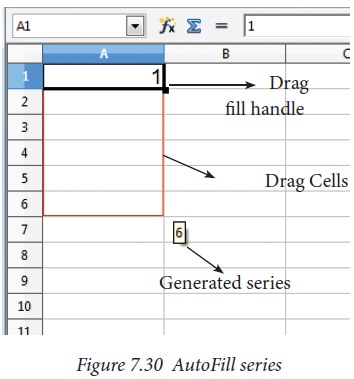
Generating whole
number series:
Step
1: In cell A1, type as 1 (one) and
press enter
Step
2: click A1 to place the cell
pointer
Step
3: Click “Drag Fill Handle” of cell pointer; now the mouse pointer becomes
a small +
Step
4: Drag over the cells; while
dragging, the generated values will
be displayed.
Step
5: Release the mouse pointer.
Selected cells will be filled with
series of values.
2. Generating series using command
Edit → Fill → Series Command is used to
generate different set of series. Before using this feature, a set of cells
should be selected. Using Fill Series feature, you can fill series of values at
any direction. (Remember that, auto fill only fills either right or down).
Refer Figure 7.31.
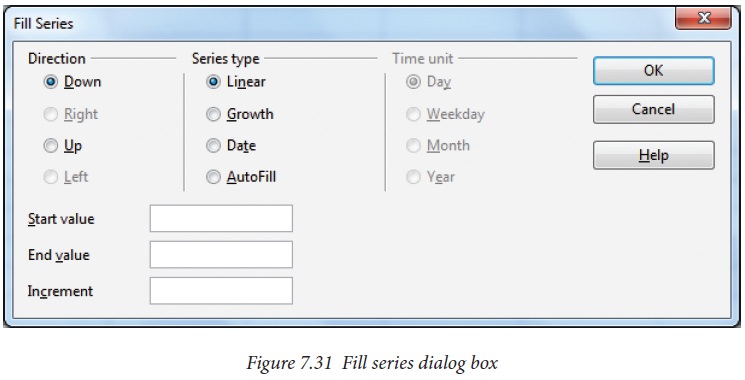
Direction
: Down / Right / Up / Left (Selected cell direction will be
default)
Series
type :
Linear
: To generate a sequence of series (Example 2,4,6,8,10…….)
Growth
: To generate multiplication series (Example 2,4,8,16,32,64……)
Date
: To generate date series (when you select date as series type; time unit
section gets enabled)
AutoFill
: To generate a continuous series of values (1,2,3,…….). When you select
“AutoFill”, Time unit section, End value and Increment text boxes become
disabled.
Time
Unit: (Enabled
only when you select the series type as “Date”
Day : To generate date series
day-wise
Weekday : To generate date series
weekday-wise
Month : To generate
date series month-wise
Year : To generate date
series year-wise
Start Value:
Initial value of the
series should be typed
End Value:
End value of the
series should be typed
If you fail to specify
the end value, series will be generated upto the selected cells.
If your selection is
less than the specified end value, series will be generated only upto the
selected cells.
Increment:
It is a middle value
between the first and second value of your series. So, the next value (Third
value) of the series will be generated based on this value.
If you want to generate a decreasing order series, negative value should be specified as an increment value.
3. Date Arithmetic:
Manual date calculations can be
tricky because you have to keep track of the number of days in a month. In
spreadsheets, date calculations become very simple. Here you can add a number
to a date and arrive at a new date, find the difference between two dates and
use a wide variety of function and formats to get what you want.
For example, enter a date
02/26/2018 in a cell, say A2. Suppose you want to calculate the date 80 days
after this date. To do so, enter the formula, = A2 + 80, in another cell, say
A4.
The date 05/17/18 appears in the
cell.
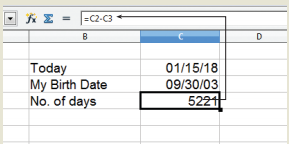
Find out how many days you were born?
· Type today’s date in first cell.
· Type your birth date in second
cell.
· Type the following formula in
third cell = first_cell_reference – second_cell_ reference
Related Topics