Chapter: 11th 12th std standard Home Science Maintain Basic Knowledge for family life Higher secondary school College
Buttons and Buttonholes
Buttons and Buttonholes
Button
closings should be appropriate to the style of the garment. Buttons too large,
or too small, or of the wrong texture can mar the entire design. There are also
decorative buttons which should be selected with same care as costume
jewellery.
To Determine the
length of buttonhole
The length of the buttonhole is determined by
the particular button size you use. The general rule is the diameter plus
height of button equals length of buttonhole.
A slash can be made by cutting scrap of fabric
and the button to be stitched can be passed through it. But the general rule is
an excellent guide to follow.
Placement of Fabrics
Buttonholes are placed on the right so that right overlaps left while
securing the buttons for girls and women garments and buttonholes are put in
the left front for men garments to facilitate left over right closing.
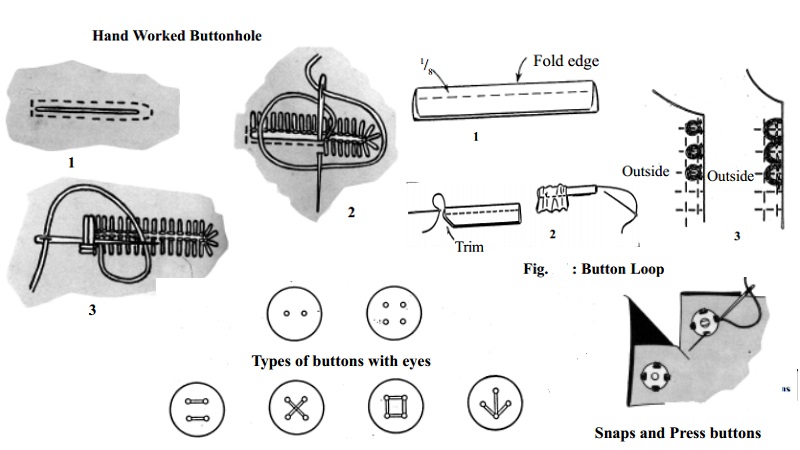
Hand Worked
Buttonholes
The following are the steps to work buttonholes by hand.
1.
Work a basting stitch through the buttonhole
marking near the center-front line. Decide on the length of buttonhole and put
in a marking basting parallel to the first. Mark placement of buttonholes with
a cross basting.
2.
Machine stitch around the rectangle. Count the
stitches, so that the rectangles will be equal in length and width, double
stitch for a few stitches so that no knot will be needed. Remove bastings. Cut
down the center of each rectangle, cutting exactly along a thread of the
fabric.
Work
buttonhole stitches from right to left. Put the needle through the slashed
opening with the point of the needle coming through the fabric just beyond the
machine stitches. Bring both the threads around the point of the needle and
complete the stitch, keeping the loops of thread along the cut edge of the
slash. Repeat the stitch and be sure the stitches are close together, revealing
no fabric between them. They must also be of an equal depth.
Worked buttonholes have a fan shape at the end nearest to the center
front, where there will be strain due to the pull on the button. The other end
is called the bar end. Make several long stitches at the end to form the bar.
Button loops
Button loops are made on cuffs of sleeves, as well as at the front or
back of blouses and dresses. Button loops can often be substituted for
buttonholes, provided loops are compatible with the overall style of the
garment. Although any type of buttons can be used in loops, ball buttons fit
will be best. Button loops may be set into the seam at the opening edge of the
garment, or they may be part of an intricate, decorative shape called a frog,
which is served in place on the outside of the finished garment.
Always make a test loop to see how the fabric works
into tubing, and to determine the proper size for the loop. Sew a button onto a
scrap of fabric to be sure that the loop will slip easily but also fit snugly
over the button, which it must, if it is to hold the garment edges securely
closed. Also check the diameter of the tubing to see whether it is suitable to
the button size.
Making loop or Tubing
Cut true bias strips of fabric 2� inches long and 1 inch inside. Fold
inhalf lengthwise with right sides together. Stitch about 1/8
inch from folded edge, stretching the fabric slightly and being careful to keep
the line of stitching parallel to the edge. Thread a large needle with several
inches of heavy-duty thread. Fasten thread at seam at one end of tubing, then
insert needle, eye first, into tube and work it through to other end. Gradually
turn all the tubing to the right side. This can be done by pulling on thread
and feeding seam allowance into tube.
Attaching the loops to
the garment
1.
Stitch as many number of loops required
according to the number of buttons. Buttons should be placed on the right front
and close together with no more than � inch between them. Run a marking basting
stitch along the seam line at the front edge. Use cross basting to mark the
spacing for the loops.
2.
Experiment with the size of loop needed for the
button. Tack one tube into a loop and push the button through it; it should be
a snug fit but not so snug as to cause undue strain on the button or the loop.
When the size is correct, put another row of marking basting the required
distance from the seam line.
3.
The loops may be attached in one of two ways as
shown. The finished appearance is slightly different. They must be basted to
the seam line with very firm, small stitches, and trim off excess length of
loops.
Button placement
Button position should be marked when the garment is nearly completed
and after the buttonholes or button loops are made. Although button position
line should be marked at the beginning of construction and button location can
be marked, the location should be finally determined when buttonholes are
finished. Lap buttonhole side of garment over button side as garment will be
worn, matching center front or center back lines, pin securely between
buttonholes.
For horizontal buttonholes, place a pin through buttonhole opening, 1/8
inch from the end that is nearest the finished garment edge, into fabric
beneath. For vertical buttonholes, button should be positioned 1/8
inch below the top of the buttonhole opening. Carefully lift the buttonhole
over pin and refasten the pin securely at the proper location. Center button at
pin mark, directly on centerline, and sew in place according to the type of
button you are using.
To sew a button with eyes
Buttons for tailored garments may have either two or four eyes. The
button with four eyes can become a subtle design feature, for the thread can be
inserted through the eyes in various ways.
This button is flat with no shank, and so one must be made with thread.
This is done by sewing over a match to make the stitches looser than they
otherwise would be. From the outside take a small stitch (1/ 16
inch) at the desired point; catching through all thicknessess. Take another
thread to secure the knot. Place the match over the button and bring the needle
up through the eyes of the button. Take several stitches through the button and
over the match. Remove the match and lift the button to pull the threads tight
against the button, a shank of threads will appear beneath the button. Wind the
thread around and around these threads, and fasten thread securely .
Snaps and Press buttons
Snaps are a kind of small fastener, have less holding power than hooks
and eyes. Each snap has two parts - a ball half and a socket half. Snaps are
available in various sizes and weights to serve every purpose. They are either
black or silver.
1.
Mark position of snaps; if a row of them is
required, space them evenly.
2.
Place the flat surface on the edge of the garment
that will be upper most when finished.
3.
Use a double thread of matching colour.
4.
Take several small overhand stitches through one
hole, slip the needle under the snap, and bring it out alongside the next hole.
5.
Take small overhand stitches through that hole
and continue.
6.
Stitches should not be seen on the right side of
the garment. Fasten threads.
Related Topics