Chapter: 11th 12th std standard Geography earth space Higher secondary school College Notes
Prismatic Compass
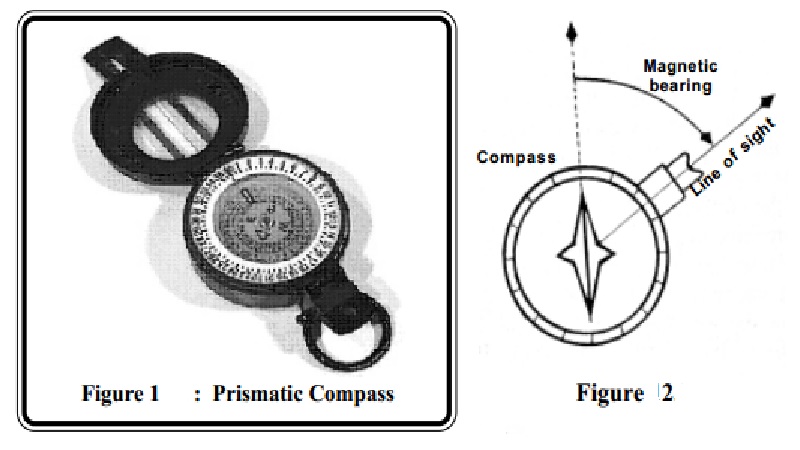
Prismatic Compass
Prismatic compass survey is one that is used in land surveying. It is also one of the easiest of survey techniques.
The Compass: A compass can be used for:
Measuring the angles in a traverse used for navigation or control purposes. As compasses have relatively poor direction accuracy, they are typically used for reconnaissance surveys.
Factors which Influence Use of Compasses
A linear line of sight between the user and the measured point is needed. A well defined object is required to obtain the maximum precision. The accuracy is highly dependent on other magnetic influences such as electric motors and natural anomalies caused by local geology.
Survey Methods Used
Compasses are used for the measurement of angles.
Traversing
The Compass is an instrument which indicates the whole circle bearing from the magnetic meridian to a particular line of sight. It consists of a needle or disc magnetised so that it will align itself with the direction of the Earth's magnetic flux, and some type of index scale so that numeric values for the bearing can be determined.
Because the Prismatic Compass is held in the hand for use, and are therefore subject to poor centring and an unstable platform. The effects of this are reduced over long sight lines, which, when combined with the vagaries of the magnetic meridian, combine to make the compass a reconnaissance or inventory tool only. Neither the instruments nor the basis upon which they work are sufficiently stable for any sort of precision work.
Local Attraction
The needle of the compass can also be 'attracted' by metallic objects close to the point of observation. These objects cause local aberrations in the direction of magnetic flux, and give rise to an effect known as local attraction. These local disturbances in the Earth's magnetic field are often due to large iron masses, electric cables, fences, cars and so on. They tend to occur locally, and if detected can sometimes be compensated for in survey procedures. Magnetic anomalies caused by underground minerals are a problem for surveyors, but form the basis of many mineral exploration techniques so the news is not all bad.
Where a closed traverse consisting of compass bearings and distances has been performed around a parcel of land (see later) it is possible to compensate for the effects of local attraction and to distribute 'angular misclosure'. This will be covered in more detail later but in summary the procedure consists of:
1. measuring forward and back bearing of each line
2. computing angles and angle misclosure (misclosure = [180 o (n - 2)] - S angles) p(n-2) - S angles})
3. adjusting each angle by adding to each
4. recomputing bearings from adjusted angles.
The presence or otherwise of local attraction can be determined from the difference between a 'forward' bearing and a 'reverse' bearing observed from, and to, a station. If I was to measure from Point A to Point B, and then from Point B back to Point A the difference in the bearings should be 180 o . Any variation in this in excess of what would be expected from random error would be most likely due to local attraction. Needless to say both forward and reverse bearings are always observed when using a compass for traversing .
Conducting a Compass Survey
Equipments required are:
1. 1 Prismatic Compass
2. 4 Ranging Poles.
3. 1 Engineer's Chain (100 ft or 30 m)
4. 10 Small pegs or arrows for use with chain.
5. 1 Survey field book
6. Pencil
7. Eraser
8. Tripod
9. Linen Tape (50m)
10. Plumb line
11. Optical Square
12. Spirit Level
Pre-Survey Checks
1. Check for compass error.
2. Check for true length of the Chain as this can introduce cumulative errors in measurements.
3. Ensure that you know the current magnetic declination of the area to be surveyed. This is particularly important when going to the field with a forest boundary schedule; as there will always be the need to add to each bearing, the Magnetic Variation or Declination of the area
4. Ensure that the survey is tied to a point or landmark, the co-ordinates of which can be obtained.
If the survey is to be tied to a pre-existing pillar, a tripod is placed above the pillar and a plumb line made to fall vertically above the pinpoint of the pillar. In the absence of a plumb line; (a piece of lead with a tapering end hung to the base of the tripod with a thin piece of thread), a piece of stone is placed at the point of convergence of the legs of the tripod just below the compass, and made to drop freely onto the top of the pillar. If the stone falls right on top of the central pin of the pillar, the tripod may be considered as being vertically above the pillar. The Compass is then fitted to the tripod and balanced horizontally with the aid of the spirit level. A ranging pole is then placed as far from the starting point as is convenient and visible, for the bearing of this pole to be taken from the starting point.
Never conduct a survey holding the compass in your hand. In the absence of a tripod, a wooden 'peg' (monopod) may be cut for use. The length of the monopod is best at breast height of the compass reader. The top of this monopod should be about the size of the base of the compass and made flat for ease of placing the compass on it. Since the monopod cannot be placed conveniently on top the survey pillar, it is fixed directly behind the pillar, with the line of sight passing over the centre of the pillar, usually indicated by a pin. The bearing to the ranging pole is then taken after the compass, resting on the monopod, is levelled. In this case, measurement of the distance should be from the top of the pillar to the ranging pole and not from where the monopod (with compass on it) is positioned.
The tripod or monopod is then moved to the location of the ranging pole and the process repeated. The compass must always shifted to and be placed directly above the location of the ranging pole whose bearing has just been taken, for the next bearing to be taken.
The Magnetic North (MN):
Our Earth has a magnetic axis inclined to the line of longitude, which divides the earth into two equal parts. This magnetic axis is the property that influences the needle of a compass. When a compass needle is allowed to swing freely and settle, it points to the northern pole of this axis, and the direction so indicated is referred to as the Magnetic North. The Magnetic North therefore is the direction of the pole of the earth's magnetic axis from any point on the earth's surface as indicated by the freely suspended needle of a compass. It is important to note that the Magnetic North forms the basis for all angular measurements with surveying instruments. Without it, surveying with theodolite and compass would not be possible.
True North (TN)
The direction indicating the pole of the earth's geographic axis in the Northern Hemisphere is the True North. All other lines referenced to this are referred to as true north bearings. The figure below shows the Magnetic North (MN), the True North (TN), the True South, (TS) and the Magnetic South (MS).
The Azimuth
The Azimuth is the smallest bearing to a point measured Eastward or Westward from a particular reference North. Azimuths may be measured either with reference to the Magnetic North or to the True North and referred to as Magnetic North and True North Azimuths respectively. The azimuth begins from 0 o or 360 o representing North and runs through 90 o East, 180 o South, 270 o West and back to 360 o North.
Forward Bearing and Back Bearing
When the bearing of a line is stated in a direction from an original point to a terminal point, it is known as a forward bearing. The back bearing is opposite in direction, to the forward bearing. If the difference between the forward bearing and the back bearing is exactly 180 o , then, the two Compass free from local attraction. As an example, consider a survey line along stations A, B and C. If the forward bearing from A to B is 95 o and the back bearing to B from A is 275, the difference between the two bearings is exactly 180 o and there will be no reason to suspect any local attraction at stations B and A. If from station B the bearing to station C is 240 (Forward Bearing) and the back-bearing from station C to B is 61, the difference between the two bearings will be 179 o . Since it is already known that there is no local attraction at stations A and B, then there is good reason to suspect local attraction at station C. To confirm this suspicion a forward bearing is taken to station A from station C, and a back-bearing taken from A to C. Since A is known to have no local attraction, if the difference between the two bearings is not exactly 180 o , then the presence of local attraction at station C is confirmed.
Related Topics