Adobe InDesign CC 2019 - Working with Text | 12th Computer Technology : Chapter 2 : Adobe InDesign CC 2019
Chapter: 12th Computer Technology : Chapter 2 : Adobe InDesign CC 2019
Working with Text
Working with Text
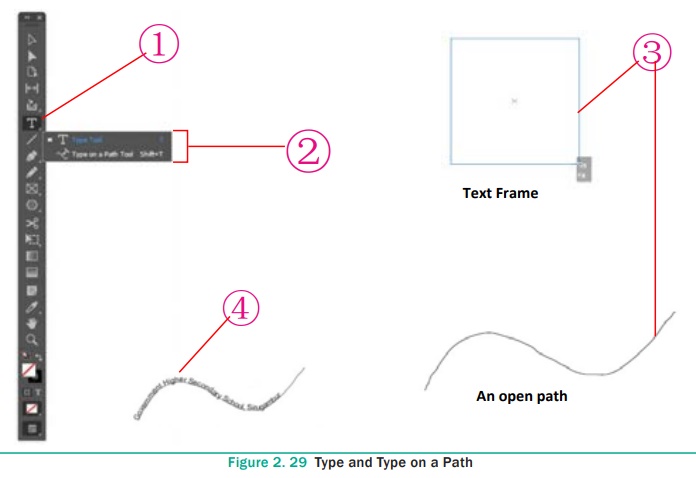
InDesign has two main type tools: Type and Type on a
Path . The Type tool is used to create a rectangle text frame where you can
store text in your document. The Type on a Path tool is used to add text along
the inner or outer edge of a path. In addition to the type tools, you can also
use the Frame tools—Rectangle, Ellipse, and Polygon—to add text to your
document.
The default font is Minion Pro Regular.
Use Type Tools
1. Click the Type tool slot on the Tools panel.
Click the arrow on the right of the Type tools menu to create a
detachable panel.
2. Click one of the following Type tools:
Type. Creates a text frame box.
Type on a Path. Creates text along the outer edge of an open or
closed path.
3. For the Type tool, drag to draw a text frame. For the Type on a
Path tool, click on a path.
4. Type some text.
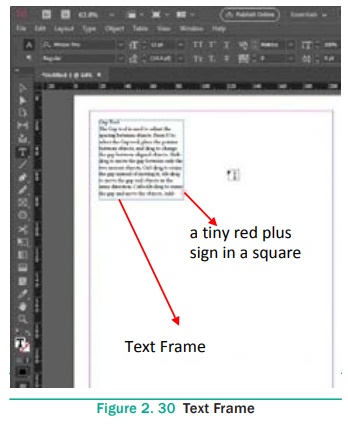
1. Creating Text Boxes
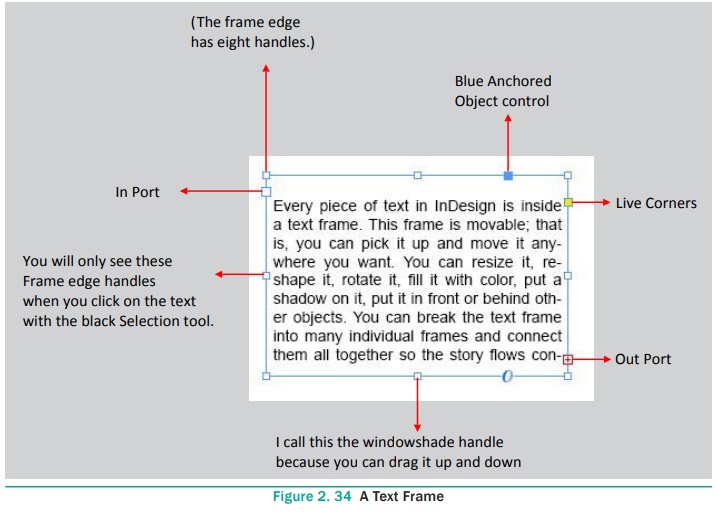
Text boxes, also referred to as text frames, are containers for
text. When you create a text box, a flashing cursor appears in the upper-left
corner of the box, ready for you to start typing. The amount of text you can
fit horizontally in a text box depends on the size of the text box because text
automatically wraps to the next line once it hits the right side of the text
box. You can copy and paste text from another source into InDesign or place a
text file in an InDesign document using the Place command.
Creating Type in a Text Frame
With the Type tool, you can create a rectangle text box the size
that you want.
1. Select the Type tool on the Tools panel.
2. Drag to create a rectangle text box the size that you want.
A flashing insertion point appears in the text frame.
3. Now start typing. The text automatically wraps to the shape of the text frame. Press Enter
key i f you want to start a new line.
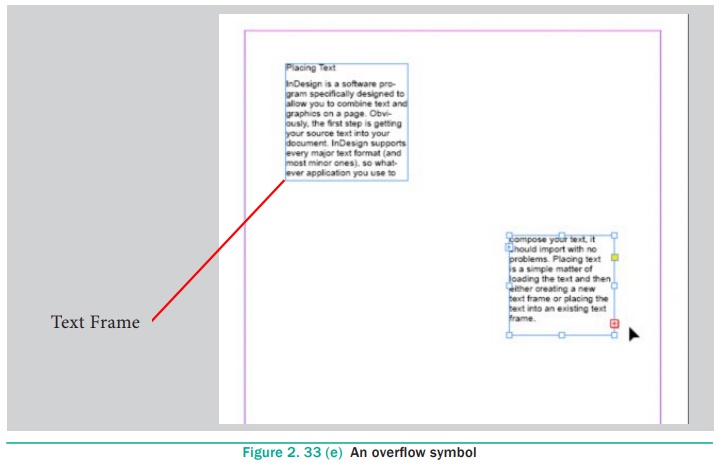
If you type more text than the frame can hold, an overflow symbol
(a tiny red plus sign in a square) appears on the edge of the rectangle box.
You can reshape the text frame object to display the text or create a thread
(link) to another text frame.
If the overflow symbol appears, deselect the text frame, select
the Selection tool on the Tools panel, and then drag a corner to reshape the
text frame.
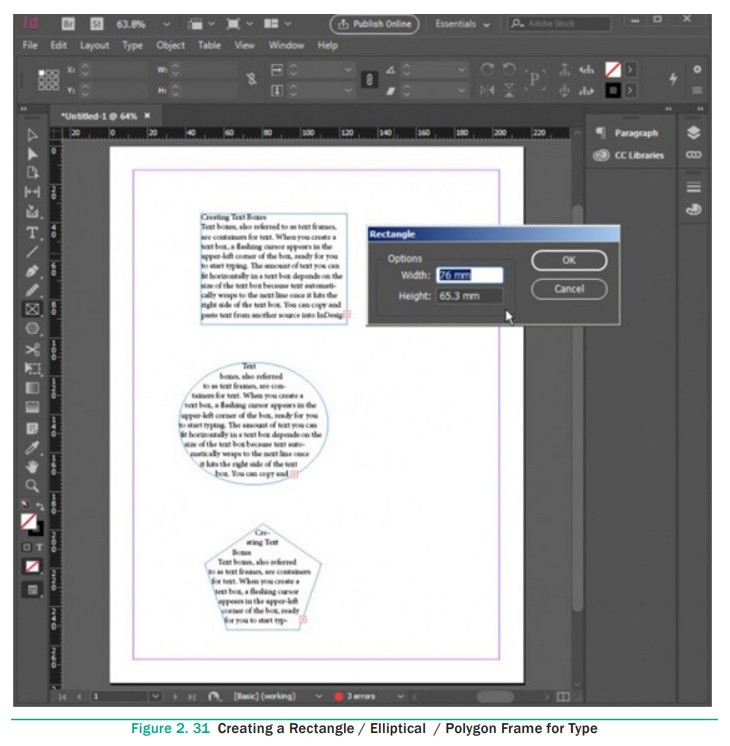
2. Creating Type Using Frame Tools
In addition to the Type tool, you can also use the Frame tools—
Rectangle, Ellipse, and Polygon— to add text to your document. Instead of a
rectangle shape for type, you can create irregular shapes to store text in your
document. The Polygon Frame tool is also used to create a star shape for type.
Create a Rectangle or Elliptical Frame for Type
1. Select the Rectangle / Ellipse / Polygon Frame tool on the
Tools panel.
2. Drag to create a rectangle or elliptical or polygon frame the
size that you want.
To create a frame to an exact size, click a blank area and
immediately Rectangle / Ellipse / Polygon dialog box appears. In it, specify
the width and height you want, and then click OK button.
3. Select the Type tool on the Tools panel.
Click in the frame, and then type some text. The text
automatically wraps to the shape of the text frame. Press Enter key if
you want to start a new line.
If the overflow symbol appears, deselect the text frame, select
the Selection tool on the Tools panel, and then drag a corner to reshape the
text frame.
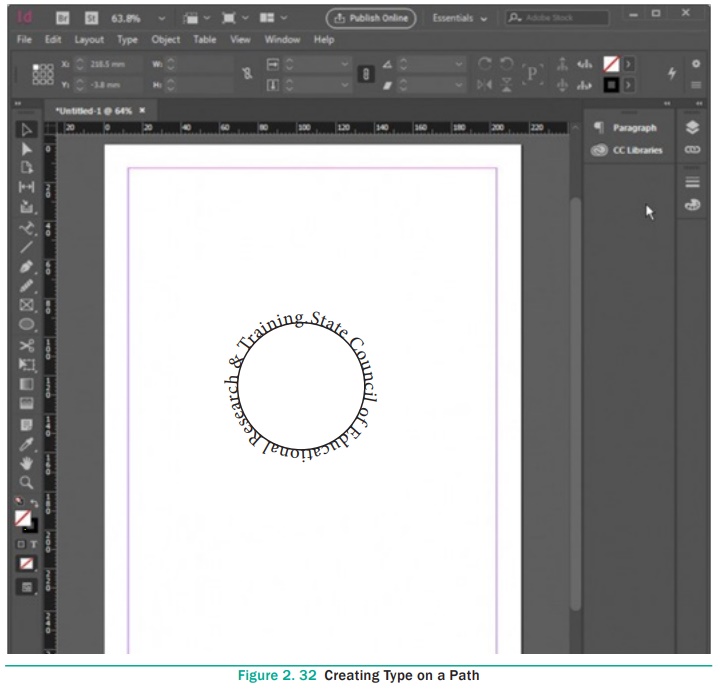
3. Creating Path Type
With the Type on a Path tool, you can add type along the inner or
outer edge of a path. You can place the text on either side of the path, but
not on both. If you initially place it on the inner part of the path, you can
always move it to the outer part of the path later. When you select text on a
path, brackets appear that you can drag to adjust the position and placement of
the text.
Create Type on a Path
1. Select the Type on a Path tool on the Tools panel.
2. Click on the edge of the path (closed or open) to which you
want to add type.
A flashing insertion point appears in the text frame. Any fill or
stroke on the object is removed.
3. Type some text. The text automatically wraps to the shape of
the text frame. Don’t press Enter key.
The type appears along the edge of the object, conforms to its
shape, and removes the fill and stroke.
If the overflow symbol appears, deselect the text frame, select
the Direct Selection tool on the Tools panel, and then drag a corner to reshape
the text frame.
4. Select a Selection tool or select the Type tool again.
4. Importing Text
If you have text from another document that you want to use in
your InDesign document, you can use the Place command to import it. You
can import text from the following text formats: plain text (TXT), Rich Text
Format (RTF), Microsoft Word (DOC or DOCX), or Microsoft Excel (XLS or XLSX) .
When you import text using the Place command on the File menu,
InDesign allows you to place the text in a new text frame or an existing one.
Follow these steps to place text into a document:
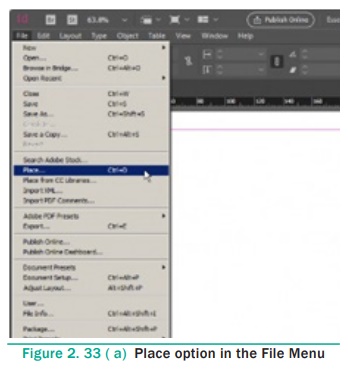
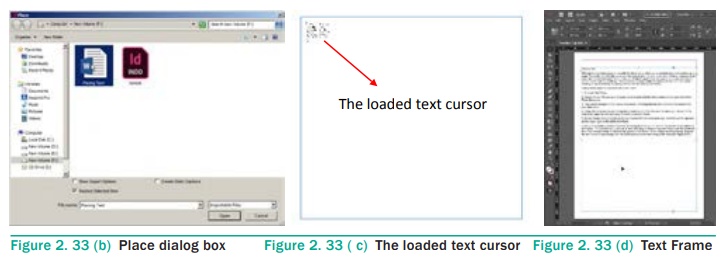
1. Choose File > Place in the menu bar. Place dialog
box appears.
2. Locate the text file you want to place, select it and click the
Open button on the right side of the Place dialog box.
3. Your cursor changes to the loaded text cursor, indicating that
the text is ready to be placed into your document.
4. Either click to place the text (filling the current column from
the point at which you clicked to the end of the page) or click and drag to
create a new text frame.
5. If a text frame cannot contain all the text placed within it, a
red plus-sign overflow symbol appears on the lower-right border of
the text frame.
Clicking this overflow symbol loads the remaining text into your cursor for placement in an additional text frame. To place this text, just click or click and drag to create a new text frame with the additional text. This new text frame is linked to the previous text frame. When linked, text flows freely between the two frames if you change the size of the frames or the formatting of the text (see Figure 2.33 (e)).
5. Typing and Selecting Text
Before you can work with text in InDesign, you need to select it.
You can select the entire text frame or the characters in the text frame. The
selection tools (Selection and Direct Selection) allow you to select both
characters and its object. You can use the type tools to select only the
characters in the text frame, but not the object. When you add text to a text
frame, pressing Enter key creates a new paragraph. If you want to force
a line break, known as a soft return, instead of a new paragraph, you can press
Shift+Enter.
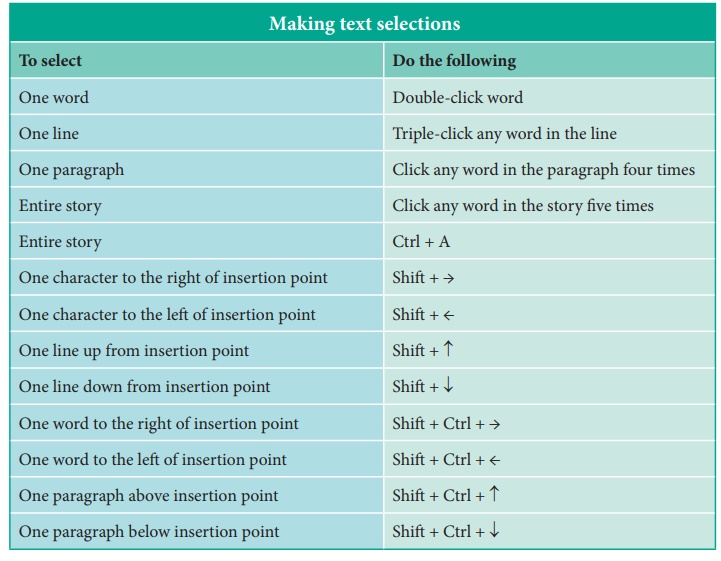
Making text selections
To select : Do the following
One word : Double-click word
One line : Triple-click any word in the line
One paragraph : Click any word in the paragraph four times
Entire story : Click any word in the story five times
Entire story : Ctrl + A
One character to the right of insertion point : Shift + →
One character to the left of insertion point : Shift + ←
One line up from insertion point : Shift + ↑
One line down from insertion point : Shift + ↓
One word to the right of insertion point : Shift + Ctrl + →
One word to the left of insertion point : Shift + Ctrl + ←
One paragraph above insertion point : Shift + Ctrl + ↑
One paragraph below insertion point : Shift + Ctrl + ↓
6. Changing the Font and Font Size of the Text
You can change the font and font size of the text to enhance the
appearance of your document using control palette. When the text is selected,
the Control palette displays the character formatting controls.
Changing the Font of the Text
1. Select the text you want to change to a different font.
2. In the Control Palette, click on Font drop down list box
to display a list of the available fonts.
3. Click on the font you want to use.
4. The text you selected changes to the new font.
5. To deselect text, click on outside the selected area.

Changing the Font Size of the Text
1. Select the text you want to change the font size.
2. In the Control Palette, click the down arrow of the Font size
drop down box to display a list of the available Font sizes.
3. Click on the font size you want to use.
The text you selected changes to the new size.
4. To deselect text, click on outside the selected area.

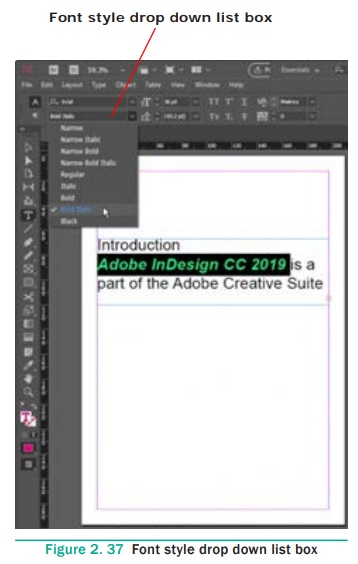
7. Changing the Text Bold, Italic or Bold Italic Style
You can make the text bold or italicize or bold italic to
emphasize information in your document.
1. Select the text you want to change to bold, italic or bold
italic.
2. In the Control Palette, click on the Font style drop
down list box to display a list of the available fonts styles.
3. Click on the font style( Bold / Italic/ Bold Italic) you want
to use.
The text you selected changes to the new font style.
4. To deselect text, click on outside the selected area.
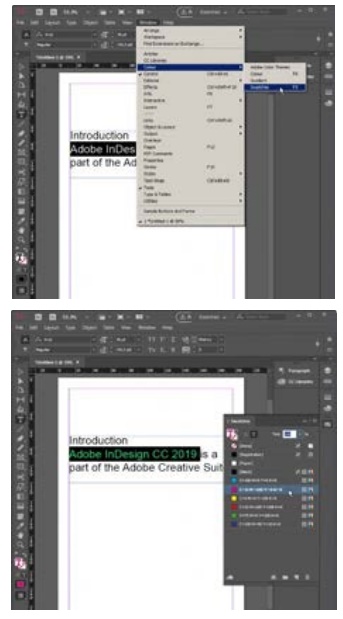
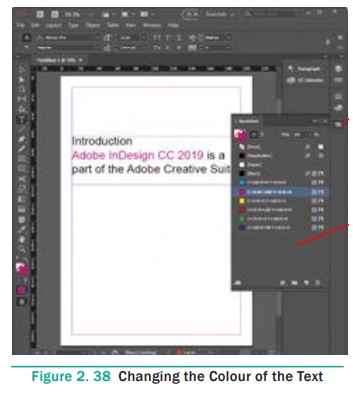
8. Changing the Colour of the Text
Colour of the text can be changed to draw attention to headings or
important information in your document.
1. Select the text you want to change the colour.
2. Click on Swatches icon to display the available colours.
3. If the Swatches icon is not displayed, choose Window >
Colour > Swatches (or) press F5.
4. Click on any colour in the Swatches panel you want to apply.
The text appears in the colour you selected.
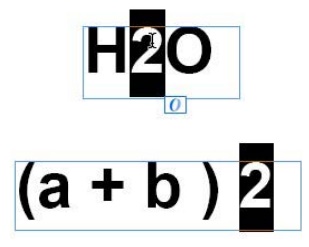
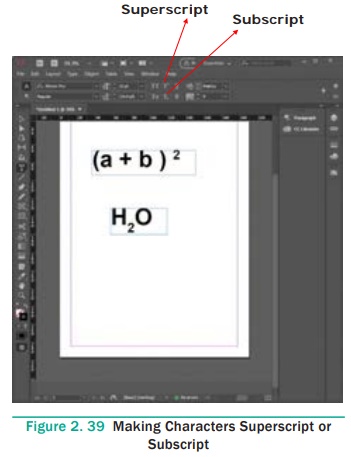
9. Making Characters Superscript or Subscript
You can change the text in Superscript or Subscript from Control
palette.
1. Select the character that you want to change Superscript or
Subscript.
2. Click on one of the buttons in the Control palette.
Superscript (![]() ),
),
Subscript (![]() )
)
3. The character you selected changes to the required one.
Related Topics