Chapter: Java The Complete Reference : The Java Library : java.util : More Utility Classes
Timer and TimerTask - java.util
Timer and TimerTask
An
interesting and useful feature offered by java.util
is the ability to schedule a task for execution at some future time. The
classes that support this are Timer
and TimerTask. Using these classes,
you can create a thread that runs in the background, waiting for a specific
time. When the time arrives, the task linked to that thread is executed.
Various options allow you to schedule a task for repeated execution, and to
schedule a task to run on a specific date. Although it was always possible to
manually create a task that would be executed at a specific time using the Thread class, Timer and TimerTask
greatly simplify this process.
Timer and
TimerTask work together. Timer is
the class that you will use to schedule a
task for execution. The task being scheduled must be an instance of TimerTask. Thus, to schedule a task,
you will first create a TimerTask
object and then schedule it for execution using an instance of Timer.
TimerTask implements the Runnable interface; thus, it can be used to create a thread of execution. Its constructor is shown
here:
protected
TimerTask( )
TimerTask defines the methods shown in Table 19-9. Notice
that run( ) is abstract, which means that it must be
overridden. The run( ) method,
defined by the Runnable interface,
contains the code that will be executed. Thus, the easiest way to create a
timer task is to extend TimerTask
and override run( ).
Once a
task has been created, it is scheduled for execution by an object of type Timer. The constructors for Timer are shown here:
Timer( )
Timer(boolean DThread) Timer(String tName)
Timer(String
tName, boolean DThread)
The
first version creates a Timer object
that runs as a normal thread. The second uses a daemon thread if DThread is true. A daemon thread will execute only as long as the rest of the
program continues to execute. The third and fourth constructors allow you to
specify a name for the Timer thread.
The methods defined by Timer are
shown in Table 19-9.
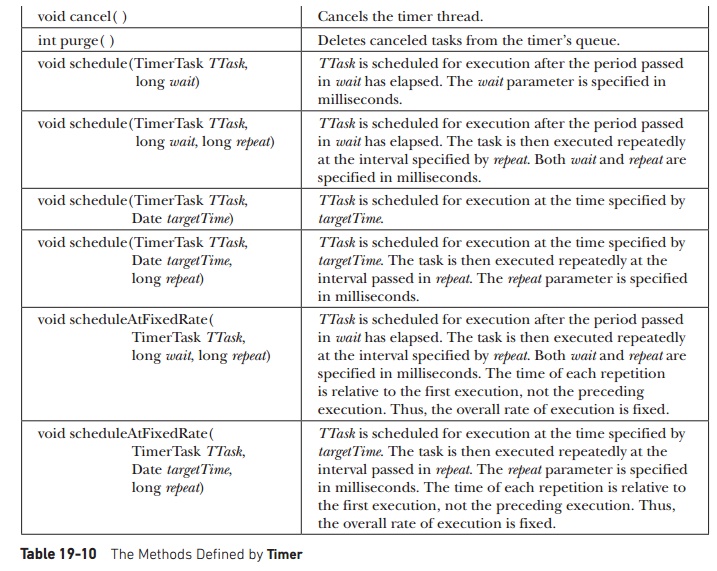
Once a Timer has been created, you will
schedule a task by calling schedule( )
on the Timer that you created. As
Table 19-10 shows, there are several forms of schedule( ) which allow
you to schedule tasks in a variety of ways.


If you
create a non-daemon task, then you will want to call cancel( ) to end the task when your program ends. If you don’t do
this, then your program may "hang" for a period of time.
The
following program demonstrates Timer
and TimerTask. It defines a timer
task whose run( ) method displays
the message "Timer task executed." This task is scheduled to run once
every half second after an initial delay of one second.
// Demonstrate Timer and
TimerTask.
import java.util.*;
class MyTimerTask extends
TimerTask { public void run() {
System.out.println("Timer
task executed.");
}
}
class TTest {
public static void
main(String args[]) {
MyTimerTask myTask = new
MyTimerTask();
Timer myTimer = new Timer();
/* Set an initial delay of 1
second, then repeat every half second.
*/
myTimer.schedule(myTask,
1000, 500);
try { Thread.sleep(5000);
} catch (InterruptedException
exc) {}
myTimer.cancel();
}
}
Related Topics