Chapter: Java The Complete Reference : The Java Library : java.util : More Utility Classes
Formatter - java.util
Formatter
At the
core of Java’s support for creating formatted output is the Formatter class. It provides format conversions that let you display
numbers, strings, and time and date in virtually any format you like. It operates in a manner similar to the C/C++ printf( ) function, which means that if
you are familiar with C/C++, then learning to use Formatter will be very easy. It also further streamlines the
conversion of C/C++ code to Java. If you are not familiar with C/C++, it is
still quite easy to format data.
The Formatter Constructors
Before
you can use Formatter to format
output, you must create a Formatter
object. In general, Formatter works
by converting the binary form of data used by a program into formatted text. It
stores the formatted text in a buffer, the contents of which can be obtained by
your program whenever they are needed. It is possible to let Formatter supply this buffer
automatically, or you can specify the buffer explicitly when a Formatter object is created. It is also
possible to have Formatter output
its buffer to a file.
The Formatter class defines many
constructors, which enable you to construct a Formatter in a variety of ways. Here is a sampling:
Formatter(
) Formatter(Appendable buf)
Formatter(Appendable
buf, Locale loc)
Formatter(String
filename) throws
FileNotFoundException
Formatter(String
filename, String charset)
throws
FileNotFoundException, UnsupportedEncodingException
Formatter(File
outF)
throws
FileNotFoundException Formatter(OutputStream outStrm)
Here, buf specifies a buffer for the formatted
output. If buf is null, then Formatter automatically allocates a StringBuilder to hold the formatted
output. The loc parameter specifies a
locale. If no locale is specified, the default locale is used. The filename parameter specifies the name of
a file that will receive the formatted output. The charset parameter specifies the character set. If no character set
is specified, then the default
character set is used. The outF
parameter specifies a reference to an open file that will receive output. The outStrm parameter specifies a reference
to an output stream that will receive output. When using a file, output is also
written to the file.
Perhaps
the most widely used constructor is the first, which has no parameters. It
automatically uses the default locale and allocates a StringBuilder to hold the formatted output.
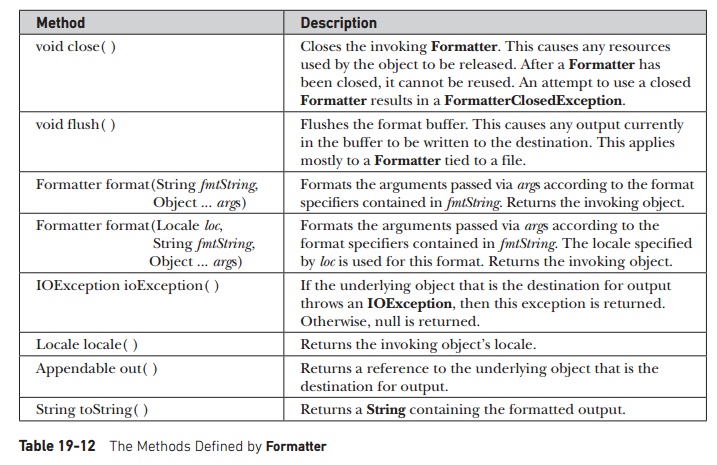
The Formatter Methods
Formatter defines the methods shown in Table 19-12.
Formatting Basics
After
you have created a Formatter, you
can use it to create a formatted string. To do so, use the format( ) method. The most commonly used version is shown here:
Formatter
format(String fmtString, Object ... args)
The fmtSring consists of two types of items.
The first type is composed of characters that are simply copied to the output
buffer. The second type contains format
specifiers that define the way the subsequent arguments are displayed.
In its
simplest form, a format specifier begins with a percent sign followed by the
format conversion specifier. All
format conversion specifiers consist of a single character. For example, the format specifier for
floating-point data is %f. In
general, there must be the same number of arguments as there are format
specifiers, and the format specifiers and the arguments are matched in order
from left to right. For example, consider this fragment:
Formatter fmt = new Formatter();
fmt.format("Formatting
%s is easy %d %f", "with Java", 10, 98.6);
This
sequence creates a Formatter that
contains the following string:
Formatting with Java is easy
10 98.600000
In this
example, the format specifiers, %s, %d, and %f, are replaced with the arguments that follow the format string.
Thus, %s is replaced by “with Java”,
%d is replaced by 10, and %f is replaced by 98.6. All other
characters are simply used as-is. As you might guess, the format specifier %s
specifies a string, and %d specifies
an integer value. As mentioned earlier, the %f specifies a floating-point value.
The format( ) method accepts a wide variety
of format specifiers, which are shown in Table 19-13. Notice that many
specifiers have both upper- and lowercase forms. When an uppercase specifier is
used, then letters are shown in uppercase. Otherwise, the upper- and
Format Specifier Conversion Applied
%a Floating-point
hexadecimal
%A
%b Boolean
%B
%c Character
%d Decimal
integer
%h Hash
code of the argument
%H
%e Scientific
notation
%E
%f Decimal
floating-point
%g Uses
%e or %f, based on the value being formatted
%G and
the precision
%o Octal
integer
%n Inserts
a newline character
%s String
%S
%t Time
and date
%T
%x Integer
hexadecimal
%X
%% Inserts
a % sign
Table
19-13 The Format Specifiers (continued)
lowercase
specifiers perform the same conversion. It is important to understand that Java
type-checks each format specifier against its corresponding argument. If the
argument doesn’t match, an IllegalFormatException
is thrown.
Once you
have formatted a string, you can obtain it by calling toString( ). For example, continuing with the preceding example,
the following statement obtains the formatted string contained in fmt:
String str = fmt.toString();
Of
course, if you simply want to display the formatted string, there is no reason
to first assign it to a String
object. When a Formatter object is
passed to println( ), for example,
its toString( ) method is
automatically called.
Here is
a short program that puts together all of the pieces, showing how to create and
display a formatted string:
// A very simple example that
uses Formatter.
import java.util.*;
class FormatDemo {
public static void
main(String args[]) { Formatter fmt = new Formatter();
fmt.format("Formatting
%s is easy %d %f", "with Java", 10, 98.6);
System.out.println(fmt);
fmt.close();
}
}
One
other point: You can obtain a reference to the underlying output buffer by
calling out( ). It returns a
reference to an Appendable object.
Now that
you know the general mechanism used to create a formatted string, the remainder
of this section discusses in detail each conversion. It also describes various
options, such as justification, minimum field width, and precision.
Formatting Strings and Characters
To
format an individual character, use %c.
This causes the matching character argument to be output, unmodified. To format
a string, use %s.
Formatting Numbers
To
format an integer in decimal format, use %d.
To format a floating-point value in decimal format, use %f. To format a floating-point value in scientific notation, use %e. Numbers represented in scientific
notation take this general form:
x.dddddde+/–yy
The %g format specifier causes Formatter to use either %f or %e, based on the value being formatted and the precision, which is
6 by default. The following program demonstrates the effect of the %f and %e format specifiers:
// Demonstrate the %f and %e
format specifiers.
import java.util.*;
class FormatDemo2 {
public static void
main(String args[]) { Formatter fmt = new Formatter();
for(double i=1.23; i <
1.0e+6; i *= 100) { fmt.format("%f %e", i, i);
System.out.println(fmt);
}
fmt.close();
}
}
It
produces the following output:
1.230000 1.230000e+00
1.230000 1.230000e+00
123.000000 1.230000e+02
1.230000 1.230000e+00
123.000000 1.230000e+02 12300.000000 1.230000e+04
You can
display integers in octal or hexadecimal format by using %o and %x, respectively.
For example, this fragment:
fmt.format("Hex: %x,
Octal: %o", 196, 196);
produces
this output:
Hex: c4, Octal: 304
You can
display floating-point values in hexadecimal format by using %a. The format produced by %a appears a bit strange at first
glance. This is because its representation uses a form similar to scientific
notation that consists of a hexadecimal significand and a decimal exponent of
powers of 2. Here is the general format:
0x1.sigpexp
Here, sig contains the fractional portion of
the significand and exp contains the
exponent. The p indicates the start
of the exponent. For example, this call:
fmt.format("%a",
512.0);
produces
this output:
0x1.0p9
Formatting Time and Date
One of
the more powerful conversion specifiers is %t.
It lets you format time and date information. The %t specifier works a bit differently than the others because it
requires the use of a suffix to describe the portion and precise format of the
time or date desired. The suffixes are shown in Table 19-14. For example, to
display minutes, you would use %tM,
where M indicates minutes in a
two-character field. The argument corresponding to the %t specifier must be of type
Calendar, Date, Long, or long.
Here is
a program that demonstrates several of the formats:
// Formatting time and date.
import java.util.*;
class TimeDateFormat {
public static void
main(String args[]) {
Formatter fmt = new
Formatter();
Calendar cal =
Calendar.getInstance();
//Display standard 12-hour time format.
fmt.format("%tr", cal);
System.out.println(fmt);
fmt.close();
//Display complete time and date information.
fmt = new Formatter();
fmt.format("%tc",
cal);
System.out.println(fmt);
fmt.close();
//Display just hour and minute.
fmt = new Formatter();
fmt.format("%tl:%tM",
cal, cal);
System.out.println(fmt);
fmt.close();
// Display month by name and
number.
fmt = new Formatter();
fmt.format("%tB %tb
%tm", cal, cal, cal);
System.out.println(fmt);
fmt.close();
}
}
Suffix Replaced
By
a Abbreviated
weekday name
A Full
weekday name
b Abbreviated
month name
B Full
month name
c Standard
date and time string formatted as
day
month date hh::mm:ss tzone year
C First
two digits of year
d Day
of month as a decimal (01—31)
D month/day/year
e Day
of month as a decimal (1—31)
F year-month-day
h Abbreviated
month name
H Hour
(00 to 23)
I Hour
(01 to 12)
j Day
of year as a decimal (001 to 366)
k Hour
(0 to 23)
l Hour
(1 to 12)
L Millisecond
(000 to 999)
m Month
as decimal (01 to 13)
M Minute
as decimal (00 to 59)
N Nanosecond
(000000000 to 999999999)
p Locale’s
equivalent of AM or PM in lowercase
Q Milliseconds
from 1/1/1970
r hh:mm:ss
(12-hour format)
R hh:mm
(24-hour format)
S Seconds
(00 to 60)
s Seconds
from 1/1/1970 UTC
T hh:mm:ss
(24-hour format)
y Year
in decimal without century (00 to 99)
Y Year
in decimal including century (0001 to 9999)
z Offset
from UTC
Z Time
zone name
Table
19-14 The Time and Date Format Suffixes
Sample
output is shown here:
03:15:34 PM
Wed Jan 01 15:15:34 CST 2014
3:15
January Jan 01
The %n
and %% Specifiers
The %n and%% format specifiers differ from the others in that they do not
match an argument. Instead, they are simply escape sequences that insert a
character into the output sequence. The %n
inserts a newline. The %% inserts a
percent sign. Neither of these characters can be entered directly into the
format string. Of course, you can also use the standard escape sequence \n to embed a newline character.
Here is
an example that demonstrates the %n
and %% format specifiers:
// Demonstrate the %n and %%
format specifiers.
import java.util.*;
class FormatDemo3 {
public static void
main(String args[]) { Formatter fmt = new Formatter();
fmt.format("Copying
file%nTransfer is %d%% complete", 88);
System.out.println(fmt);
fmt.close();
}
}
It
displays the following output:
Copying file
Transfer is 88% complete
Specifying a Minimum Field Width
An
integer placed between the % sign
and the format conversion code acts as a minimum
field-width specifier. This pads the
output with spaces to ensure that it reaches a certain minimum length. If the string or number is longer than that
minimum, it will still be printed in full. The default padding is done with
spaces. If you want to pad with 0’s, place a 0 before the field-width specifier.
For example, %05d will pad a number
of less than five digits with 0’s so that its total length is five. The
field-width specifier can be used with all format specifiers except %n.
The
following program demonstrates the minimum field-width specifier by applying it
to the %f conversion:
// Demonstrate a field-width
specifier.
import java.util.*;
class FormatDemo4 {
public static void
main(String args[]) {
Formatter fmt = new
Formatter();
fmt.format("|%f|%n|%12f|%n|%012f|",
10.12345, 10.12345, 10.12345);
System.out.println(fmt);
fmt.close();
}
}
This
program produces the following output:
|10.123450| | 10.123450|
|00010.123450|
The
first line displays the number 10.12345 in its default width. The second line
displays that value in a 12-character field. The third line displays the value
in a 12-character field, padded with leading zeros.
The
minimum field-width modifier is often used to produce tables in which the
columns line up. For example, the next program produces a table of squares and
cubes for the numbers between 1 and 10:
// Create a table of squares
and cubes.
import java.util.*;
class FieldWidthDemo {
public static void
main(String args[]) { Formatter fmt;
for(int i=1; i <= 10; i++)
{ fmt = new Formatter();
fmt.format("%4d %4d
%4d", i, i*i, i*i*i); System.out.println(fmt);
fmt.close();
}
}
}
Its
output is shown here:
1 1 1
2 4 8
3 9 27
4 16 64
25 125
36 216
49 343
64 512
81 729
100
1000
Specifying Precision
A precision specifier can be applied to
the %f, %e, %g, and %s format specifiers. It follows the
minimum field-width specifier (if there is one) and consists of a period
followed by an integer. Its exact meaning depends upon the type of data to
which it is applied.
When you
apply the precision specifier to floating-point data using the %f or %e specifiers, it determines the number of decimal places
displayed. For example, %10.4f
displays a number at least ten characters wide with four decimal places. When
using %g, the precision determines
the number of significant digits. The default precision is 6.
Applied
to strings, the precision specifier specifies the maximum field length. For
example, %5.7s displays a string of
at least five and not exceeding seven characters long. If the string is longer
than the maximum field width, the end characters will be truncated.
The
following program illustrates the precision specifier:
// Demonstrate the precision
modifier.
import java.util.*;
class PrecisionDemo {
public static void main(String
args[]) { Formatter fmt = new Formatter();
Format 4 decimal places.
fmt.format("%.4f", 123.1234567); System.out.println(fmt);
fmt.close();
Format to 2 decimal places in a 16 character
field fmt = new Formatter();
fmt.format("%16.2e",
123.1234567); System.out.println(fmt); fmt.close();
Display at most 15 characters in a string.
fmt = new Formatter();
fmt.format("%.15s",
"Formatting with Java is now easy."); System.out.println(fmt);
fmt.close();
}
}
It
produces the following output:
123.1235
1.23e+02 Formatting with
Using the Format Flags
Formatter recognizes a set of format flags that lets you control various aspects
of a conversion. All format flags
are single characters, and a format flag follows the % in a format specification. The flags are shown here:
Flag Effect
– Left
justification
# Alternate
conversion format
0 Output
is padded with zeros rather than spaces
space Positive
numeric output is preceded by a space
+ Positive
numeric output is preceded by a + sign
, Numeric
values include grouping separators
( Negative
numeric values are enclosed within parentheses
Not all flags apply to all format specifiers.
The following sections explain each in detail.
Justifying Output
By
default, all output is right-justified. That is, if the field width is larger
than the data printed, the data will be placed on the right edge of the field.
You can force output to be left-justified by placing a minus sign directly
after the %. For instance, %–10.2f
left-justifies a floating-point number with two decimal places in a
10-character field. For example, consider this program:
// Demonstrate left
justification.
import java.util.*;
class LeftJustify {
public static void
main(String args[]) { Formatter fmt = new Formatter();
//Right justify by default
fmt.format("|%10.2f|", 123.123);
System.out.println(fmt); fmt.close();
//Now, left justify.
fmt = new Formatter();
fmt.format("|%-10.2f|",
123.123);
System.out.println(fmt);
fmt.close();
}
}
It
produces the following output:
| 123.12|
|123.12
|
As you
can see, the second line is left-justified within a 10-character field.
The Space, +, 0, and ( Flags
To cause
a + sign to be shown before positive
numeric values, add the + flag. For
example,
fmt.format("%+d",
100);
creates
this string:
+100
When
creating columns of numbers, it is sometimes useful to output a space before
positive values so that positive and negative values line up. To do this, add
the space flag. For example,
// Demonstrate the space
format specifiers.
import java.util.*;
class FormatDemo5 {
public static void
main(String args[]) {
Formatter fmt = new
Formatter();
fmt.format("% d",
-100); System.out.println(fmt); fmt.close();
fmt = new Formatter();
fmt.format("% d", 100);
System.out.println(fmt);
fmt.close();
fmt = new Formatter();
fmt.format("% d",
-200);
System.out.println(fmt);
fmt.close();
fmt = new Formatter();
fmt.format("% d",
200);
System.out.println(fmt);
fmt.close();
}
}
The
output is shown here:
-100 100 -200 200
Notice
that the positive values have a leading space, which causes the digits in the
column to line up properly.
To show
negative numeric output inside parentheses, rather than with a leading –, use
the ( flag. For example,
fmt.format("%(d",
-100);
creates
this string:
(100)
The 0
flag causes output to be padded with zeros rather than spaces.
The Comma Flag
When
displaying large numbers, it is often useful to add grouping separators, which
in English are commas. For example, the value 1234567 is more easily read when
formatted as 1,234,567. To add grouping specifiers, use the comma (,) flag. For example,
fmt.format("%,.2f",
4356783497.34);
creates
this string:
4,356,783,497.34
The # Flag
The # can be applied to %o, %x, %e, and %f. For %e, and %f, the # ensures that there will be a decimal
point even if there are no decimal digits. If you precede the %x format specifier with a #, the hexadecimal number will be
printed with a 0x prefix. Preceding
the %o specifier with # causes the number to be printed with
a leading zero.
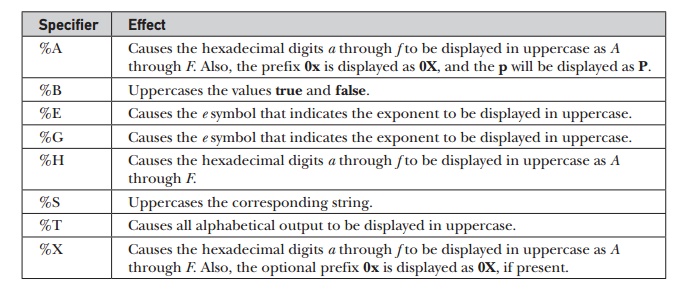
The Uppercase Option
As
mentioned earlier, several of the format specifiers have uppercase versions
that cause the conversion to use uppercase where appropriate. The following
table describes the effect.
Specifier Effect
%A Causes the hexadecimal digits a through f to
be displayed in uppercase as A through F. Also, the prefix 0x is displayed as
0X, and the p will be displayed as P.
%B Uppercases the values true and false.
%E Causes the e symbol that indicates the
exponent to be displayed in uppercase.
%G Causes the e symbol that indicates the
exponent to be displayed in uppercase.
%H Causes the hexadecimal digits a through f to
be displayed in uppercase as A through F.
%S Uppercases the corresponding string.
%T Causes all alphabetical output to be
displayed in uppercase.
%X Causes the hexadecimal digits a through f to
be displayed in uppercase as A
For
example, this call:
fmt.format("%X",
250);
creates
this string:
FA
This
call:
fmt.format("%E",
123.1234);
creates
this string:
1.231234E+02
Using an Argument Index
Formatter includes a very useful feature that lets you
specify the argument to which a format
specifier applies. Normally, format specifiers and arguments are matched in
order, from left to right. That is, the first format specifier matches the
first argument, the second format specifier matches the second argument, and so
on. However, by using an argument index, you can explicitly control which
argument a format specifier matches.
An
argument index immediately follows the %
in a format specifier. It has the following format:
n$
where n is the index of the desired argument,
beginning with 1. For example, consider this example:
fmt.format("%3$d %1$d
%2$d", 10, 20, 30);
It
produces this string:
30 10 20
In this
example, the first format specifier matches 30, the second matches 10, and the
third matches 20. Thus, the arguments are used in an order other than strictly
left to right.
One
advantage of argument indexes is that they enable you to reuse an argument
without having to specify it twice. For example, consider this line:
fmt.format("%d in hex is
%1$x", 255);
It
produces the following string:
255 in hex is ff
As you
can see, the argument 255 is used by both format specifiers.
There is
a convenient shorthand called a relative
index that enables you to reuse the argument matched by the preceding
format specifier. Simply specify <
for the argument index. For example, the following call to format( ) produces the same results as the previous example:
fmt.format("%d in hex is
%<x", 255);
Relative
indexes are especially useful when creating custom time and date formats.
Consider the following example:
//Use relative indexes to simplify the
//creation of a custom time and date format.
import java.util.*;
class FormatDemo6 {
public static void
main(String args[]) {
Formatter fmt = new
Formatter();
Calendar cal =
Calendar.getInstance();
fmt.format("Today is day
%te of %<tB, %<tY", cal);
System.out.println(fmt);
fmt.close();
}
}
Here is
sample output:
Today is day 1 of January,
2014
Because
of relative indexing, the argument cal
need only be passed once, rather than three times.
Closing a Formatter
In
general, you should close a Formatter
when you are done using it. Doing so frees any resources that it was using.
This is especially important when formatting to a file, but it can be important
in other cases, too. As the previous examples have shown, one way to close a Formatter is to explicitly call close( ). However, beginning with JDK
7, Formatter implements the AutoCloseable interface. This means
that it supports the try-with-resources
statement. Using this approach, the Formatter
is automatically closed when it is no longer needed.
The try-with-resources statement is
described in Chapter 13, in connection with files, because files are some of
the most commonly used resources that must be closed. However, the same basic
techniques apply here. For example, here is the first Formatter example reworked to use automatic resource management:
// Use automatic resource
management with Formatter.
import java.util.*;
class FormatDemo {
public static void
main(String args[]) {
try (Formatter fmt = new
Formatter())
{
fmt.format("Formatting
%s is easy %d %f", "with Java", 10, 98.6);
System.out.println(fmt);
}
}
}
The
output is the same as before.
The Java printf( ) Connection
Although
there is nothing technically wrong with using Formatter directly (as the preceding examples have done) when
creating output that will be displayed on the console, there is a more
convenient alternative: the printf( )
method. The printf( ) method
automatically uses Formatter to
create a formatted string. It then displays that string on System.out, which is the
console by default. The printf( )
method is defined by both PrintStream
and PrintWriter. The printf( ) method is described in
Chapter 20.
Related Topics