Chapter: 12th Botany : Chapter 10 : Economically Useful Plants and Entrepreneurial Botany
Entrepreneurial Botany
Entrepreneurial Botany
Entrepreneurial Botany is the study of how new businesses are
created using plant resources as well as the actual process of starting a new
business. An entrepreneur is someone who has an idea and who works to
create a product or service that people will buy, by building an organization
to support the sales. Entrepreneurship is now a popular topic for higher
secondary students, with a focus on developing ideas to create new ventures
among the young people.
Vast opportunities are there for the students of Botany. In the
present scenario students should acquire ability to merge skills and knowledge
in a meaningful way. Converting botanical knowledge into a business idea that
can be put into practice for earning a livelihood is the much-needed training
for the students.
This part of chapter is aimed to help the students to acquire such
skills with practical knowledge to start a few activities of entrepreneurship.
1. Mushroom cultivation
Malnutrition caused by the lack of adequate protein and other
nutrients in daily diet of people is becoming a major health hazard in
developing countries. Under such circumstances, mushroom being a rich source of
protein and other nutrients can be a part and parcel of every day’s food.
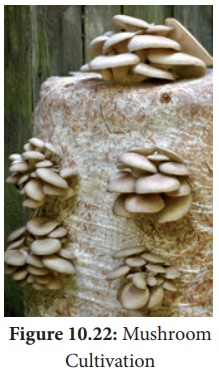
Mushrooms are the fruiting body of edible fungi and is the
most priced commodity among vegetables, not only because of its nutritive value
but also for its characteristic aroma and flavor. M u s h r o o m s are
also called white vegetable. Mushroom cultivation has great scope
in India and in other developing countries. Mushroom cultivation activities can play an important role in
supporting the local economy. Selling mushroom in a local market form a source
of additional income to the family.
Steps involved in mushroom cultivation
·
The straw used for composting should be ripe and golden-yellow in
colour. It should be cut into 2-4 inches and properly sterilized.
·
The culture space should be clean and the ventilators and windows
should be covered with fine wire mesh to prevent the entry of flies and birds.
·
The culture space should be sprayed with 0.1% Nuvan and 5%
Formalin, two days prior to spawning and transferring to bags to cropping
rooms.
·
The spawn used for mushroom should be free from contaminations. Bags
should be filled with 8 kg of wet straw.
·
During spawning running temperature and relative humidity should
be maintained 200C to 300C, 75 to 85% respectively.
·
Proper watering should be done when the growth coverings are
removed. There should not be dry patches on blocks. Excess watering must be
avoided.
·
About 20 cm gap should be maintained in between two bags or
blocks.
·
Picking must be done as their caps become 10 – 12 cm by twisting.
Two kinds of mushrooms are cultivated namely button and
oyster.
2. Single Cell Protein (SCP) Production
Single-cell proteins are the dried cells of microorganism, which
are used as protein supplement in human foods or animal feeds. Microorganisms
that can be used for the production of SCP have the capacity to synthesize proteins
rapidly than higher living organisms. Microorganisms like algae, fungi, yeast
and bacteria are used for this purpose. Here you will learn about the
production of SCP from an algae, Spirulina.
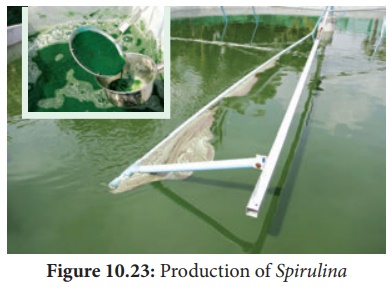
Small scale biomass production of Spirulina.
It requires an aquarium, air pump, nutrients and Spirulina
mother culture.
·
Take a 30 litre capacity aquarium and fill half of it with water.
·
Check if any heavy metal concentration or fluorine or calcium
carbonate in water.
·
Fill the tank with water and add nutrients preferably zarrouk
medium. (Add half of the required nutrients first and add another half
later).
·
To aerate the culture, fix the air pump (avoid centrifugal pump)
after adding nutrients.
·
Add the mother culture to the aquarium. For every 1 liter of water
add 4 gm. mother culture.
·
Place it in sunlight for 10-12 hrs. every day.
·
After a week check the culture and add more water leave it for one
more week, till the biomass becomes dark green.
·
Use a very fine cloth and harvest the algae.
·
Water can be reused in aquarium.
·
Dry the algae for later use.
Single cell protein has a high nutritive value due to higher
protein, vitamin, essential amino acids and lipid content. Hence it can form a
good protein supplement. However it cannot completely replace the conventional
protein sources due to their high nucleic acid content and slower in
digestibility. They may result in allergic reactions.
3. Seaweed Liquid Fertilizer
Seaweed is rich in trace elements and potassium, which makes it
ideal to add to compost in its raw state, to work in as a mulch, or to create a
liquid fertilizer. This is easy to do. Seaweed fertilizer releases about 60
nutrients from which plants can benefit.
·
Collect the seaweed that is not too stinky.
·
Rinse the seaweed to remove the excess salt.
·
Fill a bucket to three quarters way with water. Add as much
seaweed as will fit and leave to soak.
·
Stir the seaweed mix every two to four days.
·
Allow to soak for several weeks to months. So that the fertilizer
grows stronger and stronger over time. (Make sure to keep the brew somewhere so
that its odour will not affect the daily household.)
·
It is ready for use once it no longer carries a smell of ammonium.
·
When it is ready, use as a fertilizer for plants and garden beds
(soil). (It should be diluted with water at a minimum of three parts to one).
Liquid seaweed extract enhances healthy growth of plants, flowers
and vegetables. Regular use will help plants to withstand environmental stress,
pests and disease attack. It can be used as a foliar spray for fruit, flower,
vegetable crops as well as for shrubs and trees. It stimulates healthy growth
for all plants.
4. Organic farming
Organic farming is an alternative agricultural system in which plants/crops are cultivated in natural ways by using biological inputs to maintain soil fertility and ecological balance thereby minimizing pollution and wastage. Indians were organic farmers by default until the green revolution came into practice.
Use of biofertilizers is one of the important components of
integrated organic farm management, as they are cost effective and renewable
source of plant nutrients to supplement the chemical fertilizers for
sustainable agriculture. Several microorganisms and their association with crop
plants are being exploited in the production of biofertilizers. Organic farming
is thus considered as the movement directed towards the philosophy of Back
to Nature.
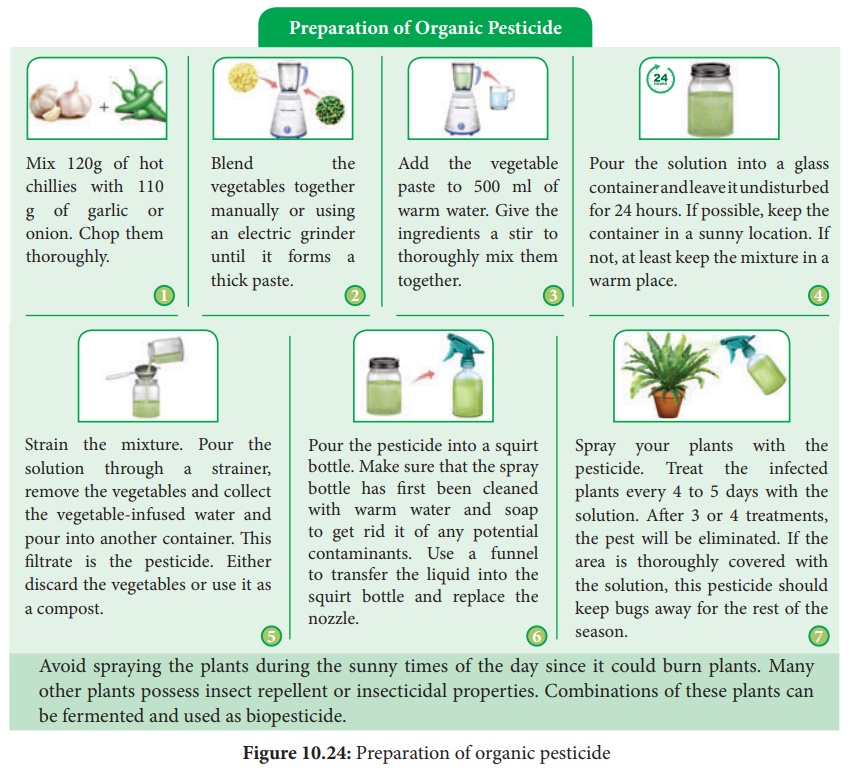
I. Organic Pesticide
Pest like aphids, spider and mites can cause serious damage to
flowers, fruits, and vegetables. These creatures attack the garden in swarms,
and drain the life of the crop and often invite disease in the process. Many
chemical pesticides prove unsafe for human and the environment. It turns fruits
and vegetables unsafe for consumption. Thankfully, there are many homemade,
organic options to turn to war against pests.
Preparation of Organic Pesticide
Refer figure: 10.24
II. Bio-pest repellent
Botanical pest repellent and insecticide made with the dried
leaves of Azadirachta indica
Preparation of Bio-pest repellent
·
Pluck leaves from the neem tree and chop the leaves finely.
·
The chopped up leaves were put in a 50-liter container and fill to
half with water; put the lid on and leave it for 3 days to brew.
·
Using another container, strain the mixture which has brewed for 3
days to remove the leaves, through fine mesh sieve. The filtrate can be sprayed
on the plants to repel pests.
·
To make sure that the pest repellent sticks to the plants, add 100
ml of cooking oil and the same amount of soap water. (The role of the soap
water is to break down the oil, and the role of the oil is to make it stick to
the leaves).
·
The stewed leaves from the mixture can be used in the compost heap
or around the base of the plants.
5. Terrarium
Can portable miniature indoor greenery be commercially sold?
A terrarium is a collection of small plants growing in a
transparent, sealed container. Terrariums are easy to make, low maintenance
gardens, and it can survie indefinitely with minimal water.
How to make a terrarium?
Prepare the Container: Collect whatever interesting glassware
you have or source your container from a store and clean it thoroughly. Plan
how to arrange the plants inside the glassware.
Add Drainage Layers: To create a false drainage layer, fill
the bottom with pebbles so that water can settle and does not flood. The depth
of the pebbles depends on the size of the container.
Add the Activated Charcoal: Cover the pebbles with charcoal to
improve the quality of the terraria by reducing bacteria, fungi and odors.
Add Soil: Add enough soil so that the plant roots will have enough
space to fit and grow.
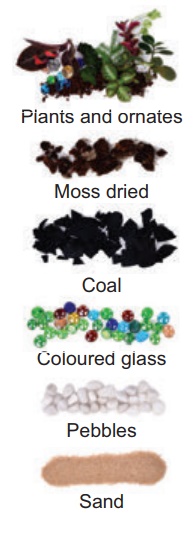
Plant: Select the desired plant such as, Caralluma spp, Asperagus spp, Portulaca spp, Begonia spp, and Chlorophytum spp; trim the roots if they are too long. Dig a pit using a stick, and place the plants’ roots in it.
Add more soil around the top and compact the soil down around the base of the plant. Place
little plants in the container and try to keep them away from the edges of the
container, so that the leaves do not touch the sides. After planting add
accessories like a layer of moss (dried or living), little figurines (old toys,
glass beads, stones) or a layer of miniature rocks. This is the little green
world
Cleaning and Watering: Wipe if there is any dirt along the
sides of the container. Give the terrarium a little bit of water and enjoy the
beautiful miniature living world on your table or in your living room.
Ready made terrariums can fetch a good price as indoor garden
objects or as gift articles.


6. Cultivation of Medicinal and Aromatic Plants
Globalization has brought opportunities and challenges in all
business sectors. Government of India has identified medicinal and aromatic
plants as one of the sectors that can make India a global leader in the 21st
century owing to the treasure of about 8,000 medicinal and 2,500 aromatic
plants that can provide large number of consumer products with national
and international demand. Medicinal plants synthesize a number of secondary
metabolites with pharmacological properties through secondary metabolism. The
chemicals isolated from medicinal plants are used in traditional and
biomedicine systems to treat diseases of both humans and animals. But most of
the medicinal and aromatic plants are still wild collecting.
Central Institute of Medicinal and Aromatic Plants (CIMAP) has
developed a number of high yielding varieties and processing technologies to
promote cultivation of medicinal and aromatic plants. Profitable cultivation of
medicinal plants can be practiced by the entrepreneurs along with traditional
agriculture horticulture crops. They can be profitably intercropped in
plantations. Cultivation of medicinal/aromatic plants offers following
advantages:
•
Generate employment through development of ancillary industries. Foreign
exchange earnings through exports.
•
Crops are not damaged by domestic animals or by birds.
•
Technologies are farmer and eco-friendly.
I. Cultivation of Medicinal Plant - Gloriosa superba
Economically useful part – Seed, Rhizome.
Major constituents - Colchicine (0.5-0.7%) and Colchicoside
Uses - Cures gout, anti-inflammatory, anticancer.

Soil and Climate: Red loamy soils are well suited for
cultivation. Glory lily is cultivated in Tamil Nadu mainly in the parts of
Tirupur, Dindigul, Karur and Salem districts covering an area of 2000 hectare.
Planting: Planting is distributed from June – July. Plough
the field 2 -3 times and add 10 tons of Farmyard Manure during last ploughing.
Trenches of 30 cm depth are formed and tubers are planted at 30 – 45 cm
spacing. The vines are trained over support.
Irrigation: Irrigation should be given immediately after planting.
Subsequent irrigation is given at 5 days intervals of time.
Harvest: Pods are harvested at 160 – 180 days.
II. Cultivation of Aromatic plant - Cymbopogon citratus(Lemongrass)
Lemongrass is a tropical herb packed with strong citrus flavor.
The lemon taste is prized in Asian cooking, as well as in tea, sauces, and
soups.
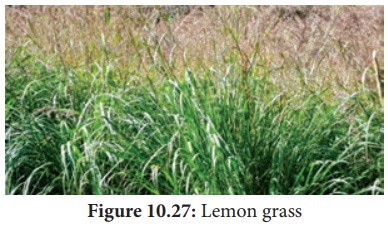
Economic part: Stem base and leaves.
Major constituents: Citronella, geraniol and citronellol.
Uses: The aromatic oil has flavouring properties and is used in
perfumery, cosmetics, confectionary, beverages, mosquito repellents and toilet
cleaners.
Soil and Climate: Lemongrass grow well in full sun, with plenty of
water, in a rich, well-draining soil.
Planting: This plant can thrive well all through the year. Fill
planting holes with composted manure to improve fertility and enhance the
soil’s ability to hold water. If you’re adding several lemongrass plants to
planting beds, space plants 60 cm apart.
Irrigation: Water requirements for this plant will vary dependent upon
the type of soil they grow. Sandy, loose soils require more frequent watering
than silty loam.
Harvest: Start harvesting as soon as plants are 30 cm tall and stem
bases are at least 1.5 cm thick. Cut stalks at ground level.
Related Topics