Chapter: Java The Complete Reference : Introducing GUI Programming with JavaFX : Exploring JavaFX Controls
TreeView - JavaFX
TreeView
One of JavaFX’s most powerful
controls is the TreeView. It
presents a hierarchical view of data in a tree-like format. In this context,
the term hierarchical means some
items are subordinate to others. For example, a tree is commonly used to
display the contents of a file system. In this case, the individual files are
subordinate to the directory that contains them. In a TreeView, branches can be expanded or collapsed on demand by the
user. This allows hierarchical data to be presented in a compact, yet
expandable form. Although TreeView
supports many customization options, you will often find that the default tree
style and capabilities are suitable. Therefore, even though trees support a
sophisticated structure, they are still quite easy to work with.
TreeView implements a conceptually simple, tree-based data structure. A tree
begins with a single root node that indicates the start of
the tree. Under the root are one or more child
nodes There are two types of child nodes: leaf nodes (also called
terminal nodes), which have no
children, and branch nodes, which
form the root nodes of subtrees. A
subtree is simply a tree that is part of a larger tree. The sequence of nodes
that leads from the root to a specific node is called a path.
One very useful feature of TreeView is that it automatically
provides scrollbars when the size of the tree exceeds the dimensions of the
view. Although a fully collapsed tree might be quite small, its expanded form
may be quite large. By automatically adding scrollbars as needed, TreeView lets you use a smaller space
than would ordinarily be possible.
TreeView is a generic class that is defined like this: class TreeView<T>
Here, T specifies the type of value held by an item in the tree. Often,
this will be of type String. TreeView defines two constructors.
This is the one we will use:
TreeView(TreeItem<T> rootNode)
Here, rootNode specifies the root of the tree. Because all nodes descend
from the root, it is the only one that needs to be passed to TreeView.
The items that form the tree
are objects of type TreeItem. At the
outset, it is important to state that TreeItem
does not inherit Node. Thus, TreeItems are not general-purpose
objects. They can be used in a TreeView,
but not as stand-alone controls. TreeItem
is a generic class, as shown here:
class TreeItem<T>
Here, T specifies the type of value held by the TreeItem.
Before you can use a TreeView, you must construct the tree
that it will display. To do this, you must first create the root. Next, add
other nodes to that root. You do this by calling either add( ) or addAll( ) on
the list returned by getChildren( ).
These other nodes can be leaf nodes or subtrees. After the tree has been
constructed, you create the TreeView
by passing the root node to its constructor.
You can handle selection
events in the TreeView in a way
similar to the way that you handle them in a ListView, through the use of a change listener. To do so, first,
obtain the selection model by calling getSelectionModel(
). Then, call selectedItemProperty(
) to obtain the property for the selected item. On that return value, call addListener( ) to add a change
listener. Each time a selection is made, a reference to the new selection will
be passed to the changed( ) handler
as the new value. (See ListView for
more details on handling change events.)
You can obtain the value of a
TreeItem by calling getValue( ). You can also follow the
tree path of an item in either the forward or backward direction. To obtain the
parent, call getParent( ). To obtain
the children, call getChildren( ).
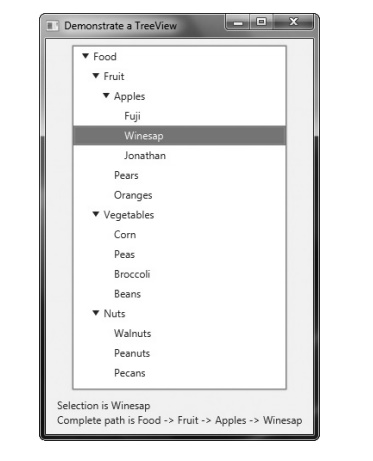
The following example shows
how to build and use a TreeView. The
tree presents a hierarchy of food. The type of items stored in the tree are
strings. The root is labeled Food. Under it are three direct descendent nodes:
Fruit, Vegetables, and Nuts. Under Fruit are three child nodes: Apples, Pears,
and Oranges. Under Apples are three leaf nodes: Fuji, Winesap, and Jonathan.
Each time a selection is made, the name of the item is displayed. Also, the
path from the root to the item is shown. This is done by the repeated use of getParent( ).
// Demonstrate a TreeView
import javafx.application.*; import
javafx.scene.*; import javafx.stage.*; import javafx.scene.layout.*; import
javafx.scene.control.*; import javafx.event.*;
import javafx.beans.value.*; import
javafx.geometry.*;
public class TreeViewDemo extends Application {
Label response;
public static void main(String[] args) {
// Start the JavaFX application by calling
launch().
launch(args);
}
// Override the start() method.
public void start(Stage myStage) {
//Give the stage a title.
myStage.setTitle("Demonstrate a
TreeView");
//Use a FlowPane for the root node. In this
case,
//vertical and horizontal gaps of 10.
FlowPane rootNode = new FlowPane(10, 10);
//Center the controls in the scene.
rootNode.setAlignment(Pos.CENTER);
//Create a scene.
Scene myScene = new Scene(rootNode, 310, 460);
// Set the scene on the stage.
myStage.setScene(myScene);
//Create a label that will report the state of
the
//selected tree item.
response = new Label("No Selection");
//Create tree items, starting with the root.
TreeItem<String> tiRoot = new
TreeItem<String>("Food");
//Now add subtrees, beginning with fruit.
TreeItem<String> tiFruit = new
TreeItem<String>("Fruit");
//Construct the Apple subtree.
TreeItem<String> tiApples = new
TreeItem<String>("Apples");
//Add child nodes to the Apple node.
tiApples.getChildren().add(new
TreeItem<String>("Fuji")); tiApples.getChildren().add(new
TreeItem<String>("Winesap"));
tiApples.getChildren().add(new
TreeItem<String>("Jonathan"));
//Add varieties to the fruit node.
tiFruit.getChildren().add(tiApples);
tiFruit.getChildren().add(new
TreeItem<String>("Pears"));
tiFruit.getChildren().add(new
TreeItem<String>("Oranges"));
//Finally, add the fruit node to the root.
tiRoot.getChildren().add(tiFruit);
//Now, add vegetables subtree, using the same
general process.
TreeItem<String> tiVegetables = new
TreeItem<String>("Vegetables");
tiVegetables.getChildren().add(new
TreeItem<String>("Corn"));
tiVegetables.getChildren().add(new
TreeItem<String>("Peas"));
tiVegetables.getChildren().add(new
TreeItem<String>("Broccoli"));
tiVegetables.getChildren().add(new
TreeItem<String>("Beans"));
tiRoot.getChildren().add(tiVegetables);
//Likewise, add nuts subtree.
TreeItem<String> tiNuts = new
TreeItem<String>("Nuts");
tiNuts.getChildren().add(new
TreeItem<String>("Walnuts"));
tiNuts.getChildren().add(new
TreeItem<String>("Peanuts"));
tiNuts.getChildren().add(new
TreeItem<String>("Pecans"));
tiRoot.getChildren().add(tiNuts);
//Create tree view using the tree just created.
TreeView<String> tvFood = new
TreeView<String>(tiRoot);
//Get the tree view selection model.
MultipleSelectionModel<TreeItem<String>>
tvSelModel =
tvFood.getSelectionModel();
//Use a change listener to respond to a
selection within
//a tree view
tvSelModel.selectedItemProperty().addListener(
new
ChangeListener<TreeItem<String>>() {
public void changed(
ObservableValue<? extends
TreeItem<String>> changed, TreeItem<String> oldVal,
TreeItem<String> newVal) {
// Display the selection and its complete path
from the root.
if(newVal != null) {
//Construct the entire path to the selected
item.
String path = newVal.getValue();
TreeItem<String> tmp =
newVal.getParent(); while(tmp != null) {
path = tmp.getValue() + " -> " +
path; tmp = tmp.getParent();
}
//Display the selection and the entire path.
response.setText("Selection is " +
newVal.getValue() +
"\nComplete path is " + path);
}
}
});
//Add controls to the scene graph.
rootNode.getChildren().addAll(tvFood,
response);
//Show the stage and its scene.
myStage.show();
}
}
Sample output is shown here:
There are two things to pay
special attention to in this program. First, notice how the tree is
constructed. First, the root node is created by this statement:
TreeItem<String> tiRoot = new
TreeItem<String>("Food");
Next, the nodes under the
root are constructed. These nodes consist of the root nodes of subtrees: one
for fruit, one for vegetables, and one for nuts. Next, the leaves are added to
these subtrees. However, one of these, the fruit subtree, consists of another
subtree that contains varieties of apples. The point here is that each branch
in a tree leads either to a leaf or to the root of a subtree. After all of the
nodes have been constructed, the root nodes of each subtree are added to the
root node of the tree. This is done by calling add( ) on the root node. For example, this is how the Nuts subtree
is added to tiRoot.
tiRoot.getChildren().add(tiNuts);
The process is the same for
adding any child node to its parent node.
The second thing to notice in
the program is the way the path from the root to the selected node is
constructed within the change event handler. It is shown here:
String path = newVal.getValue();
TreeItem<String> tmp =
newVal.getParent(); while(tmp != null) {
path = tmp.getValue() + " -> " +
path; tmp = tmp.getParent();
}
The code works like this:
First, the value of the newly selected node is obtained. In this example, the
value will be a string, which is the node’s name. This string is assigned to the
path string. Then, a temporary
variable of type TreeItem<String> is
created and initialized to refer to
the parent of the newly selected node. If the newly selected node does not have
a parent, then tmp will be null.
Otherwise, the loop is entered, within which each parent’s value (which is its
name in this case) is added to path.
This process continues until the root node of the tree (which has no parent) is
found.
Although the preceding shows
the basic mechanism required to handle a TreeView,
it is important to point out that several customizations and options are
supported. TreeView is a powerful
control that you will want to examine fully on your own.
Related Topics