Chapter: Java The Complete Reference : Introducing GUI Programming with JavaFX : Exploring JavaFX Controls
CheckBox - JavaFX
CheckBox
The CheckBox class encapsulates the functionality of a check box. Its
immediate superclass is ButtonBase.
Although you are no doubt familiar with check boxes because they are widely
used controls, the JavaFX check box is a bit more sophisticated than you may at
first think. This is because CheckBox
supports three states. The first two are checked or unchecked, as you would
expect, and this is the default behavior. The third state is indeterminate (also called undefined). It is typically used to
indicate that the state of the check box has not been set or that it is not relevant to a specific
situation. If you need the indeterminate state, you will need to explicitly
enable it.
CheckBox defines two constructors. The first is the default constructor. The
second lets you specify a string
that identifies the box. It is shown here:
CheckBox(String str)
It creates a check box that
has the text specified by str as a
label. As with other buttons, a CheckBox
generates an action event when it is selected.
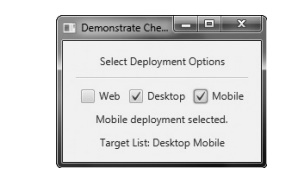
Here is a program that
demonstrates check boxes. It displays check boxes that let the user select
various deployment options, which are Web, Desktop, and Mobile. Each time a
check box state changes, an action event is generated and handled by displaying
the new state (selected or cleared) and by displaying a list of all selected
boxes.
// Demonstrate Check Boxes.
import javafx.application.*; import
javafx.scene.*;
import javafx.stage.*; import
javafx.scene.layout.*; import javafx.scene.control.*; import javafx.event.*;
import javafx.geometry.*;
public class CheckboxDemo extends Application {
CheckBox cbWeb;
CheckBox cbDesktop;
CheckBox cbMobile;
Label response;
Label allTargets;
String targets = "";
public static void main(String[] args) {
// Start the JavaFX application by calling
launch().
launch(args);
}
// Override the start() method.
public void start(Stage myStage) {
//Give the stage a title.
myStage.setTitle("Demonstrate
Checkboxes");
//Use a FlowPane for the root node. In this
case,
//vertical and horizontal gaps of 10.
FlowPane rootNode = new FlowPane(10, 10);
//Center the controls in the scene.
rootNode.setAlignment(Pos.CENTER);
//Create a scene.
Scene myScene = new Scene(rootNode, 230, 140);
// Set the scene on the stage.
myStage.setScene(myScene);
Label heading = new Label("Select
Deployment Options");
//Create a label that will report the state of
the
//selected check box.
response = new Label("No Deployment
Selected");
//Create a label that will report all targets
selected.
allTargets = new Label("Target List:
<none>");
//Create the check boxes.
cbWeb = new CheckBox("Web");
cbDesktop = new CheckBox("Desktop");
cbMobile = new CheckBox("Mobile");
// Handle action events for the check boxes.
cbWeb.setOnAction(new
EventHandler<ActionEvent>() {
public void handle(ActionEvent ae) {
if(cbWeb.isSelected())
response.setText("Web deployment
selected."); else
response.setText("Web deployment
cleared.");
showAll();
}
});
cbDesktop.setOnAction(new
EventHandler<ActionEvent>() {
public void handle(ActionEvent ae) {
if(cbDesktop.isSelected())
response.setText("Desktop deployment selected.");
else
response.setText("Desktop deployment
cleared.");
showAll();
}
});
cbMobile.setOnAction(new
EventHandler<ActionEvent>() {
public void handle(ActionEvent ae) {
if(cbMobile.isSelected())
response.setText("Mobile deployment selected.");
else
response.setText("Mobile deployment
cleared.");
showAll();
}
});
//Use a separator to better organize the
layout.
Separator separator = new Separator();
separator.setPrefWidth(200);
//Add controls to the scene graph.
rootNode.getChildren().addAll(heading,
separator, cbWeb, cbDesktop, cbMobile, response, allTargets);
// Show the stage and its scene.
myStage.show();
}
// Update and show the targets list.
void showAll() {
targets = "";
if(cbWeb.isSelected()) targets = "Web
";
if(cbDesktop.isSelected()) targets +=
"Desktop "; if(cbMobile.isSelected()) targets += "Mobile";
if(targets.equals("")) targets =
"<none>";
allTargets.setText("Target List: " +
targets);
}
}
Sample output is shown here:
The operation of this program
is straightforward. Each time a check box is changed, an action command is
generated. To determine if the box is checked or unchecked, the isSelected( ) method is called.
As mentioned, by default, CheckBox implements two states: checked
and unchecked. If you want to add the indeterminate state, it must be
explicitly enabled. To do this, call setAllowIndeterminate(
), shown here:
final void
setAllowIndeterminate(boolean enable)
In this case, if enable is true, the indeterminate state is enabled. Otherwise, it is
disabled. When the indeterminate state is enabled, the user can select between
checked, unchecked, and indeterminate.
You can determine if a check
box is in the indeterminate state by calling isIndeterminate( ), shown here:
final boolean
isIndeterminate( )
It returns true if the checkbox state is
indeterminate and false otherwise.
You can see the effect of a
three-state check box by modifying the preceding program. First, enable the
indeterminate state on the check boxes by calling setAllowIndeterminate( ) on each check box, as shown here:
cbWeb.setAllowIndeterminate(true);
cbDesktop.setAllowIndeterminate(true);
cbMobile.setAllowIndeterminate(true);
Next, handle the
indeterminate state inside the action event handlers. For example, here is the
modified handler for cbWeb:
cbWeb.setOnAction(new
EventHandler<ActionEvent>() { public void handle(ActionEvent ae) {
if(cbWeb.isIndeterminate())
response.setText("Web deployment
indeterminate."); else if(cbWeb.isSelected())
response.setText("Web deployment
selected."); else
response.setText("Web deployment
cleared.");
showAll();
}
});
Now, all three states are
tested. Update the other two handlers in the same way. After making these
changes, the indeterminate state can be selected, as this sample output shows:
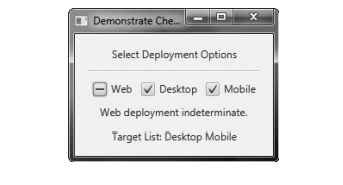
Here, the Web check box is
indeterminate.
Related Topics