Chapter: Java The Complete Reference : Introducing GUI Programming with JavaFX : Exploring JavaFX Controls
ListView - JavaFX
ListView
Another commonly used control
is the list view, which in JavaFX is encapsulated by ListView. List views are controls that display a list of entries
from which you can select one or more. Because of their ability to make
efficient use of limited screen space, list views are popular alternatives to
other types of selection controls.
ListView is a generic class that is declared like this: class ListView<T>
Here, T specifies the type of entries stored in the list view. Often,
these are entries of type String,
but other types are also allowed.
ListView defines two constructors. The first is the default constructor,
which creates an empty ListView. The second lets you specify
the list of entries in the list. It is shown here:
ListView(ObservableList<T>
list)
Here, list specifies a list of the items that will be displayed. It is an
object of type ObservableList, which
defines a list of observable objects. It inherits java.util.List. Thus, it
supports the standard collection methods. ObservableList
is packaged in javafx.collections.
Probably the easiest way to
create an ObservableList for use in
a ListView is to use the factory
method observableArrayList( ), which
is a static method defined by the FXCollections
class (which is also packaged in javafx.collections).
The version we will use is shown here:
static <E>
ObservableList<E> observableArrayList( E ... elements)
In this case, E specifies the type of elements, which
are passed via elements.
By default, a ListView allows only one item in the
list to be selected at any one time. However, you can allow multiple selections
by changing the selection mode. For now, we will use the default,
single-selection model.
Although ListView provides a default size, sometimes you will want to set
the preferred height and/or width to best match your needs. One way to do this
is to call the setPrefHeight( ) and setPrefWidth( ) methods, shown here:
final void
setPrefHeight(double height) final
void setPrefWidth(double width)
Alternatively, you can use a
single call to set both dimensions at the same time by use of setPrefSize( ), shown here:
void setPrefSize(double width, double height)
There are two basic ways in
which you can use a ListView. First,
you can ignore events generated by the list and simply obtain the selection in
the list when your program needs it. Second, you can monitor the list for
changes by registering a change listener. This lets you respond each time the user
changes a selection in the list. This is the approach used here.
To listen for change events,
you must first obtain the selection model used by the ListView. This is done by calling getSelectionModel( ) on the list. It is shown here:
final MultipleSelectionModel<T>
getSelectionModel( )
It returns a reference to the
model. MultipleSelectionModel is a
class that defines the model used for multiple selections, and it inherits SelectionModel. However, multiple
selections are allowed in a ListView
only if multiple-selection mode is turned on.
Using the model returned by getSelectionModel( ), you will obtain a
reference to the selected item property that defines what takes place when an
element in the list is selected. This is done by calling selectedItemProperty( ), shown next:
final
ReadOnlyObjectProperty<T> selectedItemProperty( )
You will add the change
listener to this property.
The following example puts
the preceding discussion into action. It creates a list view that displays
various types of transportation, allowing the user to select one. When one is
chosen, the selection is displayed.
// Demonstrate a list view.
import javafx.application.*; import
javafx.scene.*; import javafx.stage.*; import javafx.scene.layout.*; import
javafx.scene.control.*; import javafx.geometry.*; import javafx.beans.value.*;
import javafx.collections.*;
public class ListViewDemo extends Application {
Label response;
public static void main(String[] args) {
// Start the JavaFX application by calling
launch().
launch(args);
}
// Override the start() method.
public void start(Stage myStage) {
//Give the stage a title.
myStage.setTitle("ListView Demo");
//Use a FlowPane for the root node. In this
case,
//vertical and horizontal gaps of 10.
FlowPane rootNode = new FlowPane(10, 10);
//Center the controls in the scene.
rootNode.setAlignment(Pos.CENTER);
Create a scene.
Scene myScene = new Scene(rootNode, 200, 120);
//Set the scene on the stage.
myStage.setScene(myScene);
//Create a label.
response = new Label("Select Transport
Type");
//Create an ObservableList of entries for the
list view.
ObservableList<String> transportTypes =
FXCollections.observableArrayList(
"Train", "Car", "Airplane" );
//Create the list view.
ListView<String> lvTransport = new ListView<String>(transportTypes);
//Set the preferred height and width.
lvTransport.setPrefSize(80, 80);
//Get the list view selection model.
MultipleSelectionModel<String> lvSelModel
=
lvTransport.getSelectionModel();
//Use a change listener to respond to a change
of selection within
//a list view.
lvSelModel.selectedItemProperty().addListener(
new ChangeListener<String>() { public
void changed(ObservableValue<? extends String> changed,
String oldVal, String newVal) {
// Display the selection.
response.setText("Transport selected is
" + newVal);
}
});
//Add the label and list view to the scene
graph.
rootNode.getChildren().addAll(lvTransport,
response);
//Show the stage and its scene.
myStage.show();
}
}
Sample output is shown here:
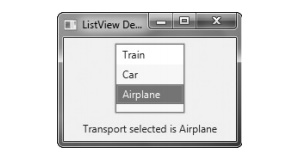
In the program, pay special
attention to how the ListView is
constructed. First, an ObservableList is
created by this line:
ObservableList<String> transportTypes =
FXCollections.observableArrayList( "Train", "Car",
"Airplane" );
It uses the observableArrayList( ) method to create
a list of strings. Then, the ObservableList
is used to initialize a ListView, as
shown here:
ListView<String> lvTransport = new
ListView<String>(transportTypes);
The program then sets the
preferred width and height of the control. Now, notice how the selection model
is obtained for lvTransport:
MultipleSelectionModel<String> lvSelModel
= lvTransport.getSelectionModel();
As explained, ListView uses MultipleSelectionModel, even when only a single selection is allowed.
The selectedItemProperty( ) method
is then called on the model and a change listener is registered to the returned
item.
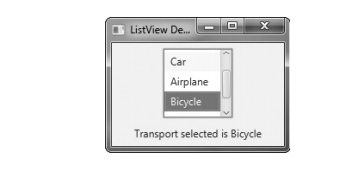
ListView
Scrollbars
One very useful feature of ListView is that when the number of
items in the list exceeds the number that can be displayed within its
dimensions, scrollbars are automatically added. For example, if you change the
declaration of transportTypes so
that it includes "Bicycle" and "Walking", as shown here:
ObservableList<String> transportTypes =
FXCollections.observableArrayList( "Train", "Car",
"Airplane",
"Bicycle", "Walking" );
the lvTransport control now looks like the one shown here:
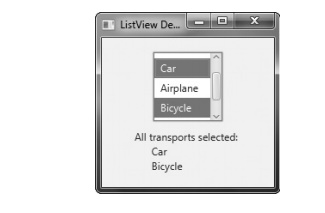
Enabling
Multiple Selections
If you want to allow more
than one item to be selected, you must explicitly request it. To do so, you
must set the selection mode to SelectionMode.MULTIPLE
by calling setSelectionMode( ) on
the ListView model. It is shown
here:
final void
setSelectionMode(SelectionMode mode)
In this case, mode must be either SelectionMode.MULTIPLE or SelectionMode.SINGLE.
When multiple-selection mode is enabled, you can obtain the list of the
selections two
ways: as a list of selected
indices or as a list of selected items. We will use a list of selected items,
but the procedure is similar when using a list of the indices of the selected
items. (Note, indexing of items in a ListView
begins at zero.)
To get a list of the selected
items, call getSelectedItems( ) on
the selection model. It is shown here:
ObservableList<T>
getSelectedItems( )
It returns an ObservableList of the items. Because ObservableList extends java.util.List, you can access the
items in the list just as you would any other List collection.
To experiment with multiple
selections, you can modify the preceding program as follows. First, make lvTransport final so it can be accessed
within the change event handler. Next, add this line:
lvTransport.getSelectionModel().setSelectionMode(SelectionMode.MULTIPLE);
It enables multiple-selection
mode for lvTransport. Finally,
replace the change event handler with the one shown here:
lvSelModel.selectedItemProperty().addListener(
new ChangeListener<String>() { public
void changed(ObservableValue<? extends String> changed,
String oldVal, String newVal) {
String selItems = "";
ObservableList<String> selected =
lvTransport.getSelectionModel().getSelectedItems();
// Display the
selections.
for(int i=0; i < selected.size(); i++)
selItems +=
"\n " + selected.get(i);
response.setText("All transports selected:
" + selItems);
}
});
After making these changes,
the program will display all selected forms of transports, as the following
output shows:
Related Topics