Chapter: Java The Complete Reference : Introducing GUI Programming with JavaFX : Exploring JavaFX Controls
RadioButton - JavaFX
RadioButton
Another type of button
provided by JavaFX is the radio button.
Radio buttons are a group of mutually exclusive buttons, in which only one
button can be selected at any one time. They are supported by the RadioButton class, which extends both ButtonBase and ToggleButton. It also implements the Toggle interface. Thus, a radio button is a specialized form of a
toggle button. You have almost certainly seen radio buttons in action because
they are the primary control employed when the user must select only one option
among several alternatives.
To create a radio button, we
will use the following constructor: RadioButton(String str)
Here, str is the label for the button. Like other buttons, when a RadioButton is used, an action event is
generated.
For their mutually exclusive
nature to be activated, radio buttons must be configured into a group. Only one
of the buttons in the group can be selected at any time. For example,
if a user presses a radio
button that is in a group, any previously selected button in that group is
automatically deselected. A button group is created by the ToggleGroup class, which is packaged in javafx.scene.control. ToggleGroup
provides only a default constructor.
Radio buttons are added to
the toggle group by calling the setToggleGroup(
) method, defined by ToggleButton,
on the button. It is shown here:
final void
setToggleGroup(ToggleGroup tg)
Here, tg is a reference to the toggle button group to which the button is
added. After all radio buttons have been added to the same group, their
mutually exclusive behavior will be enabled.
In general, when radio
buttons are used in a group, one of the buttons is selected when the group is first
displayed in the GUI. Here are two ways to do this.
First, you can call setSelected( ) on the button that you
want to select. It is defined by ToggleButton
(which is a superclass of
RadioButton). It is shown here:
final void
setSelected(boolean state)
If state is true, the
button is selected. Otherwise, it is deselected. Although the button is
selected, no action event is generated.
A second way to initially
select a radio button is to call fire( )
on the button. It is shown here:
void fire( )
This method results in an
action event being generated for the button if the button was previously not
selected.
There are a number of
different ways to use radio buttons. Perhaps the simplest is to simply respond
to the action event that is generated when one is selected. The following
program shows an example of this approach. It uses radio buttons to allow the
user to select a type of transportation.
A simple demonstration of Radio Buttons.
//This program responds to the action events
generated
//by a radio button selection. It also shows
how to
//fire the button under program control.
import javafx.application.*; import
javafx.scene.*; import javafx.stage.*; import javafx.scene.layout.*; import
javafx.scene.control.*; import javafx.event.*;
import javafx.geometry.*;
public class RadioButtonDemo extends
Application {
Label response;
public static void main(String[] args) {
// Start the JavaFX application by calling
launch().
launch(args);
}
// Override the start() method.
public void start(Stage myStage) {
//Give the stage a title.
myStage.setTitle("Demonstrate Radio
Buttons");
//Use a FlowPane for the root node. In this
case,
//vertical and horizontal gaps of 10.
FlowPane rootNode = new FlowPane(10, 10);
//Center the controls in the scene.
rootNode.setAlignment(Pos.CENTER);
//Create a scene.
Scene myScene = new Scene(rootNode, 220, 120);
//Set the scene on the stage.
myStage.setScene(myScene);
//Create a label that will report the
selection.
response = new Label("");
//Create the radio buttons.
RadioButton rbTrain = new
RadioButton("Train"); RadioButton rbCar = new
RadioButton("Car"); RadioButton rbPlane = new
RadioButton("Airplane");
//Create a toggle group.
ToggleGroup tg = new ToggleGroup();
//Add each button to a toggle group.
rbTrain.setToggleGroup(tg);
rbCar.setToggleGroup(tg);
rbPlane.setToggleGroup(tg);
//Handle action events for the radio buttons.
rbTrain.setOnAction(new
EventHandler<ActionEvent>() {
public void handle(ActionEvent ae) {
response.setText("Transport selected is train.");
}
});
rbCar.setOnAction(new
EventHandler<ActionEvent>() { public void handle(ActionEvent ae) {
response.setText("Transport selected is
car.");
}
});
rbPlane.setOnAction(new
EventHandler<ActionEvent>() { public void handle(ActionEvent ae) {
response.setText("Transport selected is
airplane.");
}
});
//Fire the event for the first selection. This
causes
//that radio button to be selected and an
action event
//for that button to occur.
rbTrain.fire();
//Add the label and buttons to the scene graph.
rootNode.getChildren().addAll(rbTrain, rbCar,
rbPlane, response);
//Show the stage and its scene.
myStage.show();
}
}
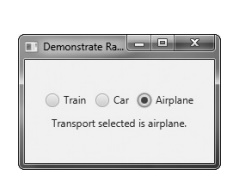
Sample output is shown here:
In the program, pay special
attention to how the radio buttons and the toggle group are created. First, the
buttons are created using this sequence:
RadioButton rbTrain = new
RadioButton("Train");
RadioButton rbCar = new
RadioButton("Car");
RadioButton rbPlane = new
RadioButton("Airplane");
Next, a ToggleGroup is constructed:
ToggleGroup tg = new ToggleGroup();
Finally, each radio button is
added to the toggle group:
rbTrain.setToggleGroup(tg);
rbCar.setToggleGroup(tg);
rbPlane.setToggleGroup(tg);
As explained, radio buttons
must be part of a toggle group in order for their mutually exclusive behavior
to be activated.
After the event handlers for
each radio button have been defined, the rbTrain
button is selected by calling fire( )
on it. This causes that button to be selected and an action event to be
generated for it. This causes the button to be initialized with the default
selection.
Handling
Change Events in a Toggle Group
Although there is nothing
wrong, per se, with managing radio buttons by handling action events, as just
shown, sometimes it is more appropriate (and easier) to listen to the entire
toggle group for changes. When a change takes place, the event handler can
easily determine which radio button has been selected and take action
accordingly. To use this approach, you must register a ChangeListener on the toggle group. When a change event occurs, you
can then determine which button was selected. To try this approach, remove the
action event handlers and the call to fire(
) from the preceding program and substitute the following:
//Use a change listener to respond to a change
of selection within
//the group of radio buttons.
tg.selectedToggleProperty().addListener(new
ChangeListener<Toggle>() {
public void changed(ObservableValue<?
extends Toggle> changed,
Toggle oldVal, Toggle newVal) {
//Cast new to RadioButton.
RadioButton rb = (RadioButton) newVal;
//Display the selection.
response.setText("Transport selected is
" + rb.getText());
}
});
//Select the first button. This will cause a
change event
//on the toggle group.
rbTrain.setSelected(true);
You will also need to add
this import statement:
import javafx.beans.value.*;
It supports the ChangeListener interface.
The output from this program
is the same as before; each time a selection is made, the response label is updated. However, in this case, only one event
handler is needed for the enter
group, rather than three (one for each button). Let’s now look at this code
more closely.
First, a change event
listener is registered for the toggle group. To listen for change events, you
must implement the ChangeListener
interface. This is done by calling addListener(
) on the object returned by
selectedToggleProperty( ). The
ChangeListener interface defines only one method, called changed( ). It is shown here:
void changed(ObservableValue<?
extends T> changed, T oldVal, T newVal)
In this case, changed is the instance of ObservableValue<T>, which
encapsulates an object that can be watched for changes. The oldVal and newVal parameters pass the previous value and the new value, respectively.
Thus, in this case, newVal holds a
reference to the radio button that has just been selected.
In this example, the setSelected( ) method, rather than fire( ), is called to set the initial
selection. Because setting the initial selection causes a change to the toggle
group, it results in a change event being generated when the program first
begins. You can also use fire( ),
but setSelected( ) was used to
demonstrate that any change to the toggle group generates a change event.
An
Alternative Way to Handle Radio Buttons
Although handling events
generated by radio buttons is often useful, sometimes it is more appropriate to
ignore those events and simply obtain the currently selected button when that
information is needed. This approach is demonstrated by the following program.
It adds a button called Confirm Transport Selection. When this button is
pressed, the currently selected radio button is obtained and then the selected
transport is displayed in a label. When you try the program, notice that changing
the selected radio button does not cause the confirmed transport to change
until you press the Confirm Transport Selection button.
//This radio button example demonstrates how
the
//currently selected button in a group can be
obtained
//under program control, when it is needed,
rather
//than responding to action or change events.
//In this example, no events related to the
radio
//buttons are handled. Instead, the current
selection
//is simply obtained when the Confirm Transport
Selection push
//button is pressed.
import javafx.application.*; import
javafx.scene.*; import javafx.stage.*; import javafx.scene.layout.*; import
javafx.scene.control.*; import javafx.event.*;
import javafx.geometry.*;
public class RadioButtonDemo2 extends Application
{
Label response;
ToggleGroup tg;
public static void main(String[] args) {
// Start the JavaFX application by calling
launch().
launch(args);
}
// Override the start() method.
public void start(Stage myStage) {
//Give the stage a title.
myStage.setTitle("Demonstrate Radio
Buttons");
//Use a FlowPane for the root node. In this
case,
//vertical and horizontal gaps of 10.
FlowPane rootNode = new FlowPane(10, 10);
//Center the controls in the scene.
rootNode.setAlignment(Pos.CENTER);
//Create a scene.
Scene myScene = new Scene(rootNode, 200, 140);
// Set the scene on the stage.
myStage.setScene(myScene);
// Create two labels.
Label choose = new Label(" Select a Transport Type ");
response = new Label("No transport
confirmed");
// Create push button used to confirm the
selection.
Button btnConfirm = new Button("Confirm Transport Selection");
// Create the radio buttons.
RadioButton rbTrain = new RadioButton("Train");
RadioButton rbCar
= new RadioButton("Car");
RadioButton rbPlane = new RadioButton("Airplane");
Create a toggle group. tg = new ToggleGroup();
//Add each button to a toggle group.
rbTrain.setToggleGroup(tg);
rbCar.setToggleGroup(tg); rbPlane.setToggleGroup(tg);
//Initially select one of the radio buttons.
rbTrain.setSelected(true);
//Handle action events for the confirm button.
btnConfirm.setOnAction(new
EventHandler<ActionEvent>() {
public void handle(ActionEvent ae) {
//Get the radio button that is currently
selected.
RadioButton rb = (RadioButton) tg.getSelectedToggle();
//Display the selection.
response.setText(rb.getText() + " is
confirmed.");
}
});
//Use a separator to better organize the
layout.
Separator separator = new Separator();
separator.setPrefWidth(180);
//Add the label and buttons to the scene graph.
rootNode.getChildren().addAll(choose, rbTrain,
rbCar, rbPlane, separator, btnConfirm, response);
// Show the stage and its scene.
myStage.show();
}
}
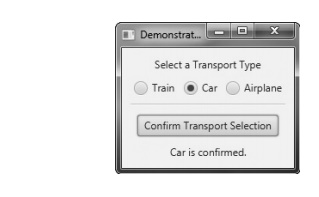
The output from the program
is shown here:
Most of the program is easy to
understand, but two key points are of special interest. First, inside the
action event handler for the btnConfirm
button, notice that the selected radio button is obtained by the following
line:
RadioButton rb = (RadioButton)
tg.getSelectedToggle();
Here, the getSelectedToggle( ) method (defined by
ToggleGroup) obtains the current
selection for the toggle group (which, in this case, is a group of radio
buttons). It is shown here:
final Toggle
getSelectedToggle( )
It returns a reference to the
Toggle that is selected. In this
case, the return value is cast to RadioButton
because this is the type of button in the group.
The second thing to notice is
the use of a visual separator, which is created by this sequence:
Separator separator = new Separator();
separator.setPrefWidth(180);
The Separator class creates a line, which can be either vertical or
horizontal. By default, it creates a horizontal line. (A second constructor
lets you choose a vertical separator.) Separator
helps visually organize the layout of controls. It is packaged in javafx.scene.control. Next, the width
of the separator line is set by calling setPrefWidth(
), passing in the width.
Related Topics