Textiles and Dress Designing - T-Shirt | 12th Textiles and Dress Designing : Practical
Chapter: 12th Textiles and Dress Designing : Practical
T-Shirt
T-Shirt
learning objectives
·
To increase the skills in stitching a T-Shirt.
·
To know about what kind of fabric should be selected and the ways
of stitchinga T-Shirt.
Introduction
·
T-Shirt is worn by all men irrespective of their age.
·
Today T-Shirt is used by women also.
·
Yoke can be attached on the back side of T-Shirts to add
interests.
·
Collar can be attached along with the neck line.
Tools required
Measuring Tools - Measuring Tape, Scale.
Drawing Tools - Brown Paper, Bell Pin, Table, Pencil.
Marking Tools - Tailor’s Chalk, Marking Wheel.
Cutting Tools - Scissors, Seam Rippers, Shears.
Stitching Tools - Thread, Hand Needle, Sewing Machine.
Ironing Tools - Ironing Board, Iron Box.
Fasteners Attachments - Buttons, Button Holes.
Suitable materials
Cotton, Polyester, Terry Cotton, Spun.
Material used for stitching
1 meter
Measurements
Age - 5 Years
Chest Circumference - 65 cm
Length - 45 cm
Shoulder Width - 26 cm
Arm Scye - 26 cm
Sleeve Length - 13 cm + 2 cm (Seam allowance)
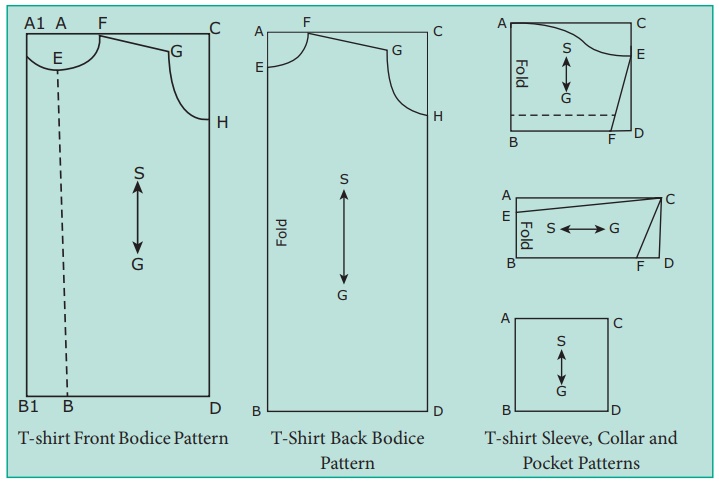
Drafting procedure
Front
AB = CD - Rectangle
AC = BD - 1/4 Chest Circumference (16 cm) + 3 cm (for ease)
AB = CD - Length (45 cm) + Hem allowance (4 cm)
A1 – A = B1 – B - Front Opening (3 cm)
AE - Front Neck Depth (5 cm)
AF - Neck Width (5 cm)
AG - 1/2 Shoulder Width (13 cm)
GH - 1/2 Upper Arm Circumference (13 cm)
HD - Side Seam
SG - Straight Grain
Back bodice
AB = CD - Length (45 cm) + Hem Allowance (4 cm)
AC – BD - 1/4 Chest Circumference (16 cm) + 3 cm (for ease)
AE - Back Neck Width (4 cm)
AF - Neck Width (5 cm)
AG - 1/2 Shoulder Width (13 cm)
GH - 1/2 Upper Arm Circumference (13 cm)
HD - Side Seam
SG - Straight Grain
Drafting procedure for sleeve
AB = CD - Sleeve Length + Hem (13 cm + 3 cm)
AC = BD - 1/2 Upper Arm Circumference (13 cm)
CE - 5 cm
DF - 2 cm
BF - Sleeve Hem
EF - Side Seam
Drafting procedure for collar
AB = CD - Collar Height (8 cm)
AC = BD - Collar Width (16 cm)
DF - 1.5 cm
AE - 1 cm
Drafting procedure for pocket
AB = CD - Height (12 cm)
AC = BD - Width (10 cm)
Cutting lines
Front Bodices - A1 E F G H D B1
Back Bodice - E F G H D B
Sleeve - A E F B
Collar - E C F B
Layout
·
Cut the shirt front bodice pattern such that the selvedges are in
the center front as plackets.
·
Cut the shirt back bodices pattern on lengthwise grain such that
the center back line is on fold.
·
Cut the sleeve pattern on length wise grain with enough material
for hem allowances.
·
Cut the collar on the cross wise grain with the center on fold.
Marking and cutting
·
Place the paper patterns on the fabric and cut with enough
allowances.
Garment components
Shirt Front - 2 Pieces
Shirt Back - 1 Piece
Sleeve - 2 Pieces
Collar - 2 Pieces
Stitching Method
·
Attach the front and back bodice along with the shoulder line.
·
Sew the pocket on the left side of the front bodice pattern.
·
Join the side seams
·
Hem the sleeves and join the side seams.
·
The sleeve should be attached to the bodice part in its arm hole.
·
Join the two collar on all sides except the neck line.
·
Turn it to the right side and make a row of stitches.
·
Join the collar to the neck line.
Finishing
·
Along the opening fix the button and button hole.
·
Cut the unwanted hanging threads.
·
Iron and fold the finished garment.
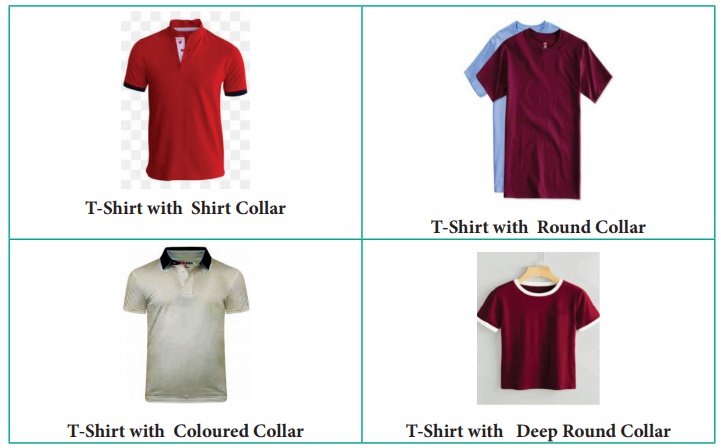
Types of T-Shirt
Related Topics