Chapter: Pharmaceutical Drug Analysis: Theory and Technique of Quantitative Analysis
Volumetric Apparatus
VOLUMETRIC APPARATUS
As we have seen that the volumetric analysis essentially
requires the precise and accurate measurement of weights and volumes of
interacting solutions. However, the weights are measured upto the fourth place
of decimal by using a manually operated good analytical balance or a single-pan
electrical balance that need to be calibrated periodically with the help of a
standard weight box.
In the broader sense, volumetric apparatus may be divided
into two categories, namely :
(a) To deliver
a definite volume of liquid, and
(b) To contain
a definite volume of liquid.
1. Volumetric Apparatus Meant to Deliver a Definite Volume of Liquid
The two specific volumetric apparatus meant to deliver a
defnite volume of liquid are burettes and pipettes which will be discussed very
briefly below :
1.1. Burettes
Various official
compendia specifies a standard temperature (°C) for glass volumetric
apparatus as mentioned hereunder :
Pharmacopoeia of India (IP) : 27°C ;
United States Pharmacopoeia (USP) and National
Formulatory (NF) : 25°C ;
National Bureau of Standards (NBS) : 20°C.
A burette is a graduated glass tube of uniform bore
throughout the entire length, used for the accurate delivery and measurement of
variable volumes of liquids. Burettes are graduated into millilitres (ml) and
1/10 millilitres (0.1 ml) and are made of varying capacity ranging from 1 ml to
100 ml ; however, the most common size is the 50 ml burette that is used
invariably and conveniently for most volumetric titrations. They are usually
closed at the bottom either by a Teflon or glass stopcock to monitor and
control the outflow of liquid.
Specifications : The design, construction and
capacity of volumetric glassware must be in accordance with those laid down by the Indian Standards Institution (ISI).
The tolerances on capacity for burettes, as speci-fied in the relevant Indian
Standards Institution, specifications are given in Table 2.1.

British Standards Institution
(B.S. 846 : 1962) has laid down specifications for burettes and these are produced to either Class ‘A’ or Class
‘B’ specifications. All Class ‘A’ and a few of Class ‘B’ burettes have
graduations that extend right round the barrel (or stem) of the burette to
minimise errors due to parallax while taking the exact burette reading. It may
be noted that Class ‘B’ burettes are normally graduated on one side only.
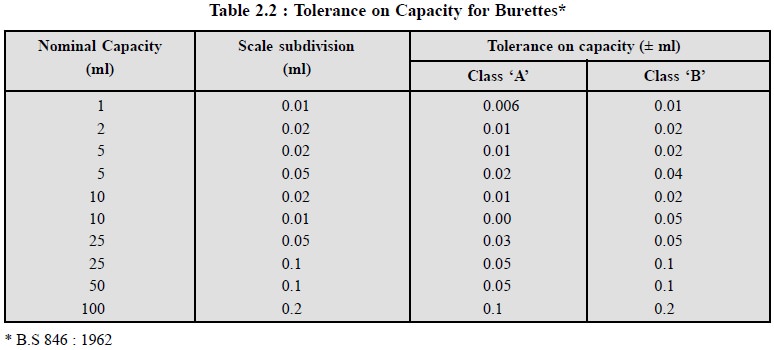
Permitted tolerances on capacity for burettes used in common practice are
stated in Table 2.2.

In fact, the tolerance actually represents the maximum
error allowed at any point and also the maximum difference allowed between the
errors at any two points. For instance, a tolerance of ± 0.05 ml signifies that
the burette may have an error at any point by ± 0.05 ml, provided that the
difference between the errors at any two given points does not exceed 0.05 ml.
Burettes calibrated at 20°C and 25°C deliver different
weights of water for each 10 ml, when weighed with standard brass weights in
air at 50% relative humidity (RH) at standard atmospheric pressure, as given
below :

Hence, the true volume for each 10 ml segment of the
burette can be calculated from the weights obtained and recorded on a
convenient chart.
Leakage : A burette must be tested for
any sort of leakage before putting it into operation. Teflon stopcocks are usually adjusted by a
knurled nut for perfect use. Glass stopcocks may require a small quantity of a
special type of grease or lubricant to allow both ease of operation and to check
leakage.
Outlet Tip : From a practical point of view
the outlet tip of either types of burette,
i.e., having Teflon or glass stopcocks, must be of such
diameter and taper as to allow the delivery of a single drop whose volume is
significantly less than that which can be held between any two finest
graduations of the scale with which the burette is calibrated.
Use of the Burette : The following steps are
usually observed while operating a burette, namely :
(i) Burette tap
is neatly lubricated with a thin-film of grease,
(ii) Rinse the
burette, before putting it into operation, at least twice with small volumes of
the solution (titrant), say about 5.0 ml, carefully draining out the solution
between the addition of each portion,
(iii) Pour the
solution into the burette until the former is little above the zero mark,
(iv) Open the
burette tap slowly to fill up the tip of the burette and to expel all air
bubbles,
(v) With the
zero at eye-level carefully, drain out the liquid until the lower part of the meniscus
is either at level or just below the Zero mark,
(vi) Remove the
drop on the tip of the burette by just touching rapidly against the inner-neck
of a flask or a porcelain tile,
(vii) The Class
‘B’ burettes should be read at level so as to avoid errors due to parallax,
(viii) To
assist easy and accurate observation of the meniscus (lower for colourless
solutions and upper for coloured solutions) it is always advisable to hold a
piece of white paper behind the burette at the appropriate level,
(ix) Burette
readings may be recorded to the nearest 0.02 ml, and
(x) Once a
titration is completed, 15 seconds duration should be allowed to elapse before
the final read-ing is made, to allow for drainage.
1.2. Pipettes
The pipette is the second volumetric apparatus that is
meant to deliver a definite volume of liquid. Pipettes are of two types, namely :
(i) Transfer Pipettes : They have only one
specific mark engraved on them and are specifically employed to deliver (or
transfer) a definite volume of liquid under certain specified conditions, and
(ii) Graduated Pipettes : They have
graduated stems and are used to deliver different small volumes as needed.
However, they are not normally used for measuring very exact volumes of
liquids.
The tolerances on capacity for pipettes, as specified by
the Indian Standards Institution
(ISI), are stated in Tables 2.3 and 2.4.


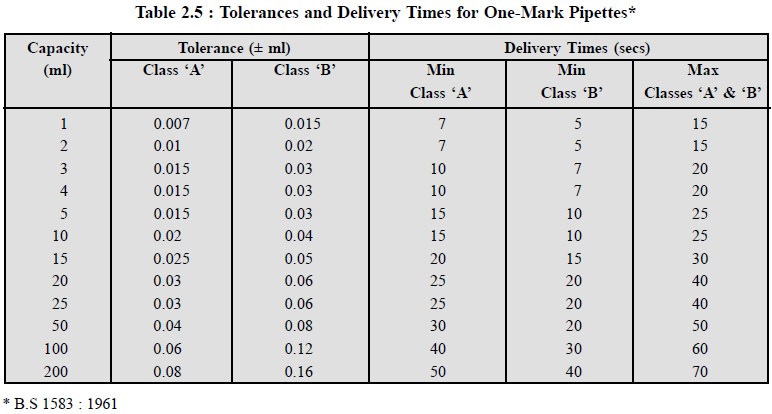
The British
Standards Institution (BSI) has laid down the permitted tolerances and
delivery times for commonly used bulb transfer pipettes as shown in Table 2.5.

The USP specifies the following tolerances accepted by
the National Bureau of Standards for transfer pipettes :

The salient features of single-graduation mark transfer
pipettes are :
(a) Capacity,
temperature at which it was graduated (Ex) and reference to delivery time in
seconds is stated on the bulb e.g.,
BOROSIL 1552 25 secs ‘A’ Ex 20 ml 20°C BS 1583.
(b) Class ‘A’
pipettes do mention the delivery time,
(c) Drainage
time is specified, though an additional waiting time of 3 seconds after
apparent cessation of flow is still important.
Note : The stated times apply
only for water and aqueous solutions.
Use of the Transfer Pipette : The following steps mentioned
sequentially must be followed while making
use of a transfer pipette :
·
Always rinse the pipette with DW before use and allow it
to drain as completely as possible,
·
Droplets of water remaining in the tip must be removed by
touching against filter paper; and at the same time wipe out the outer surface
of the pipette to prevent dilution of the solution to be pipetted,
·
Rinse the pipette with 2 to 3 small portions (5 ml) of
the solution and drain out the liquid completely,
·
Gently suck the liquid up into the pipette a little above
the single graduation mark and quickly shut the upper end of the pipette with
the tip of the index finger. Now, remove the pipette from the stock solution
and carefully wipe out the outer surface of the stem free from any liquid
adhering to it. Hold the pipette vertically and keeping the graduation mark at
the eye-level, slowly release the pressure on the index finger until the bottom
of the meniscus just coincides with the graduation mark. Maintain sufficient
pressure on the index-fnger so as to check any escape of liquid from the
pipette, and quickly get rid of the drop attached to the tip by gently touching
against a porcelain tile. Put the pipette into the receiving container, and
permit the liquid to drain out with the tip of the pipette touching the inside
of the container at an angle of 60°, taking care that the tip must not be
dipping into the deliv-ered liquid. After all the solution has drained out,
hold the pipette in this position for at least 3 seconds (waiting time), and
then remove the pipette.
Note :
·
The National
Physical Laboratory (NPL) describes a method of reading meniscus in
graduated glassware, viz., a dark
horizontal line on a white background is placed 1 mm below the meniscus. A
slight adjustment of the position of
the dark line causes the meniscus to stand out sharply against the white
background,
·
The small drop of liquid that remains in the tip of the
emptied pipette is taken into account while doing the calibration, and hence,
it must not be added to the delivered liquid by blowing down the pipette.
·
Liquids having more viscosity and much larger surface
tension than water must be provided with adequate draining time e.g., strong solution of iodine.
·
Presently, many analysts make use of pipette filler for
sucking in and draining out of liquids from the transfer pipettes for obvious
reasons.
Automatic Pipettes (Transfer
Pipettes) : Automatic pipettes are always preferred to
ordinary transfer pipettes because of their ability to handle corrosive and
toxic liquids in routine analytical laboratories, e.g., determination of Iodine Value in edible oils by
iodine-monochloride (ICl) solution.
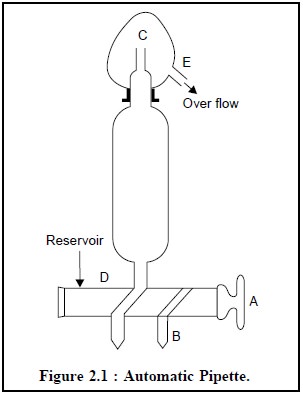
The automatic pipette (Figure 2.1) dispenses a stated
volume of liquid when filled with liquid used in the assay from tip (B) to tip
(C) and is allowed to drain out in the normal manner. D is connected to an
aspirator which is placed above the pipette so as to enable the solution to
flow under gravity.

Operation of the Automatic Pipette : The automatic pipette may be operated by observing the following steps in a sequential manner :
·
Turn the two-way tap clockwise to open so that the
solution starts flowing into the pipette.
·
After about 5.0 ml has run into the pipette, turn A clockwise
through 180°, so that solution now flows from the pipette to fill the delivery
tube B.
·
As soon as B is full upto the tip, again turn A clockwise
through 180°, so that the body of the pipette is filled completely to the
top-tip.
·
Close the tap A by turning clockwise through 90° when the
solution starts to overflow at C.
·
The pipette is now full from the lower-tip to the
upper-tip and is ready for operation.
·
Remove the drop of solution from tip B, run out and drain
for 15 seconds in the usual way.
2. Volumetric Apparatus Meant to Contain a Definite Volume of Liquid
The two particular volumetric apparatus meant to contain
a definite volume of liquid are volumetric flasks (also known as measuring or
graduated flasks) and measuring cylinders (also known as graduated cylin-ders)
which will be discussed here briefly :
2.1. Volumetric Flasks (Syn.
Measuring Flasks or Graduated Flasks)
Volumetric flasks are normally round or
pear-shaped, flat-bottomed; having a long-neck, which possesses a single graduation mark round the
neck.
Flasks bearing one graduation mark, are meant to contain
specified volume of liquid at 20°C, when the lower part of the meniscus
coincides with the mark and are known as volumetric flasks.
The long and narrow neck of uniform diameter affords as a
measure of accurate adjustment, since the height of the liquid is sensitive
enough to small variations of volume.
Units of Capacity
Litre—is defined as ‘the volume occupied by one kilogram of water
at its temperature of maximum density (4°C) and subjected to normal
atmospheric pressure’. The litre is considered as the standard unit of volume for all volumetric measurements.
The cubic centimetre is the volume occupied by a cube of
which each side is 1 cm in length, and thus, 1 litre equals 1000.028 c.c.
Therefore, it follows from here that the millilitre and cubic centimetre are
not the same, though the difference is quite negligible. Hence, all volumetric
apparatus is universally standardized in millilitres.
Standard Calibrations
The Indian
Standard Institution (ISI) has laid down the tolerances on capacity of
volumetric flasks (with different capacities) calibrated at 27°C as stated in
Table 2.6.

The United States
Pharmacopoeia (USP) requirements for volumetric flasks calibrated to
contain the indicated volume at 25°C are given in Table 2.7.

The British
Standards Institution (BSI) and the National
Physical Loaboratory (NPL) have laid down the tolerances in the capacity of
volumetric flasks (i.e., measuring
flask) at 20°C by two sets of toler-ances viz.,
Grade ‘A’ and Grade ‘B’ respectively, evidently to indicate the class of
accuracy to which the flask has been subjected to for graduation, followed by
the manufacturer’s name and finally the BS standard number. However, the
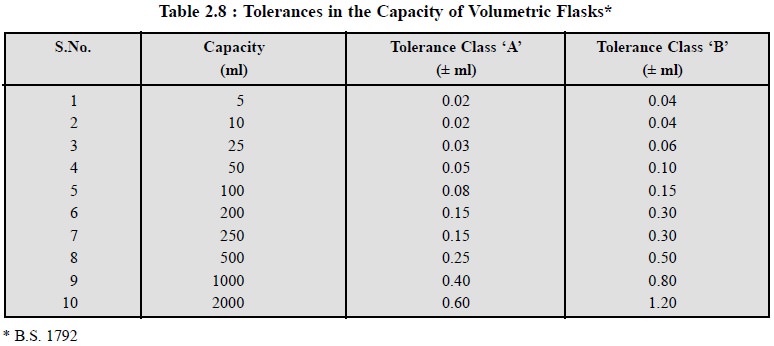
permitted tolerances for volumetric flasks commonly used in analytical
laboratories are de-picted in Table 2.8.

Preparation of Standard Solutions
A reasonably well established analytical laboratory
requires a number of standard solutions for its routine as well as specific
assays. Therefore, it necessitates to know the intricacies of preparing the
standard solutions as detailed in the following steps :
·
Transfer the requisite quantity of the accurately weighed
pharmaceutical substances or solid quantitatively into a beaker and dissolve it
in either distilled water (DW) or other specified solvent,
·
Pour the resulting solution quantitatively, into the
funnel placed in the mouth of the volumetric flask with the help of a glass rod
and a sharp jet of water from a wash-bottle by holding the beaker with the
right hand and the guiding rod with the left hand,
·
Wash down the contents of the beaker through the funnel
by means of the glass rod and the jet of DW. Repeat the process several times
till the flask is 2/3rd full,
·
Remove the funnel, swirl the contents of the volumetric
flask and make up the volume upto the mark,
·
Final adjustment of the volume must be made with the help
of a teat pipette by adding DW/solvent dropwise. In doing so, adequate care
should be taken to allow suffcient time for water/solvent to drain-down the
inside of the neck of the flask, and
·
Finally shake the contents of the flask thoroughly for 2
to 3 minutes to obtain a perfect homogeneous solution.
Note :
(i) For precise work, the temperature of the solution must be
adjusted to 20°C before making the volume upto the mark,
(ii) Standard
solutions are usually stored in stock-bottles,
(iii) Ensure
before any transfer is actually affected that the receiving vessel must be
rinsed with at least 2 to 3 successive small quantities of the solution, and
(iv) When a
standard solution is used a while after preparation, the contents of the
stockbottle must be shaken thoroughly before any solution is withdrawn, thereby
the condensed droplets of water collected on the inside neck of the container
gets mixed with the main bulk of the solution.
2.2. Graduated Cylinders
The graduated cylinders are also referred to as the
measuring cylinders among volumetric apparatus meant to contain a definite
volume of liquid. Measuring cylinders are containers either unstoppered or
stoppered having a wide range of capacities varying from 5 ml upto 2000 ml (2
Litres). In usual practice, the smaller cylinders upto 100 ml are normally
graduated either in fractions of a millimitre or in millilitres. On the
contrary, the large cylinders are graduated in units of 2, 5, 10, 20, or 50 ml,
as per their specific size and volume. However, it is pertinent to mention here
that measuring cylinders are used in a broader sense for measuring volumes of
solution when only approximate volumes are needed.
Related Topics