Chapter: Mechanical : Manufacturing Technology : Theory Of Metal Cutting
Theory of Metal Cutting
THEORY OF METAL CUTTING
Definitions
Machining:
Term applied to all material-removal processes
Metal cutting: The
process in which a thin layer of excess metal (chip) is removed by a wedge-shaped
single-point or multipoint cutting tool with defined geometry from a work
piece, through a process of extensive plastic deformation
MECHANICS OF CHIP FORMATION
The
cutting itself is a process of extensive plastic deformation to form a chip
that is removed afterward. The basic mechanism of chip formation is essentially
the same for all machining operations. Assuming that the cutting action is
continuous, we can develop so-called continuous model of cutting process.
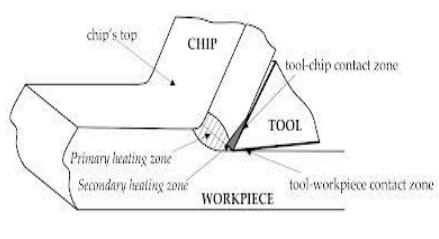
The cutting model shown above is
oversimplified. In reality, chip formation occurs not in a plane but in
so-called primary and secondary shear zones, the first one between the cut and
chip, and the second one along the cutting tool face.
Single-point cutting tool,
As distinguished
from other cutting tools such as a The cutting edge is ground to suit a particular machining operation and
may be re sharpened or reshaped as needed. The ground tool bit is held rigidly
by a tool holder while it is cutting.
Back Rake is to help control the direction of
the chip, which naturally curves into the work due to the difference in length
from the outer and inner parts of the cut. It also helps counteract the
pressure against the tool from the work by pulling the tool into the work.
Side Rake along with back rake controls the chip flow and partly
counteracts the resistance of the work to the movement of the cutter and can be
optimized to suit the particular material being cut. Brass for example requires
a back and side rake of 0 degrees while aluminum uses a back rake of 35 degrees
and a side rake of 15 degrees. Nose Radius makes the finish of the cut smoother
as it can overlap the previous cut and eliminate the peaks and valleys that a
pointed tool produces. Having a radius also strengthens the tip, a sharp point
being quite fragile.
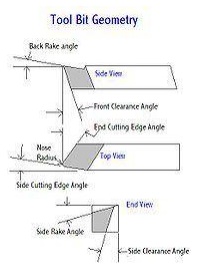
All the other
angles are for clearance in order that no part of the tool besides the actual
cutting edge can touch the work. The front clearance angle is usually 8 degrees
while the side clearance angle is 10-15 degrees and partly depends on the rate
of feed expected.
Minimum angles
which do the job required are advisable because the tool gets weaker as the
edge gets keener due to the lessening support behind the edge and the reduced
ability to absorb heat generated by cutting.
The Rake angles on
the top of the tool need not be precise in order to cut but to cut efficiently
there will be an optimum angle for back and side rake.
Forces in machining
If you make a free body analysis of the chip,
forces acting on the chip would be as follows.
At cutting tool side due to motion of chip against tool there will be a frictional force and a normal force to support that. At material side thickness of the metal increases while it flows from uncut to cut portion. This thickness increase is due to inter planar slip between different metal layers. There should be a shear force (Fs) to support this phenomenon. According to shear plane theory this metal layer slip happens at single plane called shear plane. So shear force acts on shear plane. Angle of shear plane can approximately determined using shear plane theory analysis. It is as follows

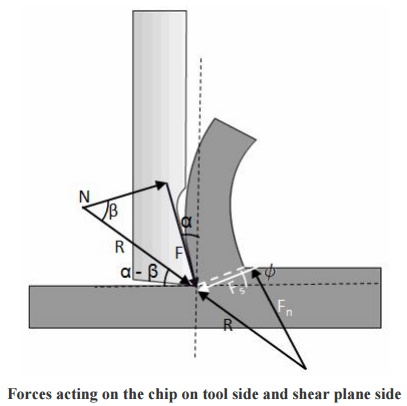
Forces acting on the chip on tool side and shear plane side
Shear force on
shear plane can be determined using shear strain rate and properties of
material. A normal force (Fn) is also present perpendicular to shear plane. The
resultant force
(R) at cutting tool
side and metal side should balance each other in order to make the chip in
equilibrium. Direction of resultant force, R is determined as shown in Figure.
Types of chip
There are three types of chips that are commonly produced in
cutting,
Discontinuous chips
Continuous chips
Continuous chips with built up edge
A discontinuous chip comes off as
small chunks or particles. When we get this chip it may indicate,
Brittle work material
Small or negative rake angles
Coarse feeds and low speeds
A continuous chip looks like a
long ribbon with a smooth shining surface. This chip type may indicate,
Ductile work materials
Large positive rake angles
Fine feeds and high speeds
Continuous chips with a built up
edge still look like a long ribbon, but the surface is no longer smooth and
shining. Under some circumstances (low cutting speeds of ~0.5 m/s, small or
negative rake angles),
Work materials like mild steel,
aluminum, cast iron, etc., tend to develop so-called built-up edge, a very
hardened layer of work material attached to the tool face, which tends to act
as a cutting edge itself replacing the real cutting tool edge. The built-up
edge tends to grow until it reaches a critical size (~0.3 mm) and then passes
off with the chip, leaving small fragments on the machining surface. Chip will
break free and cutting forces are smaller, but the effects is a rough machined
surface. The built-up edge disappears at high cutting speeds.
Chip control
Discontinuous chips are generally desired because
They are
less dangerous for the operator
Do not cause damage to workpiece surface and machine tool
Can be easily removed from the work zone
Can be easily handled and disposed after machining.
There are three principle methods to produce the favourable
discontinuous chip:
Proper selection of cutting conditions
Use of
chip breakers
Change in
the work material properties
Chip breaker
Chip break and chip curl may be
promoted by use of a so-called chip breaker. There are two types of chip
breakers
External type, an inclined obstruction clamped to the tool
face
Integral type, a groove ground into the tool face or bulges
formed onto the tool face
Cutting
tool nomenclature
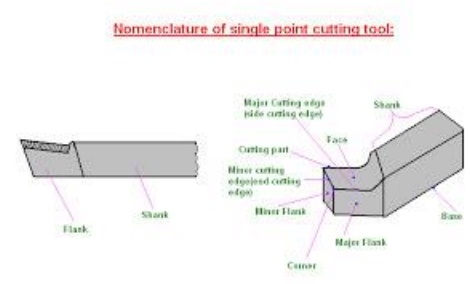
Back Rake is to help control the
direction of the chip, which naturally curves into the work due to the
difference in length from the outer and inner parts of the cut. It also helps
counteract the pressure against the tool from the work by pulling the tool into
the work.
Side Rake along with back rake
controls the chip flow and partly counteracts the resistance of the work to the
movement of the cutter and can be optimized to suit the particular material
being cut. Brass for example requires a back and side rake of 0 degrees while
aluminum uses a back rake of 35 degrees and a side rake of 15 degrees.
Nose Radius makes the finish of
the cut smoother as it can overlap the previous cut and eliminate the peaks and
valleys that a pointed tool produces. Having a radius also strengthens the tip,
a sharp point being quite fragile.
All the other angles are for
clearance in order that no part of the tool besides the actual cutting edge can
touch the work. The front clearance angle is usually 8 degrees while the side
clearance angle is 10-15 degrees and partly depends on the rate of feed
expected.
Minimum angles which do the job
required are advisable because the tool gets weaker as the edge gets keener due
to the lessening support behind the edge and the reduced ability to absorb heat
generated by cutting.
The Rake
angles on the top of the tool need not be precise in order to cut but to cut
efficiently there will be an optimum angle for back and side rake.
Orthogonal
metal cutting
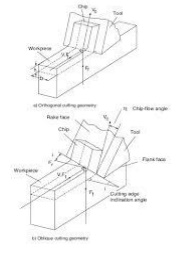
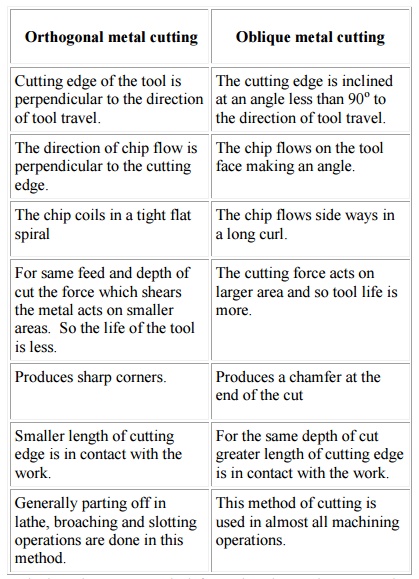
Orthogonal
metal cutting
Cutting edge of the tool is perpendicular to the
direction of tool travel.
The direction of chip flow is perpendicular to the
cutting edge.
The chip coils in a tight flat spiral
For same feed and depth of cut the force which
shears the metal acts on smaller areas. So the life of the tool is less.
Produces sharp corners.
Smaller length of cutting edge is in contact with
the work.
Generally parting off in lathe, broaching and
slotting operations are done in this method.
Oblique
metal cutting
The cutting edge is inclined at an angle less than
90o to the direction of tool travel.
The chip flows on the tool face making an angle.
The chip flows side ways in a long curl.
The cutting force acts on larger area and so tool
life is more.
Produces a chamfer at the end of the cut
For the same depth of cut greater length of cutting
edge is in contact with the work.
This method of cutting is used in almost all
machining operations.
Depending
on whether the stress and deformation in cutting occur in a plane
(two-dimensional case) or in the space (three-dimensional case), we consider
two principle types of cutting:
Orthogonal cutting the cutting
edge is straight and is set in a position that is perpendicular to the
direction of primary motion. This allows us to deal with stresses and strains
that act in a plane.
Oblique cutting the cutting edge is set at an angle.
According to the number of active
cutting edges engaged in cutting, we distinguish again two types of cutting:
Single-point cutting the cutting tool has only one major
cutting edge
Examples: turning, shaping, boring
Multipoint cutting the cutting tool has more than one major
cutting edge
Examples: drilling, milling,
broaching, reaming. Abrasive machining is by definition a process of multipoint
cutting.
Cutting conditions
Each machining operation is
characterized by cutting conditions, which comprises a set of three elements:
Cutting velocity: The traveling
velocity of the tool relative to the work piece. It is measured in m/s or
m/min.
Depth of cut: The axial
projection of the length of the active cutting tool edge, measured in mm. In
orthogonal cutting it is equal to the actual width of cut.
Feed: The relative movement of
the tool in order to process the entire surface of the work piece. In
orthogonal cutting it is equal to the thickness of cut and is measured in mm.
Thermal aspects
In cutting, nearly all of energy
dissipated in plastic deformation is converted into heat that in turn raises
the temperature in the cutting zone. Since the heat generation is closely
related to the plastic deformation and friction, we can specify three main
sources of heat when cutting,
Plastic deformation by shearing in the primary shear zone
Plastic deformation by shearing and friction on the cutting
face
Friction between chip and tool on the tool flank
Heat is mostly dissipated by,
The discarded chip carries away about 60~80% of the total heat
The
workpiece acts as a heat sink drawing away 10~20% heat
The cutting tool will also draw away ~10% heat
If coolant is used in cutting,
the heat drawn away by the chip can be as big as 90% of the total heat
dissipated. Knowledge of the cutting temperature is important because it:
Affects the wear of the cutting tool.
Cutting temperature is the primary factor affecting the cutting tool wear can
induce thermal damage to the machined surface. High surface temperatures
promote the process of oxidation of the machined surface. The oxidation layer
has worse mechanical properties than the base material, which may result in
shorter service life. Causes dimensional errors in the machined surface. The
cutting tool elongates as a result of the increased temperature, and the
position of the cutting tool edge shifts toward the machined surface, resulting
in a dimensional error of about 0.01~0.02 mm. Since the processes of thermal
generation, dissipation, and solid body thermal deformation are all transient,
some time is required to achieve a steady-state condition
Cutting temperature determination
Cutting temperature is either
measured in the real machining process, or predicted in the machining process
design. The mean temperature along the tool face is measured directly by means
of different thermocouple techniques, or indirectly by measuring the infrared
radiation, or examination of change in the tool material microstructure or
micro hardness induced by temperature. Some recent indirect methods are based
on the examination of the temper color of a chip, and on the use of thermo
sensitive paints.
There are no simple reliable
methods of measuring the temperature field. Therefore, predictive approaches
must be relied on to obtain the mean cutting temperature and temperature field
in the chip, tool and work piece.
For cutting temperature prediction, several approaches are
used:
Analytical methods: there are
several analytical methods to predict the mean temperature. The interested
readers are encouraged to read more specific texts, which present in detail
these methods. Due to the complex nature of the metal cutting process, the
analytical methods are typically restricted to the case of orthogonal cutting.
Numerical methods: These methods
are usually based on the finite element modeling of metal cutting. The
numerical methods, even though more complex than the analytical approaches,
allow for prediction not only of the mean cutting temperature along the tool
face but also the temperature field in orthogonal and oblique cutting.
Cutting tool materials
Requirements
The cutting
tool materials must possess a number of important properties to avoid excessive
wear, fracture failure and high temperatures in cutting, the following
characteristics are essential for cutting materials to withstand the heavy
conditions of the cutting process and to produce high quality and economical
parts:
Hardness at elevated temperatures
(so-called hot hardness) so that hardness and strength of the tool edge are
maintained in high cutting temperatures:
Toughness: ability of the
material to absorb energy without failing. Cutting if often accompanied by
impact forces especially if cutting is interrupted, and cutting tool may fail
very soon if it is not strong enough.
Wear resistance: although there
is a strong correlation between hot hardness and wear resistance, later depends
on more than just hot hardness. Other important characteristics include surface
finish on the tool, chemical inertness of the tool material with respect to the
work material, and thermal conductivity of the tool material, which affects the
maximum value of the cutting temperature at tool-chip interface.
Cutting tool materials
Carbon Steels
It is the oldest of tool
material. The carbon content is 0.6~1.5% with small quantities of silicon,
Chromium, manganese, and vanadium to refine grain size. Maximum hardness is
about HRC 62. This material has low wear resistance and low hot hardness. The
use of these materials now is very limited.
High-speed steel (HSS)
First produced in 1900s. They are
highly alloyed with vanadium, cobalt, molybdenum, tungsten and Chromium added
to increase hot hardness and wear resistance. Can be hardened to various depths
by appropriate heat treating up to cold hardness in the range of HRC 63-65. The
cobalt component give the material a hot hardness value much greater than
carbon steels. The high toughness and good wear resistance make HSS suitable
for all type of cutting tools with complex shapes for relatively low to medium
cutting speeds. The most widely used tool material today for taps, drills,
reamers, gear tools, end cutters, slitting, broaches, etc.
Cemented Carbides
Introduced in the 1930s. These
are the most important tool materials today because of their high hot hardness
and wear resistance. The main disadvantage of cemented carbides is their low
toughness. These materials are produced by powder metallurgy methods, sintering
grains of tungsten carbide (WC) in a cobalt (Co) matrix (it provides
toughness). There may be other carbides in the mixture, such as titanium
carbide (TiC) and/or tantalum carbide (TaC) in addition to WC.
Ceramics
Ceramic materials are composed
primarily of fine-grained, high-purity aluminum oxide (Al2O3), pressed and
sintered with no binder. Two types are available:
White, or cold-pressed ceramics,
which consists of only Al2O3 cold pressed into inserts and sintered at high
temperature.
Black, or hot-pressed ceramics,
commonly known as cermets (from ceramics and metal). This material consists of
70% Al2O3 and 30% TiC. Both materials have very high wear resistance but low
toughness; therefore they are suitable only for continuous operations such as
finishing turning of cast iron and steel at very high speeds. There is no
occurrence of built-up edge, and coolants are not required.
Cubic boron nitride (CBN) and synthetic diamonds
Diamond is the hardest substance
ever known of all materials. It is used as a coating material in its
polycrystalline form, or as a single-crystal diamond tool for special
applications, such as mirror finishing of non-ferrous materials. Next to
diamond, CBN is the hardest tool material. CBN is used mainly as coating
material because it is very brittle. In spite of diamond, CBN is suitable for
cutting ferrous materials.
Tool wear and tool life
The life of a cutting tool can be
terminated by a number of means, although they fall broadly into two main
categories:
Gradual wearing of certain
regions of the face and flank of the cutting tool, and abrupt tool failure.
Considering the more desirable case Πthe life of a cutting tool is therefore
determined by the amount of wear that has occurred on the tool profile and
which reduces the efficiency of cutting to an unacceptable level, or eventually
causes tool failure. When the tool wear reaches an initially accepted amount,
there are two options,
To resharpen the tool on a tool grinder, or
To replace the tool with a new one.
This second possibility applies in two cases,
When the resource for tool resharpening is exhausted. or
The tool does not allow for resharpening, e.g. in case of the
indexable carbide inserts
Wear zones
Gradual wear occurs at three
principal locations on a cutting tool. Accordingly, three main types of tool
wear can be distinguished,
Crater wear
Flank wear
Corner wear
Crater wear: consists of a
concave section on the tool face formed by the action of the chip sliding on
the surface. Crater wear affects the mechanics of the process increasing the
actual rake angle of the cutting tool and consequently, making cutting easier.
At the same time, the crater wear weakens the tool wedge and increases the
possibility for tool breakage. In general, crater wear is of a relatively small
concern.
Flank
wear: occurs on the tool flank as a result of friction between the machined
surface of the workpiece and the tool flank. Flank wear appears in the form of
so-called wear land and is measured by the width of this wear land, VB, Flank
wear affects to the great extend the mechanics of cutting. Cutting forces
increase significantly with flank wear. If the amount of flank wear exceeds
some critical value (VB > 0.5~0.6 mm), the excessive cutting force may cause
tool failure.
Corner wear: occurs on the tool
corner. Can be considered as a part of the wear land and respectively flank
wear since there is no distinguished boundary between the corner wear and flank
wear land. We consider corner wear as a separate wear type because of its
importance for the precision of machining. Corner wear actually shortens the
cutting tool thus increasing gradually the dimension of machined surface and
introducing a significant dimensional error in machining, which can reach
values of about 0.03~0.05 mm.
Tool life
Tool wear is a time dependent
process. As cutting proceeds, the amount of tool wear increases gradually. But
tool wear must not be allowed to go beyond a certain limit in order to avoid
tool failure. The most important wear type from the process point of view is
the flank wear, therefore the parameter which has to be controlled is the width
of flank wear land, VB. This parameter must not exceed an initially set safe
limit, which is about 0.4 mm for carbide cutting tools. The safe limit is
referred to as allowable wear land (wear criterion),
. The cutting time required for
the cutting tool to develop a flank wear land of width is called tool life, T,
a fundamental parameter in machining. The general relationship of VB versus
cutting time is shown in the figure (so-called wear curve). Although the wear
curve shown is for flank wear, a similar relationship occurs for other wear
types. The figure shows also how to define the tool life T for a given wear
criterion VBk
Parameters, which affect the rate of tool wear, are
Cutting conditions (cutting speed V, feed f, depth of cut d)
Cutting tool geometry (tool orthogonal rake angle)
Properties of work material
Surface finish
The machining processes generate
a wide variety of surface textures. Surface texture consists of the repetitive
and/or random deviations from the ideal smooth surface. These deviations are
Roughness: small, finely spaced surface irregularities (micro
irregularities)
Waviness: surface irregularities of grater spacing (macro
irregularities)
Lay: predominant direction of surface texture
Three main factors make the surface roughness the most
important of these parameters:
Fatigue life: the service life of
a component under cyclic stress (fatigue life) is much shorter if the surface
roughness is high
Bearing
properties: a perfectly smooth surface is not a good bearing because it cannot
maintain a lubricating film.
Wear: high surface roughness will result in more intensive
surface wear in friction.
Surface finish is evaluated quantitatively by the average
roughness height, Ra
Roughness control
Factors, influencing surface roughness in machining are
Tool geometry (major cutting edge angle and tool corner
radius),
Cutting conditions (cutting velocity and feed), and
Work material properties (hardness).
The influence of the other process parameters is outlined
below:
Increasing the tool rake angle generally improves surface
finish
Higher work material hardness results in better surface finish
Tool material has minor effect on surface finish.
Cutting fluids affect the surface
finish changing cutting temperature and as a result the built-up edge
formation.
Cutting fluids
Cutting fluid (coolant) is any
liquid or gas that is applied to the chip and/or cutting tool to improve
cutting performance. A very few cutting operations are performed dry, i.e.,
without the application of cutting fluids. Generally, it is essential that
cutting fluids be applied to all machining operations.
Cutting fluids serve three principle functions:
To remove heat in cutting: the
effective cooling action of the cutting fluid depends on the method of
application, type of the cutting fluid, the fluid flow rate and pressure. The
most effective cooling is provided by mist application combined with flooding.
Application of fluids to the tool flank, especially under pressure, ensures
better cooling that typical application to the chip but is less convenient.
To lubricate the chip-tool
interface: cutting fluids penetrate the tool-chip interface improving
lubrication between the chip and tool and reducing the friction forces and
temperatures.
To wash away chips: this action
is applicable to small, discontinuous chips only. Special devices are
subsequently needed to separate chips from cutting fluids.
Methods of application
Manual
application
Application of a fluid from a can
manually by the operator. It is not acceptable even in job-shop situations
except for tapping and some other operations where cutting speeds are very low
and friction is a problem. In this case, cutting fluids are used as lubricants.
Flooding
In flooding, a steady stream of
fluid is directed at the chip or tool-workpiece interface. Most machine tools
are equipped with a recirculating system that incorporates filters for cleaning
of cutting fluids. Cutting fluids are applied to the chip although better
cooling is obtained by applying it to the flank face under pressure
Coolant-fed tooling
Some tools, especially drills for
deep drilling, are provided with axial holes through the body of the tool so
that the cutting fluid can be pumped directly to the tool cutting edge.
Mist applications
Fluid droplets suspended in air
provide effective cooling by evaporation of the fluid. Mist application in
general is not as effective as flooding, but can deliver cutting fluid to
inaccessible areas that cannot be reached by conventional flooding.
Types of cutting fluid
Cutting Oils
Cutting oils are cutting fluids
based on mineral or fatty oil mixtures. Chemical additives like sulphur improve
oil lubricant capabilities. Areas of application depend on the properties of
the particular oil but commonly, cutting oils are used for heavy cutting
operations on tough steels.
Soluble Oils
The most common, cheap and
effective form of cutting fluids consisting of oil droplets suspended in water
in a typical ratio water to oil 30:1. Emulsifying agents are also added to
promote stability of emulsion. For heavy-duty work, extreme pressure additives
are used. Oil emulsions are typically used for aluminum and cooper alloys.
Chemical fluids
These cutting fluids consist of
chemical diluted in water. They possess good flushing and cooling abilities.
Tend to form more stable emulsions but may have harmful effects to the skin.
Environmental issues
Cutting fluids become
contaminated with garbage, small chips, bacteria, etc., over time. Alternative
ways of dealing with the problem of contamination are:
Replace the cutting fluid at least twice per month,
Machine
without cutting fluids (dry cutting),
Use a filtration system to continuously clean the cutting
fluid.
Disposed cutting fluids must be
collected and reclaimed. There are a number of methods of reclaiming cutting
fluids removed from working area. Systems used range from simple settlement
tanks to complex filtration and purification systems. Chips are emptied from
the skips into a pulverizer and progress to centrifugal separators to become a
scrap material. Neat oil after separation can be processed and returned, after
cleaning and sterilizing to destroy bacteria.
Machinability
Machinability is a term
indicating how the work material responds to the cutting process. In the most
general case good machinability means that material is cut with good surface
finish, long tool life, low force and power requirements, and low cost.
Machinability of different materials
Steels Leaded steels: lead acts
as a solid lubricant in cutting to improve considerably machinability.
Resulphurized steels: sulphur
forms inclusions that act as stress raisers in the chip formation zone thus
increasing machinability.
Difficult-to-cut steels: a group
of steels of low machinability, such as stainless steels, high manganese
steels, precipitation-hardening steels.
Other metals
Aluminum: easy-to-cut material
except for some cast aluminum alloys with silicon content that may be abrasive.
Cast iron: gray cast iron is
generally easy-to-cut material, but some modifications and alloys are abrasive
or very hard and may cause various problems in cutting.
Cooper-based alloys: easy to
machine metals. Bronzes are more difficult to machine than brass.
Selection of cutting conditions
For each machining operation, a
proper set of cutting conditions must be selected during the process planning.
Decision must be made about all three elements of cutting conditions,
Depth of cut
Feed
Cutting speed
There are two types of machining operations:
Roughing
operations: the primary objective of any roughing operation is to remove as
much as possible material from the work piece for as short as possible
machining time. In roughing operation, quality of machining is of a minor
concern.
Finishing
operations: the purpose of a finishing operation is to achieve the final shape,
dimensional precision, and surface finish of the machined part. Here, the
quality is of major importance. Selection of cutting conditions is made with
respect to the type of machining operation. Cutting conditions should be
decided in the order depth of cut - feed - cutting speed.
Related Topics