Chapter: Java The Complete Reference : The Java Library : Introducing the AWT: Working with Windows, Graphics, and Text
Introducing Graphics - AWT Classes
Introducing Graphics
The AWT includes several methods that support graphics. All
graphics are drawn relative to a window. This can be the main window of an
applet, a child window of an applet, or a stand-alone application window.
(These methods are also supported by Swing-based windows.)
The origin of each window is at the top-left corner and is 0,0.
Coordinates are specified in pixels. All output to a window takes place through
a graphics context.
A graphics context is encapsulated by the Graphics class. Here are two ways in which a graphics context can
be obtained:
It is passed to a method, such as paint( ) or update( ),
as an argument.
It is returned by the getGraphics(
) method of Component.
Among other things, the Graphics
class defines a number of methods that draw various types of objects, such as
lines, rectangles, and arcs. In several cases, objects can be drawn edge-only
or filled. Objects are drawn and filled in the currently selected color, which
is black by default. When a graphics object is drawn that exceeds the
dimensions of the window, output is automatically clipped. A sampling of the
drawing methods supported by Graphics is
presented here.
Drawing Lines
Lines are drawn by means of the drawLine( ) method, shown here: void drawLine(int startX, int startY, int endX, int endY )
drawLine( ) displays a line in the
current drawing color that begins at startX, startY and ends at endX, endY.
Drawing Rectangles
The drawRect( ) and fillRect( ) methods display an outlined
and filled rectangle, respectively. They are shown here:
void drawRect(int left,
int top, int width, int height) void
fillRect(int left, int top, int width, int height)
The upper-left corner of the rectangle is at left, top. The dimensions
of the rectangle are specified by width
and height.
To draw a rounded rectangle, use drawRoundRect( ) or fillRoundRect(
), both shown here:
void drawRoundRect(int left,
int top, int width, int height, int xDiam, int yDiam)
void fillRoundRect(int left,
int top, int width, int height, int xDiam, int yDiam)
A rounded rectangle has rounded corners. The upper-left corner of
the rectangle is at left, top. The dimensions of the rectangle are
specified by width and height. The diameter of the rounding arc along the X axis is
specified by xDiam. The diameter of
the rounding arc along the Y axis is specified by yDiam.
Drawing Ellipses and Circles
To draw an ellipse, use drawOval(
). To fill an ellipse, use fillOval(
). These methods are shown here:
void drawOval(int left,
int top, int width, int height) void
fillOval(int left, int top, int width, int height)
The ellipse is drawn within a bounding rectangle whose upper-left
corner is specified by left, top and whose width and height are
specified by width and height. To draw a circle, specify a square as the bounding rectangle.
Drawing Arcs
Arcs can be drawn with drawArc(
) and fillArc( ), shown here:
void drawArc(int left,
int top, int width, int height, int startAngle, int sweepAngle)
void fillArc(int left, int
top, int width, int height, int startAngle, int sweepAngle)
The arc is bounded by the rectangle whose upper-left corner is
specified by left, top and whose
width and height are specified by width
and height. The arc is drawn from startAngle through the angular distance
specified by sweepAngle. Angles are
specified in degrees. Zero degrees is on the horizontal, at the three o’clock
position. The arc is drawn counterclockwise if sweepAngle is positive, and clockwise if sweepAngle is negative. Therefore, to draw an arc from twelve
o’clock to six o’clock, the start angle would be 90 and the sweep angle 180.
Drawing Polygons
It is possible to draw arbitrarily shaped figures using drawPolygon( ) and fillPolygon( ), shown here:
void drawPolygon(int x[
], int y[ ], int numPoints) void fillPolygon(int x[
], int y[ ], int numPoints)
The polygon’s endpoints are specified by the coordinate pairs
contained within the x and y arrays. The number of points defined
by these arrays is specified by numPoints.
There are alternative forms of these methods in which the polygon is specified
by a Polygon object.
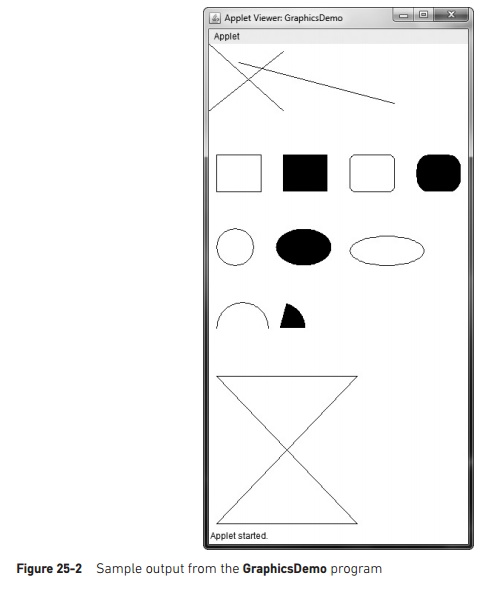
Demonstrating the Drawing Methods
The following program demonstrates the drawing methods just
described.
// Draw
graphics elements.
import
java.awt.*;
import
java.applet.*; /*
<applet
code="GraphicsDemo" width=350 height=700> </applet>
*/
public
class GraphicsDemo extends Applet {
public
void paint(Graphics g) {
Draw lines. g.drawLine(0, 0, 100, 90);
g.drawLine(0, 90, 100, 10); g.drawLine(40, 25, 250, 80);
Draw rectangles. g.drawRect(10, 150, 60, 50);
g.fillRect(100, 150, 60, 50);
g.drawRoundRect(190,
150, 60, 50, 15, 15); g.fillRoundRect(280, 150, 60, 50, 30, 40);
Draw Ellipses and Circles g.drawOval(10, 250,
50, 50); g.fillOval(90, 250, 75, 50); g.drawOval(190, 260, 100, 40);
Draw Arcs
g.drawArc(10,
350, 70, 70, 0, 180); g.fillArc(60, 350, 70, 70, 0, 75);
// Draw
a polygon
int
xpoints[] = {10, 200, 10, 200, 10}; int ypoints[] = {450, 450, 650, 650, 450};
int num = 5;
g.drawPolygon(xpoints,
ypoints, num);
}
}
Sample output is shown in Figure 25-2.
Sizing Graphics
Often, you will want to size a graphics object to fit the current
size of the window in which it is drawn. To do so, first obtain the current
dimensions of the window by calling getSize(
) on the window object. It returns the dimensions of the window
encapsulated within a Dimension object.
Once you have the current size of the window, you can scale your graphical output accordingly.
To demonstrate this technique, here is an applet that will start as
a 200´200-pixel square and grow by
25 pixels in width and height with each mouse click until the applet gets
larger than 500´500. At that point, the next
click will return it to 200´200, and the process starts
over.
Within the window, a rectangle is drawn around the inner border of
the window; within that rectangle, an X
is drawn so that it fills the window. This applet works in appletviewer, but it may not work in a browser window.
//
Resizing output to fit the current size of a window.
import
java.applet.*;
import
java.awt.*;
import
java.awt.event.*; /*
<applet
code="ResizeMe" width=200 height=200> </applet>
*/
public
class ResizeMe extends Applet { final int inc = 25;
int max
= 500; int min = 200; Dimension d;
public
ResizeMe() { addMouseListener(new MouseAdapter() {
public
void mouseReleased(MouseEvent me) {
int w =
(d.width + inc) > max?min :(d.width + inc);
int h =
(d.height + inc) > max?min :(d.height + inc);
setSize(new
Dimension(w, h));
}
});
}
public
void paint(Graphics g) { d = getSize();
g.drawLine(0,
0, d.width-1, d.height-1); g.drawLine(0, d.height-1, d.width-1, 0);
g.drawRect(0, 0, d.width-1, d.height-1);
}
}
Related Topics