Chapter: 11th 12th std standard Class Nursing Health Care Hospital Hygiene Higher secondary school College Notes
Uses, Guidelines and Types of bandages.
Bandages
Applications
of bandages
These are made from flannel, calico,
elastic net or special paper, they can be improvised by any of the above
material, or from stockings or ties
Uses of bandages.
Maintain direct pressure over a
dressing to control bleeding.
Retain dressing and slings in
position
Prevent or reduce swelling.
Provide support for a limb or joint.
Restrict movement
Assist in lifting and carrying
casualty.
Guidelines
Bandages should be applied firm
enough to keep dressing and splints in position.
But not so tight as to cause injury
to the part or to impede the circulation of the blood.
A bluish tinge of the finger or
nails may be a danger sign that the bandages are too tight.
Loss of sensation is an other sign.
Types of bandages
Triangular bandages.
Roller bandages
Special-such as, many tail or ' T'
bandages.
Triangular bandage
The triangular bandage may be used
in nursing for slings to support an arm after injury
Roller bandages
Roller
bandages are used for the following purposes..
1) To cover and to
retain dressing and splints in position.
To exercise pressure on a part in
order to prevent or to reduce swelling.
To provide support for a part ,
sprained or dislocated joint
To prevent and control haemorrhage
To restrict movement.
To correct deformity.
Materials
Roller bandages are made from strips
of different material of varying lengths and widths, according to the part to
which they are applied.
Materials commonly used are flannel,
open wove cotton, fast edge cotton, calico, crepe or elastic net.
Before use, the bandage should be
firmly and evenly rolled, either by hand or by machine.
The parts of the bandage are
referred to as the head and the free end to tail.
Usually,
a single roller bandage is used, but for, some certain parts, a double headed
roller bandage is required.
In this, the free ends of two roller
bandages are sew together leaving the heads to close together, on the same side
of the bandage.
Most roller bandages are 6 yards
long, except the very narrow ones, which are usually, short.
The width lay according to the part
of the body to be bandaged.
The usual width of the bandages are,
1 Inch to 4 to 6 inches.
Part
bandage Width
Fingers 1. inch.
Arm 2 to 2 inches.
Leg 3 to 3 inches.
Trunk 4 to 6 inches.
Head 2 inches.
Rules for the application of roller
bandages
Use a tightly rolled bandage or the
correct width.
Support the part to be bandaged
through out.
For the forearm, the hand should be
prone.
Always stand in front of the patient
except when applying a cape line bandage.
Bandage a limb in the position in
which it is to remain.
Hold the bandage with the head
uppermost and apply the outer surface of the bandage to the part, never unroll
more than a few inches of bandage at a time.
Bandage from within outwards and
from below upwards, maintain even pressure throughout.
Begin the bandage with a firm
oblique turn to fix it and allow each successive turn to cover two thirds of
the previous one, with the free edges lying parallel.
Make any reverse or crossing a line
on the outer side of the limb, except, when this brings them over a wound or
prominence of bone, in which case, they must be on the front of the limb.
Pad the axilla or groin when
bandaging these parts, so that, two of the surfaces of skin do not touch
beneath the bandage.
Finish off with a straight turn
above the part, hold in the end and fasten with a safety pin.
Points to be observed
The comfort of the patient is the
first consideration, except, when arresting haemorrhage or correcting a
deformity.
Neatness and economy must be
considered.
The bandage should be firm and
applied with even pressure throughout.
The extremities must be carefully
watched
for any signs of swelling or
blueness due to interference with circulation by a bandage that is too light.
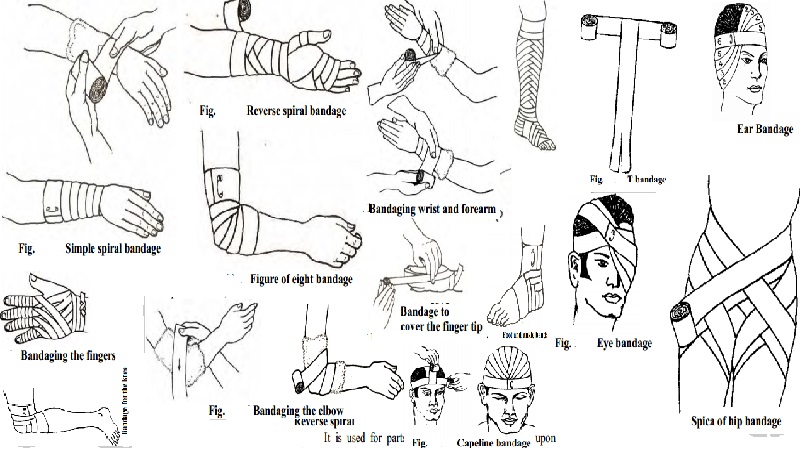
Terms used in roller bandaging
Simple spiral
Reverse spiral
Figure of eight
Spica
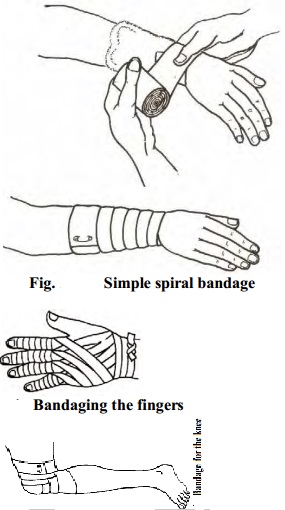
Simple spiral
Is used for parts which are of
uniform thickness, such as, a finger or a wrist.
The
bandage is applied obliquely round the part, each turn cover two thirds (2/3)
of the proceeding one, and the edges being kept parallel.
Reverse spiral
It is used for parts which vary in thickness and upon which
the bandage of circular turns cannot be tied properly like leg and forearms.
One or two simple spiral turns are usually made to carry the bandages to the
point at which the spiral can no longer be employed. And then the lower edge of
its last spiral is fixed with the thumb about halfway between the mid line and
outer surface of the limb. The bandage is then reversed and brought down and
carried round the limb, when another reverse is made immediately above the
former one. These reverses are repeated as far as necessary and the bandage
completed with one or two.
Spiral
turns straight round the limb. Care should be taken and that, each reverse
occurs immediately above the previous one , so that, the pattern is even. Each
turn should cover two thirds of the preceding one, as in the simple spiral.
Figure of Eight
Is used for bandaging limb and for covering joints. It
consists of series of loops, encircling the part in the from of a figure of
eight. The upper loops being completely hidden by the successive turns end the
lower loops forming the pattern. Each one cover the two thirds of the preceding
loop and crossing in the same line.
The Spica
Is a form of the figure of eight in which one turn is very
much large then the other. It is used for joints at right angles to the body.
eg: shoulder, groin and thumb.
The divergent spica
Is
a form of the figure of eight in which the turn go alternately above and below
a fixed starting turn ending above, and is used for bend joints, as the elbow
or heel.
Bandages
for hand, wrist, forearm, elbow and Arm Hand bandage
With the pronated, (the palm held downwards) fix the bandage
by a turning round the wrist and carry the roll obliquely over the back of the
hand to the side of the little finger. Carry the bandage round the palm,
encircling the finger with one horizontal turn, so that the lower boarder of the
bandage, just touches the root of the nail of the little finger. Carry the
bandage one more round the palm and then return obliquely to the wrist. The
figure of eight turn round the wrist and hand are repeated until the hand is
covered and the bandage is then finished with a spiral turn round the wrist.
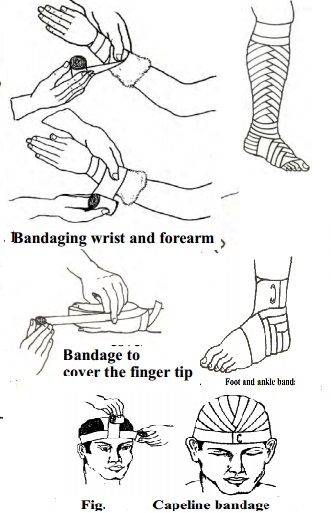
Wrist, Forearm, and Upper arm
Bandages
The
wrist and forearm are bandaged by use of the simple and reverse spiral until
the elbow is reached. The figure of eight turn can be so used, as the limb
enlarges as an alternative to the reverse spiral turn, if preferred.
To Cover the elbow
Bend
the elbow at right angles, lay the outer side of the bandage on the inner side
of the joint and take one straight turn carrying the bandage over the elbow tip
and round the limb of the elbow. The second turn is made to encircle forearm
and the third arm. Each of these turns being made to cover the margins of the
first turn. Continue the turns alternately, below and above the first turn,
allowing each to cover a little more than two thirds of the previous turn, and
finishing about the elbow.
The upper arm
The bandages, as is the forearm, by a succession of reverse
spirals or figure of eight turns, and the bandages may be carried on from the
forearm, or elbow or started independently, or most conveniently.
Finger bandages
With the hand pronated, fix the
bandage by two circular turns a round the wrist leaving the end free from tying
off. Afterwards, carry the bandage obliquely over the back of hand to the base
of the finger to be bandaged. Taking the fingers is order, start from the
little finger side.
Take on spiral turn to the base of the finger nail and then
cover the finger by simple spiral turns. Then carry the bandage a cross the
back of the hand to the wrist, and complete it with one straight turn round the
wrist. Secure the bandage by a safety pin or by tying the two each of the
bandage together. If more than one finger as to be bandaged, take a turn round
the wrist between each two fingers and continue as above until the bandage is
complete.
To
cover the finger tip
Take the bandage straight up to the back of the finger and
over the middle of the tip and down the front to the level of the second joint.
Holding the turns
Back
and front with the fingers of the other hand, make two more turns over the tip
of the finger, one on either side of the first turn. Fix the loop with a
straight circular turn as near to the tip as possible and then cover the finger
by simple spiral turns as before. Being careful to make them from within
outwards. Take a straight turn round the wrist and either finish off as before
or continue the next finger.
Spica of thumb bandage
With the hand held, so that, the back of the thumb is upper
most, take two turns round the wrist and carry the bandage over the back of the
thumb. Encircle the thumb with one or two straight turns, so that, the lower
border of the bandage is level with the root of the nail. Carry the bandage
back. Over the back of the hand, round the wrist and repeat the figure of eight
turns round thumb and wrist, until the wall of the thumb is completely covered.
Complete the bandages with one straight turn, round the wrist.
Spica of shoulder bandage
Place a small pad of cotton wool in each axilla. Take 3-4
inch bandage and fix it with two spiral turns round the upper part of the arm.
Take two or three reverse spiral turns round the upper arm until the bandages
reaches the point of the shoulder. Then carry the bandage over the shoulder,
across the back and under the opposite armpit. Bring it back across the chest
and arm round under the armpit and over the shoulder again covering two thirds
of the previous turn. This form a figure of eight round the arm and the body
and the turns are repeated until the whole shoulder is covered. The bandage
should be secured by a pin immediately over the injured shoulder.
Bandages for the foot, ankle and leg
If
the patient is in bed, the heel should be elevated on a support, about 6 inches
high. If he is up and about, he should be seated in a chair with the foot
supported on a stool or another chair. To avoid stooping, the nurse may, if she
prefers, sit opposite to the patient and take his foot on her knee.
Foot and ankle bandage
Take one or two turns round the ankle to fix the bandage and
then take it on obliquely across the foot, the root of the little toe. Make one
horizontal turn right round the foot at his level and then carry the bandage
back over the foot and take a turn round the ankle just above the heel. Figure
of eight turns are then repeated round the foot and ankle, each turn over
lapping the preceding turn by two third of its width, until the whole foot is
covered.
If
the bandage is to be continued up the leg, the reverse spiral or figure of
eight turns may be used as for the arm.

To cover the heel
The leg should be supported, so
that, the heel projects well over the edge of the chair, stool or cushion on
which it is placed.
The
foot should be kept at right angles to the leg. Commence the bandage by a turn
over the tip of the heel. The bandage is then carried round the foot just below
the tip of the heel, so that, the margin of the bandage covering the tip of the
heel is well covered. It is then brought over the ankle and taken round the
leg, just above the tip of the heel, so that, the other margin of the bandage
covering the heel tip is now also covered. The turns are repeated. Each turn
being made just below and above the preceding one until the heel is well
covered and the bandage so extends from halfway along the foot to well above
the ankle.
Bandage for the knee
Flex the knee, lay the outer side of the bandage against the
knee and take one straight turn over the knee cap. The bandage is thus brought
round the knee, just below and the just above. Note that the margins of the
bandage covering the kneecap are covered as in the elbow and heel bandages. The
turns are repeated below and above the joint until the whole knee is covered
and the bandage is then secured by one straight turn round the thigh.
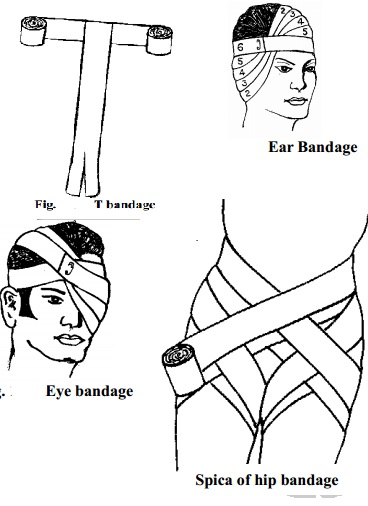
Spica of hip bandage
Place
the outside of the bandage on the inner side of the thigh about 6 inches below
the groin. Carry the bandage horizontally round the limb and make three or four
ascending reverse spiral turns round the thigh. Carry the bandages from within
outwards over the front of the groin and up round the hip and back, passing
over the prominence of the hip bone on the opposite side. Bring the bandage
down, over the abdomen to the outer side of the thigh and repeat the figure of
eight round the body and the thigh until the hip is covered. Spica of groin bandage
This
is applied in the same way as the spica for the hip except that the bandage is
started higher up. The reverse spiral and omitted and the crossings are made
over the front of the groin instead of on the outer side of the front of the
thigh.
Double spica of groin bandage
Lay the outer surface of the bandage over the right groin
from without inwards and pass the bandage round the thigh, carrying it up over
the front of the right groin to the left hip. Round the back and right hip and
over the lower part of the abdomen to the outer side of the thigh. Pass the
bandage under the thigh, up to the left groin round the back and right hip and
down again to the inner side of the right hip and down to the inner side of the
right thigh. These turns, which really from of double figure of eight, round
the body and right thigh and round the body and left thigh, are repeated until
both groins as covered each turn being slightly higher than the covering two
thirds of the preceding one.
Head and
other bandage Capeline bandage
The bandage is, sometimes, used when
the whole scalp is to be covered. A double headed roller bandage is used. The
patient should be seated and the nurse should sand behind the patient. Place a
center of the outer surface of the bandage in the center of the forehead, the
lower border of the bandage lying just above the eyebrows. The head of the
bandage as brought
over
the temples and above the years to the nape of te neck where the ends are
crossed. The upper bandage being carried, round the head and other brought over
the center of the top of the scalp to the root of the nose. The bandage which
encircles head is now brought over the forehead, covering and fixing the
bandage which could cross the scalp. This bandage is then brought back over the
scalp. Slightly to one side of the center, thus covering one margin of the
original turn. At the back, it is again crossed and fixed by the encircling
bandage and is turn back over the scalp to the opposite side of the centerline,
now covering the other margin of its original turn. These backward and forward
turns are repeated to alternate side of the center, each one being, in turn,
fixed by the encircling bandage until the whole scalp is covered. The bandages
is completed by a circular turn round the head and pinned in the center of the
forehead.
Ear bandage
Lay the outer surface of the bandage
against forehead and carry the bandage round the head in one circular turn,
bandaging away from the injured ear. Towards the sound side, carry the bandage
round to the back of the head, low down in the nape of the neck again, repeat
these.
Each
turn being slightly higher than the previous one as it cover the dressing, but
slightly over as it cover the hair. Continue until the whole is covered and
complete the bandage by one straight turn around the forehead, pinning where
all the turns cross one another some people prefer to take the bandage around
the forehead between each turn covering the dressing, but this makes a heavy
bulk around the head which is not really necessary.
Eye bandage
Lay the outer surface of the bandage against the forehead
and take the circular turn round the head, bandaging away from the injured eye.
Carry the bandage on, round side for the second time. Take it obliquely to the
back of the head, under the prominence at the back of the skull and from there
bring it upwards beneath the ear of the affected side, over the pad of the
circular turn and continue.
Over
the head to the starting point. Repeat this turn two or three times until the
dressing is covered, finishing with a safety pin just above the good eye.
Many tail bandages
Many
tail bandages are used for abdominal
wound certain chest dressing and
for any part where the use of a roller bandage
would entail a great amount of movement and exertion for the patient. It
consists of a number of strips or tails
of cotton material, 4-6 inches
wide and of sufficient length to encircle the part and overlap at least 8 inches . Each strip overlies the one above by
two thirds of its width and the whole is secured in the center by a piece of
the same material. All seams must be sewn so that, there are no hard ridges to
hurt the patient. Bandages for the chest are sometimes provided with two tails,
stitched to the top of the back piece and slanting slightly outwards, which
pass over the shoulder and are pinned to the front the bandage when the other
tails are folded over to keep the bandage from slipping down. Similarly,
abdominal bandages are sometimes provided with two tails stitched to the bottom
of back piece and are called groin straps which are passed between the legs and
secured to the front of the bandage to prevent it from slipping up. Smaller
many tail bandages may sometimes be used to keep a dressing on a limb.
The advantage of the many tail bandage are that, it is easily applied and adjusted and a wound can
be inspected without any disturbance to the patient.
The disadvantages are that, if it is applied with little support, it tends to slip and become displaced and
can easily be undone by the patient.
The application of abdominal many
tail bandage
For
the bandage to be comfortably and efficiently applied , two people are required
, although in and emergency one can manage. The patient should be lying quite
flat before any attempt is made to apply or adjust a many tail bandage. The
bandage is prepared with the tails rolled into the center, from either end, the
smooth portion of the back being uppermost and being placed next to the
patient. The bandage is placed in the position, so that, the center band lies
under the patients back. The bandage is applied from below upwards. One tail
being brought across the body at a time and held in position by a tail from the
opposite side. The last tail is brought obliquely downwards and secured with a
safety pin.
T Bandage
'T'
bandages consist of two strips o flannel, about 4 inches wide, stitches
together in the form of a 'T'. The horizontal strip is made long enough to pass
round the body and the vertical strip is passed up between the legs. It is then
pinned to the horizontal strip to keep rectal of perineal dressing in position.
Plaster of paris bandages
Plaster bandages may be brought ready- made, such as , the
'Gypsona' tape bandage or may be prepared by rubbing dry plaster of paris into
the meshes of strip of book muslin. Plaster of paris bandages are used.
To make splints to immobilize fractures
To protect the wound or to
immobilize a part to relieve a pain and promote healing.
To make plaster beds and jackets.
The bandages are applied wet and as they dry, they form a
hard support to the fracture site. It should be protected from bending or
cracking until completely dry and set. A plaster tends to shrink as it dries
and if it gets too tight, it may impede
circulation. A
patient with a plaster applied to a limb should be instructed to report back to the hospital immediately if the
extremely becomes blue, cold, or swollen.
Adhesive bandage
In certain circumstances, the doctor may order an adhesive
bandage to be worn. These give fine support and may be used for protection and
to promote healing in condition, such as, varicose ulcer. Examples of those are
elastoplast and crepe bandages. These are supplied according to similar rules
to those relating to roller bandages. But great care must be taken to see that
the bandage lies smoothly against the skin and that , there are no folds or
wrinkles in the bandage.
Tubular gauze bandage
This is a special form of tubular
bandage, which can be applied with an applicator to any part of the body. It is
ideal for small dressing on hands and limbs.
Bandage for the jaw
Take
a narrow strip of material, about 4 feet long or a narrow fold triangular
bandage and place the center of it, under the chin. Carry one end upwards over
the top of the head and cross with the other end above the ear. Carry the
shorter end low down across the front of the forehead and the larger end in to opposite direction round the back of
the head and tie off close, above the other ear.
Related Topics