Chapter: Mechanical : Robotics : Robot Kinematics And Robot Programming
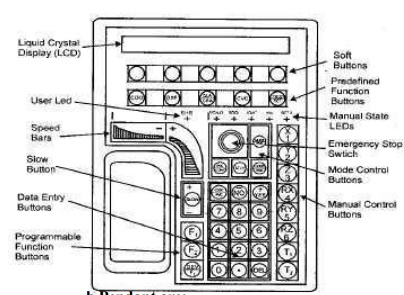
Teach pendant for Robot system
Teach
pendant for Robot system
The teach pendant has the following primary
functions:
Serve as the
primary point of control for initiating and monitoring operations.
Guide the
robot or motion device, while teaching locations. Support application programs.
The Teach
Pendant is used with a robot or motion device primarily to teach. Robot
locations for use: in application programs.
The Teach Pendant is also used with c routine's that
pause execution at specified points and allow an Operator to teach * re-
teach the robot locations used by the program.
There are two styles of Teach Pendants: the
programmer‘s pendant, for use while an application is being pendant, which is
designed for use during normal system operation.
The operator‘s
-activatedpendantswitch,whichhasisconnectedapalmtotheremote emergency stop
circuitry of the controller.
Whenever this switch is released, arm power is
removed from the motion device.
To operate the Teach Pendant left hand is put
through the opening on the left-hand side of the pendant and the left thumb is
used to operate the pendant speed bars.
The right hand is used for all the other function
buttons.

The major areas of the Teach Pendant are:
1. Data
Entry Buttons:
The data entry buttons are
used to input data, normally in response to prompts that appear on the pendant
display
The data entry buttons
include YES/NO, DEL, the numeric buttons, the decimal point and the REC/DONE
button, which behaves like the Return or Enter key on a normal keyboard. In
many cases, application programs have users press the REC/DONE button to signal
that they have completed a task.
2. Emergency Stop Switch:
The emergency stop switch on the Teach
Pendant immediately halts program execution and turns off arm power.
3. User LED:
The pendant is in background mode when
the user LED is in not lit and none of the predefined functions are being used.
The user LED is lit whenever an application program is making use of the Teach
Pendant.
4. Mode Control Buttons:
The mode control buttons change the
state being used to move the robot, switch control between the Teach Pendant
and the application programs and enable arm power when necessary.
5. Manual Control Buttons:
When the Teach Pendant is in manual
mode, these buttons select which robot joint will move, or the coordinate axis
along which the robot will move.
6. Manual State LEDs:
The
manual state LEDs indicates the type of manual motion that has been selected.
7. Speed Bars:
The speed bars are used totion.
Pressing control the speed barthe rob near the outer ends will move the robot
faster, while pressing the speed bar near the center
will
move the robot slower.
8. Slow Button:
The
slow button selects between the two different speed ranges of the speed bars.
9. Predefined Function Buttons:
The predefined function buttons have
specific, system- wide functions assigned to them, like display of coordinates,
clear error, etc.
10. Programmable
Function Buttons:
The programmable function buttons are used in custom
application programs, and their functions will vary depending upon the program
being run.
11. Soft Buttons:
The ―soft‖ buttons have different function or the selection made from the predefined function buttons.
Related Topics