Chapter: Microprocessor and Microcontroller : Micro Controller Programming & Applications
Servo Motor Interfacing with 8051 Micro Controller
Servo Motor
Servos
are DC motors with built in gearing and feedback control loop circuitry. And no
motor drivers required. They are extremely popular with robot, RC plane, and RC
boat builders. Most servo motors can rotate about 90 to 180 degrees. Some
rotate through a full 360 degrees or more. However, servos are unable to
continually rotate, meaning they can't be used for driving wheels, unless they
are modified (how to modify), but their precision positioning makes them ideal
for robot legs and arms, rack and pinion steering, and sensor scanners to name
a few.
Since
servos are fully self-contained, the velocity and angle control loops are very
easy to implement, while prices remain very affordable. To use a servo, simply
connect the black wire to ground, the red to a 4.8-6V source, and the
yellow/white wire to a signal generator (such as from your microcontroller).
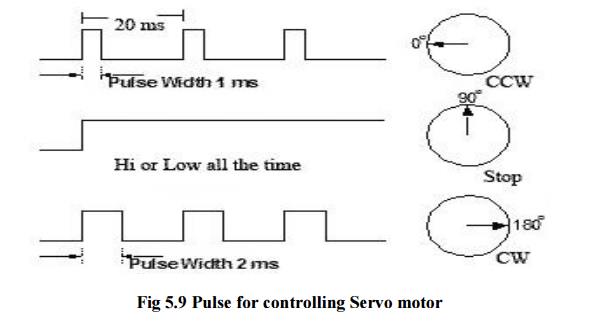
Vary the square wave pulse width from 1-2 ms and your servo is now
position/velocity controlled. Pulse width modulation (PWM) is a powerful
technique for controlling analog circuits with a processor's digital outputs.
PWM is employed in a wide variety of applications, ranging from measurement and
communications to power control and conversion. The general concept is to
simply send an ordinary logic square wave to your servo at a specific wave
length, and your servo goes to a particular angle (or velocity if your servo is
modified). The wavelength directly maps to servo angle.
1 Controlling the Servo Motor
PWM
Pulse
width modulation (PWM) is a powerful technique for controlling analog circuits
with a processor's digital outputs. PWM is employed in a wide variety of
applications, ranging from measurement and communications to power control and
conversion. The general concept is to simply send an ordinary logic square wave
to your servo at a specific wave length, and your servo goes to a particular
angle (or velocity if your servo is modified). The wavelength directly maps to
servo angle.
Programmable Counter Array (PCA)
The PCA
is a special modules in Philips P89V51RD2 which includes a special 16-bit Timer
that has five 16-bit capture/compare modules associated with it. Each of the
modules can be programmed to operate in one of four modes: rising and/or
falling edge capture, software timer, high-speed output, or pulse width
modulator. Each module has a pin associated with it in port 1.
Module 0
is connected to P1.3 (CEX0), module 1 to P1.4 (CEX1), etc. Registers CH and CL
contain current value of the free running up counting 16-bit PCA timer. The PCA
timer is a common time base for all five modules and can be programmed to run
at: 1/6 the oscillator frequency, 1/2 the oscillator frequency, the Timer 0
overflow, or the input on the ECI pin (P1.2). The timer count source is
determined from the CPS1 and CPS0 bits in the CMOD SFR.
In the
CMOD SFR there are three additional bits associated with the PCA. They are CIDL
which allows the PCA to stop during idle mode, WDTE which enables or disables
the Watchdog function on module 4, and ECF which when set causes an interrupt
and the PCA overflow flag CF (in the CCON SFR) to be set when the PCA timer
overflows. The Watchdog timer function is implemented in module 4 of PCA. Here,
we are interested only PWM mode.
8051 Pulse width modulator mode
All of
the PCA modules can be used as PWM outputs. Output frequency depends on the
source for the PCA timer. All of the modules will have the same frequency of
output because they all share one and only PCA timer.
The duty
cycle of each module is independently variable using the module's capture
register CCAPnL. When the value of the PCA CL SFR is less than the value in the
module's CCAPnL SFR the output will be low, when it is equal to or greater than
the output will be high.
When CL
overflows from FF to 00, CCAPnL is reloaded with the value in CCAPnH. This
allows updating the PWM without glitches. The PWM and ECOM bits in the module's
CCAPMn register must be set to enable the PWM mode. For more details see
P89V51RD2 datasheet.
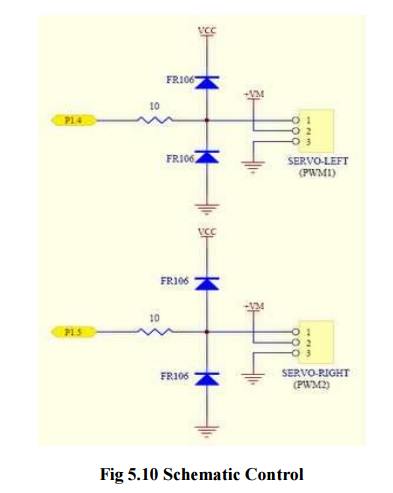
This is
an example how to control servos with 8051 by using PWM. The schematic is shown
below. I use P1.4 (CEX1) to control the left servo and P1.2 (CEX2) to control
the right servo. Here, I use GWS servo motor model S03T STD. I need three
states of duty cycle:
ü 20 ms to
Stop the servo
ü 1 ms to
Rotate Clockwise
Calculation for duty cycle (for XTAL 18.432 MHz
with 6 Clock/Machine cycle)
ü Initial
PWM Period = 20mS (18.432MHz /6-Cycle Mode)
ü Initial
PCA Count From Timer0 Overflow
ü 1 Cycle
of Timer0 = (1/18.432MHz)x6 = 0.326 uS
ü Timer0
AutoReload = 240 Cycle = 78.125 uS
ü 1 Cycle
PCA = [(1/18.432MHz)x6]x240 = 78.125 uS
ü Period
20mS of PCA = 20ms/78.125us = 256 (CL Reload)
ü CL (20mS)
= 256 Cycle Auto Reload
ü Load
CCAPxH (1.0mS) = 256-13 = 243 (243,244,...,255 = 13 Cycle)
ü Load
CCAPxH (2.0mS) = 255-26 = 230 (230,231,...,255 = 26 Cycle)
2 Program
Filename
: pwm_servos.h
Hardware
: Controller -> P89V51RD2
XTAL ->
18.432 MHz
Mode ->
6 Clock/MC
I/O : P1.4 ->
Left (PWM-CEX1)
P1.5 ->
Right (PWM-CEX2)
Compiler
: SDCC
/*
Control the Left servo */
void
ServoL_back()
{
CCAP1H =
243;
}
void
ServoL_forward()
{
CCAP1H =
230;
}
void
ServoL_stop()
{
CCAP1H =
0;
}
/*
Control the Right servo */ void ServoR_back()
{
CCAP2H =
230;
}
void
ServoR_forward()
{
CCAP2H =
243;
}
void
ServoR_stop()
{
CCAP2H =
0;
}
/*
Initialize the PCA and PWM mode */ void Servos_init()
{
/* Initial
Timer0 Generate Overflow PCA */
TMOD =
0x02; /* Timer0 Mode2 : 8bit auto
reload */
TH0 = 16;
/* 256-240, 8.125usec Auto-relead (20msec/PWM) */ TL0 = TH0; TCON = 0x10; /*
setb TR0, TCON or 0001,0000*/
/*Initial
PWM Period = 20mS (18.432MHz /6-Cycle Mode) Initial PCA Count From Timer0
Overflow 1 Cycle of Timer0 = (1/18.432MHz)x6 = 0.326uS Timer0 AutoReload = 240
Cycle = 78.125uS 1 Cycle PCA = [(1/18.432MHz)x6]x240 = 78.125uS Period 20mS of
PCA = 20ms/78.125us = 256(CL Reload) CL(20mS) = 256 Cycle Auto Reload Load
CCAPxH(1.0mS) = 256-13 = 243 (243,244,...,255 = 13 Cycle) Load CCAPxH(2.0mS) =
255-26 = 230 (230,231,...,255 = 26 Cycle)*/
CMOD=0x04;
CCAPM1=0x42; CCAPM2=0x42; CCAP1H=0x00; CCAP2H=0x00; CCON=0x40;
}
test.c
#include
<p89v51rd2.h> #include "pwm_servos.h" void PowerOn()
{
unsigned
char inner, outer; IE = 0x00;
P1 =
0xFF; /* Motor STOP */
for
(outer = 0x00; outer < 0x10; outer++) { /* Delay for a while */ for (inner =
0x00; inner < 0xFF; inner++);
}
Servos_init();
IE =
0x80; /* Start interrupt */
}
void
main()
{
PowerOn();
ServoR_forward();
ServoL_back(); while (1);
}
Related Topics