Textiles and Dress Designing - Pattern Alteration | 12th Textiles and Dress Designing : Chapter 8 : Laying the Pattern, Marking and Cutting
Chapter: 12th Textiles and Dress Designing : Chapter 8 : Laying the Pattern, Marking and Cutting
Pattern Alteration
Pattern Alteration
A comfortable, attractive garment fits properly. It is neither too
large nor too small and conforms to the contours of the body without binding,
pulling, sagging, straining or wrinkling. Fitting problems usually involve one
or more of these basic body areas: neckline, bust line, hipline, arms, shoulder
line, back waistline or abdomen.
Pattern adjustments and alterations are often necessary to achieve
a good fit, especially in a form-fitting garment. Making adjustments or alterations
before the garment is cut from the fabric will eliminate many problems later.
A Pattern can be Altered and Adjusted in Three Ways
·
By folding out excess fullness
·
By slashing and spreading or overlapping along pattern lines to
increase or decrease dimensions.
·
By redrawing darts or seam lines.
1. Standards and Basic Rules for Pattern Alteration
Pattern Alteration Standards
·
Original grain-lines are saved
·
Patterns are kept in balance and proportion
·
Change is created only in required point needed and is not obvious
·
Designer’s lines are protected
Basic Rules or Techniques of Pattern Alteration
·
All similar pieces must be altered to correspond with the
alterations on the major piece
·
Additions or extensions must be made by taping an extension strip
to the edge involved
·
Altered patterns must have the same character as the original
pattern piece
·
Correct movement on altered pattern to give the altered line the
same character as the original line
·
The altered pattern must be properly flat, as like the original pattern
piece
2. Basic Alterations
Altering the Length
If the garment is too short or too long can able to lengthen or
shorten the pattern before cutting the fabric. Usually one can make the
alterations on the horizontal dashed lines marked on the patterns, such as
elbow line, waistline or a hip line. On sleeves one can alter the length on the
elbow line, on dresses on the waist and hip line and on trousers and skirts on
the knee line.
Shortening a Pattern
·
Measure the length of the pattern and take the same measurement on
your body
·
Compare the pattern measurements with individual measurements and
calculate the difference
·
Draw a horizontal line on the pattern at the level where it needed
to be shortened (for example waist, hip, knee etc)
·
Draw a parallel line just above periodically drawn line
·
Cut the pattern into two parts from the lower line. Move and tape
the lower piece straight up on the level of the upper line. Make sure that the
centre front/back remains straight
·
Draw the sides of the pattern smooth and continuous
·
Check that seams that will be sewn together still have the same
length
If the pattern gets shortened a lot, it is good to divide the
difference into more than one line, for example on the waist and hip or hip and
knee, in order to keep the proportions correct. It can be also measure the
actual length from waist to hip so that it is easy to calculate the length to
be reduced
Lengthening a Pattern
·
Measure the length of the pattern and take the same measurement of
the body
·
Compare the pattern measurements with individual body measurements
and calculate the difference
·
Draw a horizontal line on the pattern at the level where it has to
be lengthened (for example waist, hip, knee etc)
·
Cut the pattern into two parts through the lengthening line. Place
a piece of paper under the pieces and tape the lower part on it
·
Draw a parallel line on the paper, the required amount above the
edge of the pattern
·
Tape the edge of upper pattern piece on the line. Make sure that
the center front/back remains straight
·
Draw the sides of the pattern smooth and continuous
·
Check that the seams that will be sewn together still have the
same length.
Altering the Width of a Pattern
·
Altering the Width of a Pattern from Seam
·
Measure the length of the pattern and take the same measurement of
the body
·
Compare the pattern measurements body measurements and calculate
the difference. If the difference is significant width can be reduced or added
from or to the waist darts, depending on the garment.
·
Divide the difference evenly to all seams and mark the difference
with a dot on each part has to be changed.
·
Draw the outline of the pattern through the dot, adapting to the
original shape.
·
Check that the new line is not too steep or curved – in that case
it will not fit properly after sewing. In case of improper fit allowance
reduced or added can be from/to the waist darts.
·
Check that seams that will be sewn together still have the same
length.
Note that the patterns of slim garments that are made of elastic
fabrics can be slightly smaller than actual body measurements.
Altering the Width of a Pattern from Waist Darts
·
Measure the waist of the pattern and individual waist.
·
Compare the pattern measurements with your own measurements and
calculate the difference.
·
Add or reduce the difference to/from all waist darts so that one
can add or reduce the same amount from the side of each dart and draw new lines
towards the tip of the dart.
·
Check that the sides of darts are the same length and that the
edge of the pattern continues smoothly over the darts.
Note that the darts should not be too wide. The back darts closest
to center back should be wider than the other back darts – the width should not
be more than 3-4 cm. Front darts should not be wider than 2,5 cm.
If there are two back darts, the darts closer to side seam can be
left unsewn; this gives the waist more fullness. In this case, draw the edge of
the pattern smooth above the dart that you are not sewing.
3. Pattern Alteration for Centre Front and Centre Back
Points to be Considered
·
Keep all fabric grain lines, the centre front, and the centre back
on the fabrics straight of grain.
·
Make adjustments carefully in order to preserve the garment’s
original style or design lines. Maintain ease allowance for comfort.
·
Whenever possible, use adjustment lines already provided on a
pattern. When you alter a pattern, make corresponding changes on all related
pieces.
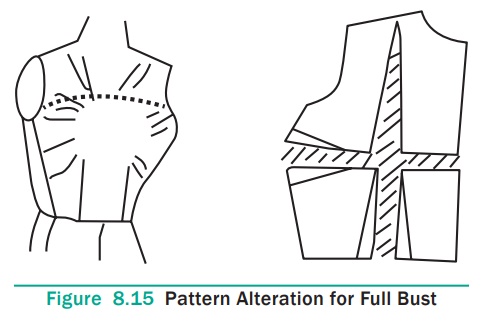
Full Bust (Large Cup Size)
Slash across the pattern along bust dart fold line to centre
front. Slash across the pattern from waist to shoulder along waist dart fold
line. Spread the desired amount at centre front and bust area. Do not spread at
shoulder seam. Redraw seam lines and darts. (New darts will be larger than the
original darts.)

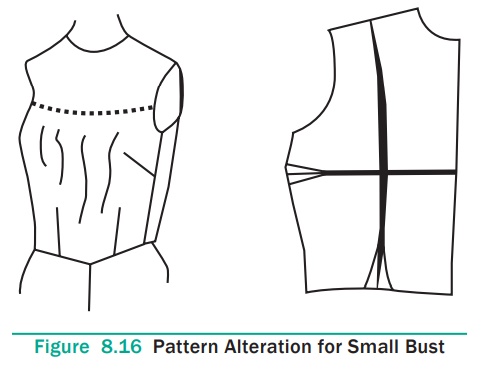
Small Bust (Small Cup Size)
Slash across the pattern along bust dart fold line to centre
front. Slash across pattern from waist to shoulder along waist dart fold line.
Overlap darts the desired amount to decrease the bust area. Do not overlap at
shoulder seam. (New darts will be smaller than the original darts).

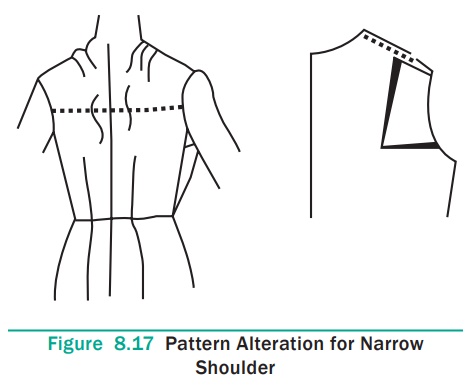
Narrow Shoulders
Slash from midpoint of shoulder down and across to middle of
armscye. Overlap pattern the desired amount, and redraw. Be sure to complete
alterations for both bodice front and back.

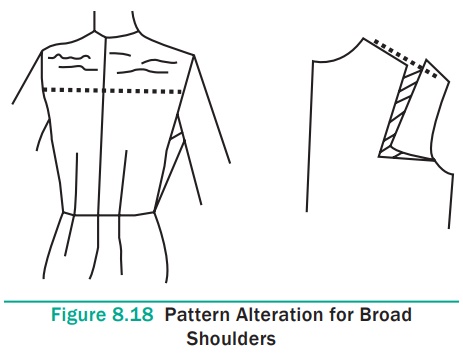
Broad Shoulders
Slash from midpoint of shoulder down and across to the middle of
armscye. Spread pattern the desired amount. Redraw seam from neckline to
armscye. Be sure to complete alterations for both bodice front and back.

Principles of Pattern Alteration
·
As far as possible make changes within a pattern by slashing and
spreading or slashing and lapping. Patterns can also be altered by redrawing
the edges of the pattern. (This is the method adopted for altering garments at
the time of fitting.)
·
But the first method is the best in altering paper patterns.
·
To preserve the original grain line, make all slashes and folds
parallel or perpendicular to the grain line (to centre front line, centre back
line etc).
·
Where there are darts, make changes between the tip of the dart
and the outside edge.
·
If an alteration in length is made along one edge of the pattern,
take care to make an identical alteration in the adjoining edge. For example,
if back shoulder seam is shortened the front shoulder seam should also be
shortened.
·
When tucks or darts are used for making a pattern smaller,
remember that the width of these should be just half the amount to be removed.
·
When decreasing or increasing the width of pattern pieces, if only
half the pattern (half back or half front) is used, subtract or add only one
fourth of the total adjustment to be made. For example, if waist measurement
has to be increased by one inch, add ¼” to the half back pattern and the same
amount to the front pattern. If only a front or back section needs adjustment,
add or minus half the amount of the adjustment to the respective section.
·
When the pattern alteration involves slashing and spreading, it is
necessary to keep a sheet of paper beneath and to pin or stick to it the
spread-out parts so that they will thereafter remain in position. On spreading
or lapping after slashing, some edges of the pattern become jagged. These must
be trimmed after drawing the new seam lines.
Related Topics