Chapter: 11th 12th std standard Class Nursing Health Care Hospital Hygiene Higher secondary school College Notes
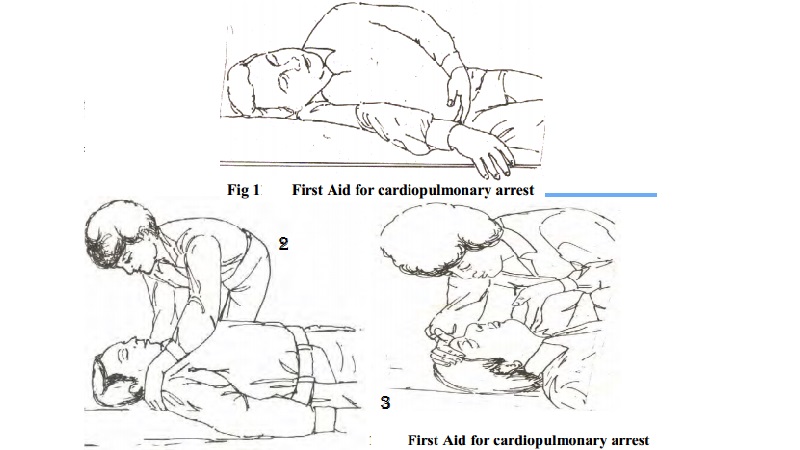
First aid for cardiopulmonary arrest
Cardiopulmonary emergencies
CARDIAC EMERGENCY (CPR)
First aid for cardiopulmonary arrest
Establish unresponsiveness
When you first discover the victim,
look at him closely. Shake him gently by the shoulders and shout ' Are you
okay?'. This 'shaking and shouting' will establish whether or not he is
unconscious.
Observe A.B.C. of resuscitation - A
= Airway,
B = Breathing, C = Circulation.
Open the airway
Open the victim' s airway. The most common cause of airway
obstruction in an unconscious person is the tongue, which has relaxed and
fallen into the airway.
Because the tongue is attached to the lower jaw, moving the
lower jaw forward will lift the tongue away from the back of the throat,
opening the airway
You
can use three methods to open the airway: the preferred head-tilt/chin-lift,
the head-tilt/neck-lift, or the jaw thrust without head-tilt.
To use the head-tilt/chin-lift method, place your hands that
is closest to the victim' s head on his forehead and tilt his head slightly.
Place the fingertips of your other hand under his lower jaw on the bony part
near the chin. Gently lift the chin up, taking care not to close his mouth.
To use the head-tilt/neck-lift method, place the palm of
your hand that is closest to the victim' s head on his forehead and your other
hand under his neck.
Place the hand lifting his neck
close to the back of his head to minimize cervical-spine extension.
Then gently press back on his
forehead while lifting up and supporting his neck.
Use the jaw-thrust without head-tilt
method if you suspect the victim has a neck or spine injury. Kneel at the
victim' s head, facing his feet.
Place your thumbs on his mandible near the corners of his
mouth, pointing your thumbs toward his feet. Then position the tips of your
index fingers at the angles of his jaw. Push your thumbs down while you lift
upward with the tips of your index fingers. This action should open the victim'
s airway.
Once you have opened the victim' s
airway see if this action alone has restored his breathing. Put your ear over
his mouth and nose while you look forward his chest and abdomen.
Listen
for any air movement and look to see if his chest or abdomen is moving up and
down. Feel with your chest for any flow of air. If the victim has started to
breathe, maintain his airway until help arrives.
Restore
breathing
If the victim hasn' t started to
breathe, close his nostrils with the thumb and index finger of your hand on his
forehead.
Open your mouth wide and place it
over the victim' s mouth, sealing it tightly so that no air can escape.
When you use the jaw-thrust method
to open the airway, you must tuck your cheek under his nostrils.
Deliver
four quick breaths
o Don' t allow the victim to exhale
between these breaths.
o These
four breaths maintain positive pressure in the airway. Even if the victim has stopped breathing for
only for a short time, some of his lungs' alveoli may have collapsed. Positive
pressure helps reinflate them.
When you see the victim' s chest
rise, then fall (after your fourth breath), you will know that air is entering
and escaping his lungs. If the victim wears dentures, keeping them in place
will usually make ventilation easier. But if they are slipping, remove them.
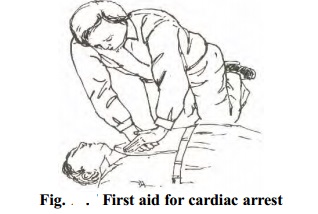
Restore Circulation
Now locate the victim' s carotid
pulse. To do so, keep your hand on his forehead to maintain the head-tilt
position. Use your other hand to find the carotid artery on the side closest to
you, in the groove beside the larynx. Use your index and middle fingers to
gently palpate the artery for 5 to 10 seconds.
If you find a pulse, don' t give cardiac compressions but do
ventilate the patient at a rate of one breath every seconds (12 breaths a
minute).
Continue to check his pulse after
every 12 breaths. If you find no pulse, prepare to begin cardiac compression.
Position yourself close to the victim' s side, with your knees apart. This
position gives you a broad base of support.
Use
the fingers of your hand that' s closest to the victim' s feet to lower margin
of his rib cage and trace the margin to the notch where the ribs meet the
sternum.
Next, place your middle finger on
the notch.
Place your index finger of the same
hand next to your middle finger. Then place the heel of your other hand next to
your index finger on the long axis of the sternum, as shown.
This is the correct position for
cardiac compression. If your hands are placed incorrectly, you may lacerate the
victim' s liver or fracture a rib.
Place the hand you used to locate
the notch over the heel of your other hand. Interlock or extend your fingers to
keep them off the victim' s ribs and to maintain vertical pressure through the
heel of the hand touching the sternum.
Align your shoulders over your
hands, keeping your elbows straight. Keeping your fingers off the ribs and your
shoulders aligned ensures that you will compress downward, not laterally.
Lateral compressions won' t deliver sufficient pressure.
Using the weight of your upper body,
compress downward about 1.1/2 to 2 inches (3 to 5 cm), concentrating the
pressure through the heels of your hands.
Don' t deliver bouncing compressions
because they are less effective and could injure the victim. Then relax the
pressure completely to let the victim' s heart fill with blood.
Don' t remove your hands from his
chest when you relax, or you will lose your hand position.
If you are the only rescuer, time
your compressions at a rate of 80 a minute. Count, 'One and two and three and
four and five and �' up to the count of fifteen.
Then deliver two quick breaths without
allowing the victim to exhale between them. (Actually, you will be delivering
60 compressions a minute, with the delay to
ventilate the victim).
Perform CPR for 1
minute, check the victim' s pulse, then quickly telephone for help if none has
arrived. Return quickly and resume CPR. If there is no phone available,
continue CPR.
If a second rescuer arrives, ask her
to call or go for help if you have not been able to do so. Then she can help
you resuscitate the victim. (Of course, she must be trained in CPR if she is
going to assist you).
Have the second rescuer get on the
opposite side of the victim' s airway, across from you. As she opens the victim'
s airway and tries to locate the carotid pulse, you continue giving
compressions.
If your compressions are strong
enough, she should feel a pulse. When the second rescuer signal that she has
found the pulse you are generating, stop your compressions for 5 seconds so she
can see if the victim' s heart is beating on its own.
If she can' t feel a spontaneous
pulse, she should deliver one breathe. You can then resume compressions
(approximately 60 per minute), while the second rescuer delivers a full breath
on the upstroke of every fifth compression.
To assure that you work as a team,
count out loud: 'One thousand one, one thousand two, one thousand three, one
thousand four, one thousand five, one thousand�' and so on. Have the second
rescuer check for the victim' s pulse every few minutes.
When you feel tired, tell the second
rescuer you want to switch positions. To alert her, say: 'Switch, one thousand,
two, one thousand, five, one thousand'. When you finish this count, the second
rescuer should be delivering a full breath as you a move toward the victim' s
head.
When you get to his head, open his
airway and assess his carotid pulse for 5 seconds. The second rescuer should
get into position for cardiac compression.
If you can' t feel a pulse, deliver
one breath and tell the second rescuer to start the compressions. If you do
find a pulse but the victim is not breathing, tell the second rescuer not to
give any compression.
Continue giving the victim
mouth-mouth ventilation and check his pulse every few minutes, in case his
heart stops again.
Cardiopulmonary
resuscitation for small children and infants is similar to that for adults.
Generally, a child younger than a
year is considered an infant, and
one between 1 and 8 years old is considered
a small child.
Use adult CPR techniques for
children older than 8 years. In an emergency, of course, you are not going to
delay CPR until you determine the child' s age. Instead, consider his body size
relation to the size of your hand.
For
example, if he looks too small to use both hands for cardiac compression, use
the heel of one hand. If he is too small for that, use two or three fingers.
CPR for small children
1.
Use the head-tilt/neck-lift (as
shown) or head-tilt/chin-lift method to open the airway. You may need to use
two or three fingers instead of your whole hand to lift the child' s neck if it
is very small.
2.
If you use the head-tilt/chin-lift
method, be careful not to close the child' s mouth when you lift his chin.
Also, be sure your fingers are not pressing on the soft tissue under his chin,
which may cause edema and subsequent airway obstruction.
3.
If the child' s face is large
enough, maintain a tight seal by pinching his nostrils (as shown) and placing
your mouth over his. If he has a small face, place your mouth over his mouth
and nose. When ventilating, give only enough air to make the child' s chest
rise.
4.
Try
to palpate the child' s carotid pulse. If you find a pulse, do not give cardiac
compression but do ventilate the child at a rate of one breath every
5.
4
seconds. If you can' t locate a pulse, find the proper location for
compression. Use the same technique you would for an adult.
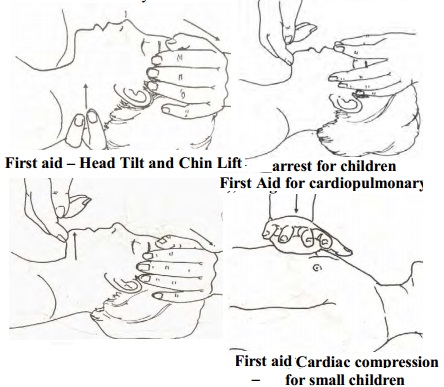
Then compress about 1 to 1.1/2 inches (2.5 to
3.8 cm), using the heel of one hand (as shown).
Give 80 compressions a minute, with
a breath after every fifth compression. Your count should be: 'One and two and
three and four and five and one�' and so on.
This rate and ratio are the same if
you have a second rescuer helping you, but the second rescuer should ventilate
on the upstroke of the fifth compression.
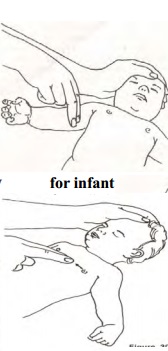
CPR for infants
1) When
you tilt an infant' s head, you will lift up his back as well. So before
opening an infant' s airway, place a rolled towel of your hand closest to his
feet beneath his back to support it.
Then gently tilt his head back. You
don' t need to neck.
Cover both his mouth and node with
your mouth. To ventilate, give only small breaths - just enough to make his
chest rise.
If you are having trouble
ventilating the infant, his stomach may be distended, limiting chest expansion.
Don' t relieve gastric distension
unless absolutely necessary, because the infant may aspirate stomach contents.
But if his abdomen is so tense you
can' t ventilate, turn him onto his right side and gently press on his
epigastric region.
Gastric distension is caused by
delivering too much air, so give only enough air to make the infant' s chest
rise.
Because an infant' s neck is short and chubby, palpate his
brachial rather than carotid pulse.
The brachial pulse is located on the
inside of the upper arm, midway between the shoulder and the elbow.
Don' t palpate his apical pulse -
what you think is a pulse may be just precordial activity.
To locate your hand position for
cardiac compression, draw an imaginary line between the infant's nipples. (An
infant' s heart is located higher in the chest than a small child' s or adult'
s).
Place two or three fingers in the middle of this line.
Deliver about 100 compressions a minute, giving a breath after every five
compression.
Count to yourself: 'One, two, three,
four, five' (even though you are alone). Because an infant is so small, one
rescuer along can try to resuscitate him.
Unconsciousness
Any interference with the normal
functioning of the brain and the nerves brings about loss of consciousness.
Level of Consciousness
Partial ( Stupor)
Complete ( coma)
Causes of unconsiousness
Brain injuries
Convulsions
Heat strokes
Diabetes
Heart attack
Epilepsy
Hemorrhage
Poisons - eg. Carbon mono-oxide
poisoning
Management
See that there is a supply of fresh
air and the air passages are free.
Take the casualty away form harmful
gases
Watch for symptoms of shock
Remove false teeth
Loosen tight clothing up to neck,
chest and waist.
If the breathing has stopped or
about to stop, turn the casualty into the required position and start
artificial respiration.
If breathing is noisy, turn casualty
to 3 quarter turn position and support in this position with pillows.
If breathing is not noisy, let the
casualty lie on his back, raise the shoulder slightly with the pillow and turn
the head to one side
Watch continuously for any changes
in the condition
Do not leave the casualty until the
medical comes
Do not give any form of drinks in
this condition
On return to consciousness, give
little water.
Related Topics