Chapter: Biology: Practical Botany
Microscope: Structure, Uses, Functioning Processes of Simple , Compound Microscope
Microscope and its Uses
The instrument, through which very tiny objects can be seen by magnifying the objects, is known as Microscope (Greek word Microsmeans tiny +skopeein means see). The inventor of microscope is Antony Von Leeuwenhoek (actual spelling is Antoj van Leeuwenhoek). Microscope may be of various types e.g. Optical (light) Microscope. Electron Microscope and Phase Contrast Microscope etc. We use Light Microscope in our laboratories. Optical Microscope again is of two types: (a) Simple Microscope and (b) Compound Microscope.
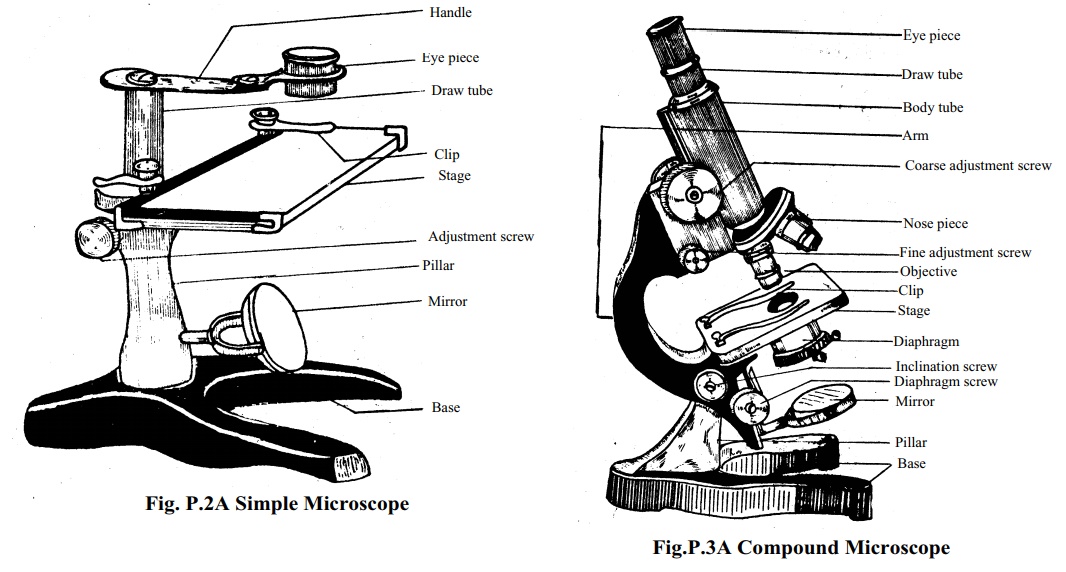
A. Simple Microscope: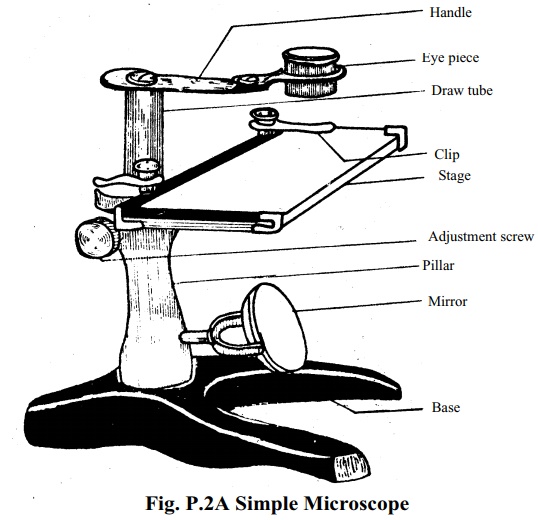
The instrument is called Simple Microscope becausethe structural and functional devices of it are simple. Comparatively larger organs or it parts are usually observed or dissected with the help of this microscope. That is why this microscope is called Simple Microscope. The structure and uses of a Simple Microscope are stated below:
Structure: The structure of a simple microscope is very simple. It has a body, astage made of thick glass for placing slides, two clips to fix the slides, a handle, an eyepiece placed with the handle and a mirror. There is an adjustment knob by which the eye piece may be moved upward and downward. The entire body stands on the base or foot.
Functioning Processes: At first the slide is to fix on the stage with the help ofclips. The light should be focused on the slide by moving the mirror. Then keeping the eye in the eyepiece the adjustment knob should move in such a way that the eyepiece comes to a position from where the object on the stage can be seen most clearly. At this position, keeping the eye in the eyepiece, the specimen is to be observed carefully, or if required be dissected with the help of forceps or needle whichever is convenient.
B. Compound Microscope:
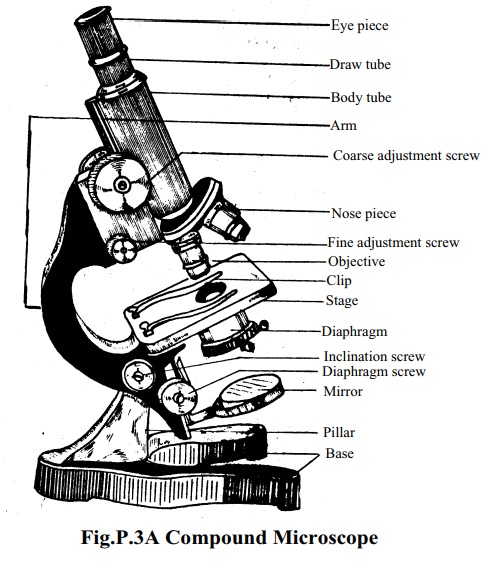
The structure of a compound Microscope is quitecomplex and its working process is also complicated. Different parts of a compound Microscope and their functions are described below:
The different parts of a compound microscope again may be divided into two groups : (1) Mechanical parts and (2) Optical parts.
(1) Mechanical Parts:
(a) Base or Foot: The flat part on which the entire body of the microscope issituated is called the Base or Foot.
(b) Pillar: The vertical part placed in the backside of the base is called thePillar.
(c) Arm: The upper bend part flexibly fixed with the pillar by a screw is theArm. Holding the Arm we use to move the microscope.
(d) Body tube: It is a long tube. It is fixed at the end of the bend arm. There aretwo screws at the junction of the arm and the body tube. One of the screw is called Coarse Adjustment and the other one is called Fine Adjustment. By turning these screws the body tube maybe moved upward or downward as per requirement.
(e) Drawtube: The drawtube is inserted inside the body tube. It may be Pulledupwardly when necessary.
(f) Nosepiece: It is circular body fixed at the lower end of the body tube. It isprovided with three holes with spiral threads in its inner wall where objectives of different magnifications are attached.
(g) Stage: The stage is rectangular and attached with the arm at the base. Thereis a hole at the centre of the stage through which light is focused. Two clips are fixed on the stage at its base. Slide is fixed on the stage with the help of the clips.
(h) Diaphragm: By expansion and contraction of this part ascertains theamount of light to fall on the slide.
(i) Coarse and fine adjustments: At the top of the arm there are two largescrews on two sides; these are called coarse adjustment screws. With the help of these screws the drawtube may be moved upward or downward rapidly. Another pair of comparatively small screw is present below the coarse adjustment screws. The drawtube maybe moved very slowly up and down, by moving these screws. These screws are known as fine adjustment screws.
2. Optical parts:
Eyepiece: It is a small tube, which can be inserted into the drawtube. There are two lenses fitted at its two ends. Keeping the eyes on this eyepiece object (specimen) placed on the stage is to be observed.
Objectives : There are also small tubes like eyepiece, and they are providedwith lenses. Uisually three objectives of different magnifications are attached in the three holes of the nosepiece. Magnification power is inscribed on the body of the eyepiece and objectives.
Condenser: It is simple a combination of two lenses. It is attached beneaththe hole of the stage. Light being converged through this condenser fall on the specimen placed on the slide.
Mirror: It is a Plano-concave mirror. It is attached at the base of the pillarLight can be focused through condenser and diaphragm, by turning the mirror at necessary direction.
The magnification determined by multiplying the power inscribed on the eyepiece and objectives [let the magnification power of the eyepiece is IOX and that of the objective i 20X. Then the magnification of the object is equal to 10 X 20 = 200 times. Student should learn the use of simple and compound microscope from the class teacher in the practical class.
Methods of Practical works:
The following tasks are to be performed in practical class.
1. At first, students are to know from the teacher as to what to do with thesupplied specimen, or may understand by reading question papers.
2. External size, shape and other identifying characters of the supplie specimenshould be observed carefully and if necessary diagrams are to be drawn and labelled its different parts in the notebook.
3. If the specimen is root, stem or leaf and if their anatomy (internal structure isto be studied, a cross section should be taken with a sharp blade and be mounted with a drop of glycerin on the slide. Then it should be observe carefully and labelled diagram is to be drawn in the practical notebook.
4. After drawing necessary diagrams and writing descriptions, its identifyingcharacters should be found out and the specimen should be identified.
5. Diagrams should always be large in size. At the time of drawing, at first afade line to be drawn with a hard pencil. When it is clear that the outline of the diagram is all right, then distinct line to be drawn over the fade line by a HB pencil. If necessary the diagram may be shaded by 2B or 3B pencils. Labeling of the diagram should Preferably be done at one side and in one line.
Related Topics