Chapter: Java The Complete Reference : Introducing GUI Programming with Swing : Introducing Swing Menus
Use Actions - Swing
Use
Actions
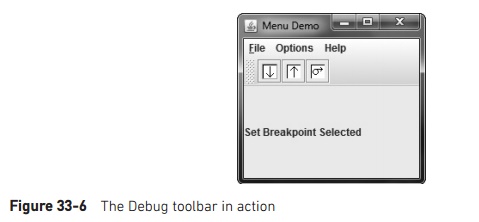
Often, a toolbar and a menu
item contain items in common. For example, the same functions provided by the
Debug toolbar in the preceding example might also be offered through a menu
selection. In such a case, selecting an option (such as setting a breakpoint)
causes the same action to occur, independently of whether the menu or the
toolbar was used. Also, both the toolbar button and the menu item would (most
likely) use the same icon. Furthermore, when a toolbar button is disabled, the
corresponding menu item would also need to be disabled. Such a situation would
normally lead to a fair amount of duplicated, interdependent code, which is
less than optimal. Fortunately, Swing provides
a solution: the action.
An action is an instance of
the Action interface. Action extends the ActionListener interface and provides a means of combining state
information with the actionPerformed( )
event handler. This combination allows one action to manage two or more
components. For example, an action lets you centralize the control and handling
of a toolbar button and a menu item. Instead of having to duplicate code, your
program need only create an action that automatically handles both components.
Because Action extends ActionListener,
an action must provide an implementation of the actionPerformed( ) method. This handler will process the action
events generated by the objects linked to the action.
In addition to the inherited actionPerformed( ) method, Action defines several methods of its
own. One of particular interest is putValue(
). It sets the value of the various properties associated with an action
and is shown here:
void putValue(String key, Object val)
It assigns val to the property specified by key that represents the desired
property. Although not used by the example that follows, it is helpful to note
that Action also supplies the getValue( ) method that obtains a
specified property. It is shown here:
Object getValue(String key)
It returns a reference to the
property specified by key.
The key values used by putValue( ) and getValue( ) include those shown here:
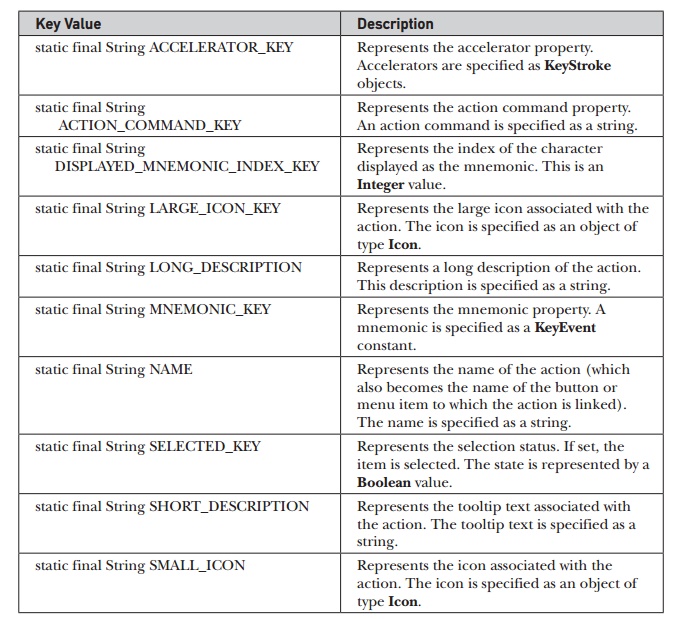
For example, to set the
mnemonic to the letter X, use this
call to putValue( ):
actionOb.putValue(MNEMONIC_KEY, new
Integer(KeyEvent.VK_X));
One Action property that is not accessible through putValue( ) and getValue( )
is the enabled/disabled status. For this, you use the setEnabled( ) and isEnabled(
) methods. They are shown here:
void setEnabled(boolean enabled) boolean isEnabled( )
For setEnabled( ), if enabled
is true, the action is enabled.
Otherwise, it is disabled. If the action is enabled, isEnabled( ) returns true.
Otherwise, it returns false.
Although you can implement
all of the Action interface
yourself, you won’t usually need to. Instead, Swing provides a partial
implementation called AbstractAction
that you can extend. By extending AbstractAction,
you need implement only one method: actionPerformed(
). The other Action methods are
provided for you. AbstractAction provides
three constructors. The one used in this chapter is shown here:
AbstractAction(String name, Icon image)
It constructs an AbstractAction that has the name
specified by name and the icon
specified by image.
Once you have created an
action, it can be added to a JToolBar
and used to construct a JMenuItem.
To add an action to a JToolBar, use
this version of add( ):
void add(Action actObj)
Here, actObj is the action that is being added to the toolbar. The
properties defined by actObj are used
to create a toolbar button. To create a menu item from an action, use this JMenuItem
constructor:
JMenuItem(Action actObj)
Here, actObj is the action used to construct a menu item according to its
properties.
To illustrate the benefit of
actions, we will use them to manage the Debug toolbar created in the previous
section. We will also add a Debug submenu under the Options main menu. The
Debug submenu will contain the same selections as the Debug toolbar: Set
Breakpoint, Clear Breakpoint, and Resume. The same actions that support these
items in the toolbar will also support these items in the menu. Therefore,
instead of having to create duplicate code to handle both the toolbar and menu,
both are handled by the actions.
Begin by creating an inner
class called DebugAction that
extends AbstractAction, as shown
here:
//A class to create an action for the Debug
menu
//and toolbar.
class DebugAction extends AbstractAction {
public DebugAction(String name, Icon image, int
mnem, int accel, String tTip) {
super(name, image); putValue(ACCELERATOR_KEY,
KeyStroke.getKeyStroke(accel, InputEvent.CTRL_DOWN_MASK));
putValue(MNEMONIC_KEY, new Integer(mnem));
putValue(SHORT_DESCRIPTION, tTip);
}
//Handle events for both the toolbar and the
//Debug menu.
public void actionPerformed(ActionEvent ae) {
String comStr = ae.getActionCommand();
jlab.setText(comStr + " Selected");
//Toggle the enabled status of the
//Set and Clear Breakpoint options.
if(comStr.equals("Set Breakpoint")) {
clearAct.setEnabled(true);
setAct.setEnabled(false);
} else if(comStr.equals("Clear
Breakpoint")) {
clearAct.setEnabled(false);
setAct.setEnabled(true);
}
}
}
DebugAction extends AbstractAction.
It creates an action class that will be used to define the properties associated with the Debug menu and toolbar.
Its constructor has five parameters that let you specify the following items:
Name
Icon
Mnemonic
Accelerator
Tooltip
The first two are passed to AbstractAction’s constructor via super. The other three properties are
set through calls to putValue( ).
The actionPerformed( ) method of DebugAction
handles events for the action. This means that when an instance of DebugAction is used to create a toolbar
button and a menu item, events generated by either of those components are
handled by the actionPerformed( )
method in DebugAction. Notice that
this handler displays the selection in jlab.
In addition, if the Set Breakpoint option is selected, then the Clear
Breakpoint option is enabled and the Set Breakpoint option is disabled. If the
Clear Breakpoint option is selected, then the Set Breakpoint option is enabled
and the Clear Breakpoint option is disabled. This illustrates how an action can
be used to enable or disable a component. When an action is disabled, it is
disabled for all uses of that action. In this case, if Set Breakpoint is
disabled, then it is disabled both in the toolbar and in the menu.
Next, add these DebugAction instance variables to MenuDemo:
DebugAction setAct;
DebugAction clearAct;
DebugAction resumeAct;
Next, create three ImageIcons that represent the Debug options,
as shown here:
// Load the images for the actions.
ImageIcon setIcon = new
ImageIcon("setBP.gif"); ImageIcon clearIcon = new
ImageIcon("clearBP.gif"); ImageIcon resumeIcon = new
ImageIcon("resume.gif");
Now, create the actions that
manage the Debug options, as shown here:
// Create actions.
setAct = new DebugAction("Set
Breakpoint", setIcon, KeyEvent.VK_S, KeyEvent.VK_B,
"Set a break point.");
clearAct =
new DebugAction("Clear Breakpoint",
clearIcon, KeyEvent.VK_C, KeyEvent.VK_L,
"Clear a break point.");
resumeAct =
new DebugAction("Resume", resumeIcon,
KeyEvent.VK_R, KeyEvent.VK_R,
"Resume execution after
breakpoint.");
// Initially disable the Clear Breakpoint
option.
clearAct.setEnabled(false);
Notice that the accelerator
for Set Breakpoint is B and the accelerator for Clear Breakpoint is L. The
reason these keys are used rather than S and C is that these keys are already
allocated by the File menu for Save and Close. However, they can still be used
as mnemonics because each mnemonic is localized to its own menu. Also notice
that the action that represents Clear Breakpoint is initially disabled. It will
be enabled only after a breakpoint has been set.
Next, use the actions to
create buttons for the toolbar and then add those buttons to the toolbar, as
shown here:
//Create the toolbar buttons by using the
actions.
JButton jbtnSet = new JButton(setAct);
JButton jbtnClear = new JButton(clearAct);
JButton jbtnResume = new JButton(resumeAct);
//Create a Debug toolbar.
JToolBar jtb = new
JToolBar("Breakpoints");
//Add the buttons to the toolbar.
jtb.add(jbtnSet); jtb.add(jbtnClear);
jtb.add(jbtnResume);
//Add the toolbar to the north position of
//the content pane.
jfrm.add(jtb, BorderLayout.NORTH);
Finally, create the Debug
menu, as shown next:
//Now, create a Debug menu that goes under the
Options
//menu bar item. Use the actions to create the
items.
JMenu jmDebug = new JMenu("Debug");
JMenuItem jmiSetBP = new JMenuItem(setAct);
JMenuItem jmiClearBP = new JMenuItem(clearAct); JMenuItem jmiResume = new
JMenuItem(resumeAct); jmDebug.add(jmiSetBP);
jmDebug.add(jmiClearBP);
jmDebug.add(jmiResume);
jmOptions.add(jmDebug);
After making these changes
and additions, the actions that you created will be used to manage both the
Debug menu and the toolbar. Thus, changing a property in the action (such as
disabling it) will affect all uses of that action. The program will now look as
shown in Figure 33-7.

Related Topics