Chapter: Java The Complete Reference : Introducing GUI Programming with Swing : Introducing Swing Menus
Create a Main Menu - Swing
Create
a Main Menu
Traditionally, the most
commonly used menu is the main menu.
This is the menu defined by the menu bar, and it is the menu that defines all
(or nearly all) of the functionality of an application. Fortunately, Swing
makes creating and managing the main menu easy. This section shows you how to
construct a basic main menu. Subsequent sections will show you how to add
options to it.
Constructing the main menu
requires several steps. First, create the JMenuBar
object that will hold the menus. Next, construct each menu that will be in the
menu bar. In general, a menu is constructed by first creating a JMenu object and then adding JMenuItems to it. After the menus have
been created, add them to the menu bar. The menu bar, itself, must then be
added to the frame by calling setJMenuBar(
). Finally, for each menu item, you must add an action listener that
handles the action event fired when the menu item is selected.
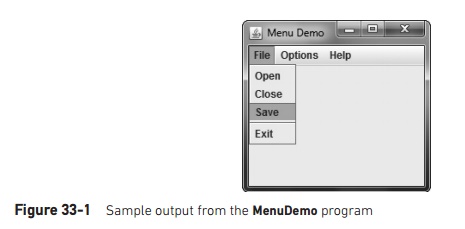
A good way to understand the
process of creating and managing menus is to work through an example. Here is a
program that creates a simple menu bar that contains three menus. The first is
a standard File menu that contains Open, Close, Save, and Exit selections. The
second menu is called Options, and it contains two submenus called Colors and
Priority. The third menu is called Help, and it has one item: About. When a
menu item is selected, the name of the selection is displayed in a label in the
content pane. Sample output is shown in Figure 33-1.
// Demonstrate a simple main menu.
import java.awt.*; import java.awt.event.*;
import javax.swing.*;
class MenuDemo implements ActionListener {
JLabel jlab;
MenuDemo() {
// Create a new JFrame container.
JFrame jfrm = new JFrame("Menu
Demo");
//Specify FlowLayout for the layout manager.
jfrm.setLayout(new FlowLayout());
//Give the frame an initial size.
jfrm.setSize(220, 200);
//Terminate the program when the user closes
the application.
jfrm.setDefaultCloseOperation(JFrame.EXIT_ON_CLOSE);
//Create a label that will display the menu
selection.
jlab = new JLabel();
//Create the menu bar.
JMenuBar jmb = new JMenuBar();
//Create the File menu.
JMenu jmFile = new JMenu("File");
JMenuItem jmiOpen = new JMenuItem("Open"); JMenuItem jmiClose = new
JMenuItem("Close"); JMenuItem jmiSave = new
JMenuItem("Save"); JMenuItem jmiExit = new
JMenuItem("Exit"); jmFile.add(jmiOpen);
jmFile.add(jmiClose);
jmFile.add(jmiSave);
jmFile.addSeparator();
jmFile.add(jmiExit);
jmb.add(jmFile);
// Create the Options menu.
JMenu jmOptions = new
JMenu("Options");
// Create the Colors submenu.
JMenu jmColors = new JMenu("Colors");
JMenuItem jmiRed = new JMenuItem("Red"); JMenuItem jmiGreen = new
JMenuItem("Green"); JMenuItem jmiBlue = new
JMenuItem("Blue"); jmColors.add(jmiRed); jmColors.add(jmiGreen); jmColors.add(jmiBlue);
jmOptions.add(jmColors);
// Create the Priority submenu.
JMenu jmPriority = new
JMenu("Priority"); JMenuItem jmiHigh = new
JMenuItem("High"); JMenuItem jmiLow = new JMenuItem("Low");
jmPriority.add(jmiHigh); jmPriority.add(jmiLow); jmOptions.add(jmPriority);
// Create the Reset menu item.
JMenuItem jmiReset = new
JMenuItem("Reset"); jmOptions.addSeparator();
jmOptions.add(jmiReset);
//Finally, add the entire options menu to
//the menu bar
jmb.add(jmOptions);
// Create the Help menu.
JMenu jmHelp = new JMenu("Help");
JMenuItem jmiAbout = new
JMenuItem("About"); jmHelp.add(jmiAbout);
jmb.add(jmHelp);
Add action listeners for the menu items.
jmiOpen.addActionListener(this); jmiClose.addActionListener(this);
jmiSave.addActionListener(this); jmiExit.addActionListener(this);
jmiRed.addActionListener(this); jmiGreen.addActionListener(this);
jmiBlue.addActionListener(this); jmiHigh.addActionListener(this);
jmiLow.addActionListener(this); jmiReset.addActionListener(this);
jmiAbout.addActionListener(this);
Add the label to the content pane.
jfrm.add(jlab);
Add the menu bar to the frame.
jfrm.setJMenuBar(jmb);
Display the frame. jfrm.setVisible(true);
}
// Handle menu item action events.
public void actionPerformed(ActionEvent ae) {
Get the action command from the menu selection.
String comStr = ae.getActionCommand();
If user chooses Exit, then exit the program.
if(comStr.equals("Exit")) System.exit(0);
Otherwise, display the selection.
jlab.setText(comStr + " Selected");
}
public static void main(String args[]) {
// Create the frame on the event dispatching
thread.
SwingUtilities.invokeLater(new Runnable() {
public void run() { new MenuDemo();
}
});
}
}
Let’s examine, in detail, how
the menus in this program are created, beginning with the MenuDemo constructor. It starts by creating a JFrame and setting its layout manager, size, and default close operation. (These operations are described in
Chapter 31.) A JLabel is then
constructed. It will be used to display a menu selection. Next, the menu bar is
constructed and a reference to it is assigned to jmb by this statement:
// Create the menu bar.
JMenuBar jmb = new JMenuBar();
Then, the File menu jmFile and its menu entries are created
by this sequence:
// Create the File menu.
JMenu jmFile = new JMenu("File");
JMenuItem jmiOpen = new
JMenuItem("Open");
JMenuItem jmiClose = new
JMenuItem("Close");
JMenuItem jmiSave = new
JMenuItem("Save");
JMenuItem jmiExit = new
JMenuItem("Exit");
The names Open, Close, Save,
and Exit will be shown as selections in the menu. Next, the menu entries are
added to the file menu by this sequence:
jmFile.add(jmiOpen);
jmFile.add(jmiClose);
jmFile.add(jmiSave);
jmFile.addSeparator();
jmFile.add(jmiExit);
Finally, the File menu is
added to the menu bar with this line:
jmb.add(jmFile);
Once the preceding code
sequence completes, the menu bar will contain one entry: File. The File menu
will contain four selections in this order: Open, Close, Save, and Exit.
However, notice that a separator has been added before Exit. This visually
separates Exit from the preceding three selections.
The Options menu is
constructed using the same basic process as the File menu. However, the Options
menu consists of two submenus, Colors and Priority, and a Reset entry. The
submenus are first constructed individually and then added to the Options menu.
The Reset item is added last. Then, the Options menu is added to the menu bar.
The Help menu is constructed using the same process.
Notice that MenuDemo implements the ActionListener interface and action
events generated by a menu selection are handled by the actionPerformed( ) method defined by MenuDemo. Therefore, the program adds this as the action listener for the menu items. Notice that no listeners are added to
the Colors or Priority items because they are not actually selections. They
simply activate submenus.
Finally, the menu bar is
added to the frame by the following line:
jfrm.setJMenuBar(jmb);
As mentioned, menu bars are
not added to the content pane. They are added directly to the JFrame.
The actionPerformed( ) method handles the action events generated by
the menu. It obtains the action command string associated with the selection by
calling getActionCommand( ) on the
event. It stores a reference to this string in comStr. Then, it tests
the action command against "Exit", as shown here:
if(comStr.equals("Exit"))
System.exit(0);
If the action command is
"Exit", then the program terminates by calling System.exit( ). This method causes the immediate termination of a
program and passes its argument as a status code to the calling process, which
is usually the operating system or the browser. By convention, a status code of
zero means normal termination. Anything else indicates that the program
terminated abnormally. For all other menu selections, the choice is displayed.
At this point, you might want
to experiment a bit with the MenuDemo
program. Try adding another menu or adding additional items to an existing
menu. It is important that you understand the basic menu concepts before moving
on because this program will evolve throughout the course of this chapter.
Related Topics