Chapter: Java The Complete Reference : Introducing GUI Programming with Swing : Introducing Swing Menus
Create a Popup Menu - Swing
Create
a Popup Menu
A popular alternative or
addition to the menu bar is the popup menu. Typically, a popup menu is
activated by clicking the right mouse button when over a component. Popup menus
are supported in Swing by the JPopupMenu
class. JPopupMenu has two
constructors. In this chapter, only the default constructor is used:
JPopupMenu( )
It creates a default popup
menu. The other constructor lets you specify a title for the menu. Whether this
title is displayed is subject to the look and feel.
In general, popup menus are
constructed like regular menus. First, create a JPopupMenu object, and then add menu items to it. Menu item
selections are also handled in the same way: by listening for action events.
The main difference between a popup menu and regular menu is the activation
process.
Activating a popup menu
requires three steps.
You must register a listener for mouse events.
Inside the mouse event handler, you must watch for the popup
trigger.
When a popup trigger is received, you must show the popup menu by
calling show( ).
Let’s examine each of these
steps closely.
A popup menu is normally
activated by clicking the right mouse button when the mouse pointer is over a
component for which a popup menu is defined. Thus, the popup trigger is usually
caused by right-clicking the mouse on a popup menu–enabled component. To listen for the popup trigger,
implement the MouseListener
interface and then register the listener by calling the addMouseListener( ) method. As described in Chapter 24, MouseListener defines the methods shown
here:
void mouseClicked(MouseEvent me) void mouseEntered(MouseEvent me) void mouseExited(MouseEvent me) void mousePressed(MouseEvent me) void mouseReleased(MouseEvent me)
Of these, two are very
important relative to the popup menu: mousePressed(
) and mouseReleased( ).
Depending on the installed look and feel, either of these two events can trigger a popup menu. For this
reason, it is often easier to use a MouseAdapter
to implement the MouseListener
interface and simply override mousePressed(
) and mouseReleased( ).
The MouseEvent class defines several methods, but only four are
commonly needed when activating a popup menu. They are shown here:
int getX( ) int getY( )
boolean isPopupTrigger( )
Component getComponent( )
The current X,Y location of
the mouse relative to the source of the event is found by calling getX( ) and getY( ). These are used to specify the upper-left corner of the
popup menu when it is displayed. The
isPopupTrigger( ) method returns true if the mouse event represents a
popup trigger and false otherwise.
You will use this method to determine when to pop up the menu. To obtain a
reference to the component that generated the mouse event, call getComponent( ).
To actually display the popup
menu, call the show( ) method
defined by JPopupMenu, shown next:
void show(Component invoker, int upperX, int upperY)
Here, invoker is the component relative to which the menu will be
displayed. The values of upperX and upperY define the X,Y location of the
upper-left corner of the menu, relative to
invoker. A common way to obtain the invoker is to call getComponent( ) on the event object passed to the mouse event handler.
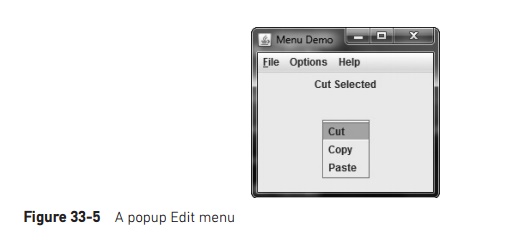
The preceding theory can be
put into practice by adding a popup Edit menu to the MenuDemo program shown at the start of this chapter. This menu will
have three items called Cut, Copy,
and Paste. Begin by adding the following instance variable to MenuDemo:
JPopupMenu jpu;
The jpu variable will hold a reference to the popup menu.
Next, add the following code
sequence to the MenuDemo
constructor:
//Create an Edit popup menu.
jpu = new JPopupMenu();
//Create the popup menu items.
JMenuItem jmiCut = new
JMenuItem("Cut"); JMenuItem jmiCopy = new
JMenuItem("Copy");
JMenuItem jmiPaste = new
JMenuItem("Paste");
//Add the menu items to the popup menu.
jpu.add(jmiCut);
jpu.add(jmiCopy);
jpu.add(jmiPaste);
//Add a listener for the popup trigger.
jfrm.addMouseListener(new MouseAdapter() {
public void mousePressed(MouseEvent me) {
if(me.isPopupTrigger())
jpu.show(me.getComponent(), me.getX(),
me.getY());
}
public void mouseReleased(MouseEvent me) {
if(me.isPopupTrigger())
jpu.show(me.getComponent(), me.getX(),
me.getY());
}
});
This sequence begins by
constructing an instance of JPopupMenu
and storing it in jpu. Then, it
creates the three menu items, Cut, Copy, and Paste, in the usual way, and adds
them to jpu. This finishes the
construction of the popup Edit menu. Popup menus are not added to the menu bar
or any other object.
Next, a MouseListener is added by creating an anonymous inner class. This
class is based on the MouseAdapter
class, which means that the listener need only override those methods that are
relevant to the popup menu: mousePressed(
) and mouseReleased( ). The
adapter provides default implementations of the other MouseListener methods. Notice that the mouse listener is added to jfrm. This means that a right-button
click inside any part of the content pane will trigger the popup menu.
The mousePressed( ) and mouseReleased(
) methods call isPopupTrigger( )
to determine if the mouse event is a popup trigger event. If it is, the popup
menu is displayed by calling show( ).
The invoker is obtained by calling getComponent(
) on the mouse event. In this case, the invoker will be the content pane.
The X,Y coordinates of the upper-left corner are obtained by calling getX( ) and getY( ). This makes the menu pop up with its upper-left corner
directly under the mouse pointer.
Finally, you also need to add
these action listeners to the program. They handle the action events fired when
the user selects an item from the popup menu.
jmiCut.addActionListener(this);
jmiCopy.addActionListener(this);
jmiPaste.addActionListener(this);
After you have made these
additions, the popup menu can be activated by clicking the right mouse button
anywhere inside the content pane of the application. Figure 33-5 shows the
result.
One other point about the
preceding example. Because the invoker of the popup menu is always jfrm, in this case, you could pass it
explicitly rather than calling getComponent(
). To do so, you must make jfrm
into an instance variable of the MenuDemo
class (rather than a local variable) so that it is accessible to the inner
class. Then you can use this call to show(
) to display the popup menu:
jpu.show(jfrm, me.getX(), me.getY());
Although this works in this
example, the advantage of using getComponent(
) is that the popup menu will automatically pop up relative to the invoking
component. Thus, the same code could be used to display any popup menu relative
to its invoking object.
Related Topics