Adobe Flash Professional CS6 - The Flash workspace | 12th Computer Technology : Chapter 5 : Adobe Flash Professional CS6
Chapter: 12th Computer Technology : Chapter 5 : Adobe Flash Professional CS6
The Flash workspace
The Flash workspace
The Flash CS6 workspace includes a variety of tools and other
components that you work with to create Flash applications.
1. Flash Window Components
The Flash window is divided into four main components. They are
1. Stage and Pasteboard
2. Timeline
3. Tools panel
4. Property Inspector
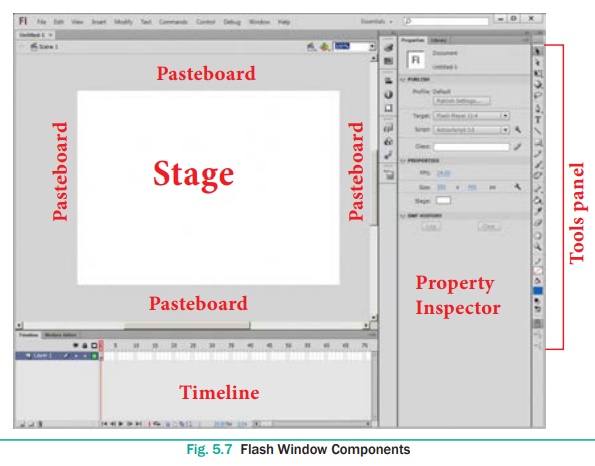
2. The Stage and Pasteboard (work area)
The white rectangle area in the middle of your workspace is called
the Stage.
All the animations, objects and scenes for a Flash movie are
created, edited, placed and played back in the stage.
As with a theater stage, the Flash Stage is the area that viewers
see when a movie is playing. The term movie refers to Flash-created movies.
It contains the text, images, audio and video that appear on the
screen. You can resize the Stage. By default, the Flash Stage appears white,
but, you can change its background color from the Document settings dialog
box using the Modify > Document (Ctrl +J) command. To change
the view of the Stage, Zoom in and out. To help in positing the items on the
Stage, you can use the grid, guides and rulers.
The gray area surrounding the Stage in Flash is the Pasteboard.
You can create and edit objects in the pasteboard also but they will not be
visible in the final movie. Only the graphical objects kept inside the stage
are visible in the final movie.
The Stage reflects the actual size of the movie you create in
Flash when it is published.
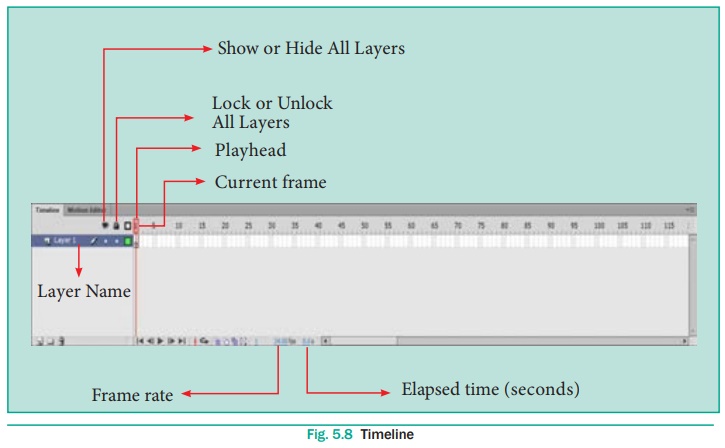
3. The Timeline
The timeline is one of the most important components of Flash. It
is located below the Stage. It is used to specify of each element’s appearance
and animation.
The Timeline also contains Frames and Layers. Flash movies measure
time in frames. Frames are the discrete, small slices of time. You can change
the content on the Flash Stage for different frames.
A red vertical line in the Timeline is called the Playhead. When
the movie plays, the playhead moves through the frames in the Timeline.
To display a frame’s content on the Stage, you should move the
playhead to that frame in the Timeline.
Layers help you organize the artwork in your movie. Each layer can
contain a different image that appears on the Flash Stage. You can draw and
edit objects on one layer without affecting objects on another layer of
Timeline. You can hide, lock, or show the contents of layers by clicking the
dots in the layer under the layer option icons.
Timeline is the record of every frame, layer and scene that makes
up a movie. It controls and organizes the movie’s content over time using
layers and frames.
4. The Flash Tools panel
The Flash Tools panel includes the tools you need to create,
select, or edit graphics on the Stage. The double arrows at the top of the
Tools panel are used to collapse the panel to icon-only view, or to expand the
panel and see all the tools. By default, the toolbar is on the right side of
your screen. The single capital letter in parentheses indicate the keyboard
shortcuts to select those tools.
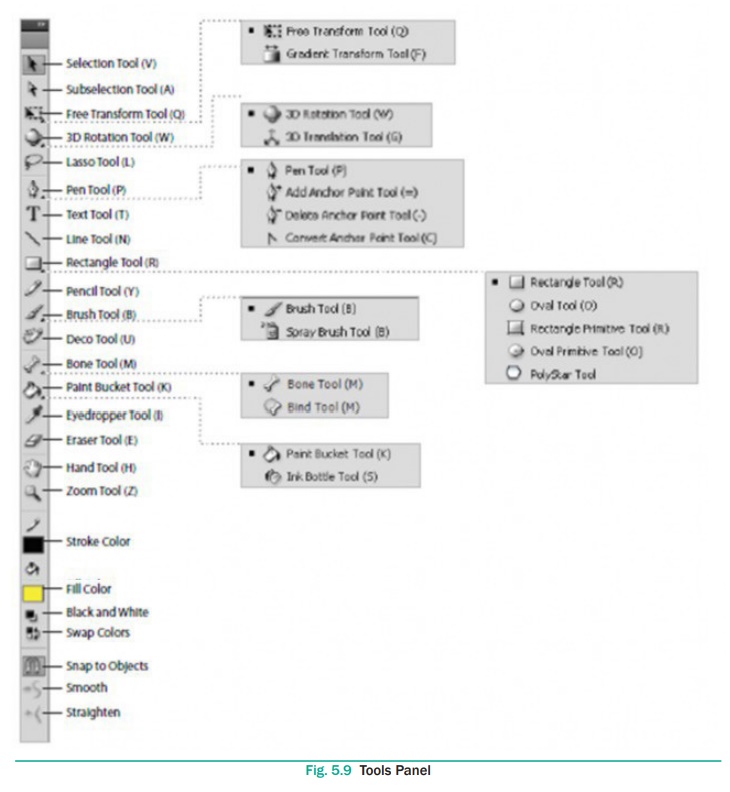
Using the Tools Panel
The Tools panel contains a collection of tools. When you move the
mouse pointer on a tool, its name appears.
Some tools in the Tools panel have additional options that allow
you to modify their use. For example, the Brush tool has options for changing
the size and shape of the brush head. When the tool is selected, the options
are available in the Options area of the Tools panel.
Selection Tool (V)
This tool is used to select an object or parts of an object, such
as the stroke or fill, and to reshape and reposition objects. The options for
the Selection tool are Snap to Objects (aligns objects), Smooth (smooths
lines), and Straighten (straightens lines).
Subselection Tool (A)
This tool is used to select, drag, and reshape an object. We know
that vector graphics are composed of lines and curves (each of which is a
segment) connected by anchor points. When you select an object with this tool,
it displays the anchor points and allows you to use them to edit the object.
Free Transform Tool (Q)
It is used to rotate, scale, skew, and distort objects.
Gradient Transform Tool
(F)
It is used to transform a gradient fill by adjusting the size,
direction, or center of the fill. The Free and Gradient Transform tools are
grouped within one icon on the Tools panel. To see the menu containing grouped
tools, click and hold the tool icon until the menu opens.
3D Rotation Tool (W)
It is used to create 3D effects by rotating movie clips in 3D
space on the Stage.
3D Translation Tool (G)
It is used to create 3D effects by moving movie clips in 3D space
on the Stage. The 3D Rotation and the 3D Translation tools are grouped within
one icon on the Tools panel.
Lasso Tool (L)
It is used to select objects or parts of objects by drawing a
freehand.
Pen Tool (P)
It is used to draw lines and curves by creating a series of dots,
known as anchor points, that are automatically connected. Other tools used to
add, delete, and convert the anchor points created by the Pen tool are grouped
with the Pen tool.
Text Tool (T)
It is used to create and edit text.
Line Tool (N)
It is used to draw straight lines. You can draw vertical,
horizontal, and 45° diagonal lines by pressing and holding Shift key while
drawing the line.
Rectangle Tool(R)
It is used to draw rectangular shapes. Press and hold Shift
key to draw a perfect square.
Oval Tool (O)
It is used to draw oval shapes. Press and hold Shift key to
draw a perfect circle.
Primitive Rectangle and
Oval (R)
It is used to draw objects with properties, such as corner radius
or inner radius, that can be changed using the Properties panel.
PolyStar Tool
It is used to draw polygons and stars. The Rectangle, Oval,
Primitive, and PolyStar tools are grouped within one tool on the Tools panel.
Pencil Tool (Y)
It is used to draw freehand lines and shapes. The Pencil Mode
option displays a menu with the following commands:
Straighten (draws straight lines), Smooth (draws smooth curved
lines), and Ink (draws freehand with no modification).
Brush Tool (B)
It is used to draw (paint) with brush-like strokes.
Spray Brush Tool
It is used to spray colors and patterns onto objects. Dots are the
default pattern for the spray. However, you can use a graphic symbol, such as a
flag, to create a pattern.
The Brush and Spray Brush tools are grouped together.
Deco Tool (U)
It is used to turn graphic shapes into geometric patterns or to
create kaleidoscopic like effects.
Bone Tool (M)
It is used to animate objects that have joints. For example you
could use a series of linked objects, such as arms and legs to create character
animations.
Bind Tool
It is used to adjust the relationships among individual bones. The
Bone and Bind tools are grouped together.
Paint Bucket Tool (K)
It is used to fill enclosed areas of a drawing with color.
Ink Bottle Tool (S)
It is used to apply line colors and thickness to the stroke of an
object. The Paint Bucket and Ink Bottle are grouped together.
Eyedropper Tool (I)
It is used to select stroke, fill, and text attributes so they can
be copied from one object to another.
Eraser Tool (E)
It is used to erase lines and fills.
Hand Tool (H)
It is used to move the Stage around the Pasteboard by dragging the
Stage.
Zoom Tool (Z)
It is used to change the magnification of an area of the Stage.
Clicking an area of the Stage zooms in and holding down Alt Key and clicking
zooms out.
Stroke Color Tool
It is used to set the stroke color of drawn objects.
Fill Color Tool
It is used to set the fill color of drawn objects.
Black and White Tool
It is used to set the stroke color to black and the fill color to
white.
Swap Colors Tool
It is used to swap the stroke and fill colors.
5. Property Inspector
The Property Inspector appears on the right side of your Flash
workspace by default. It is grouped with the Library panel. It displays
properties and options for objects selected on the Stage, and also allows you
to modify them. The object can be text, an image, a line, or any other shape.
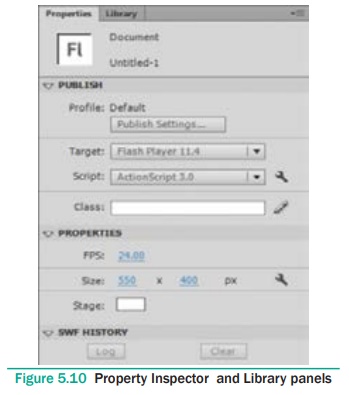
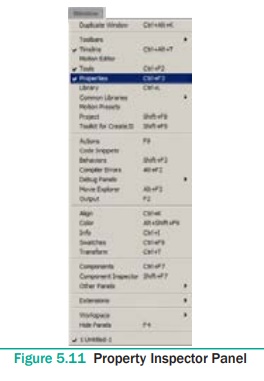
Like any other panel, the Property Inspector panel can also be
viewed or hidden by using Window menu.
Related Topics