Chapter: Civil Surveying : Theodolite Surveying
Temporary Adjustments of Theodolite
Temporary
Adjustments of Theodolite
Theodolite has two types of adjustments-temporary and permanent.
Temporary adjustments are to be done at every station the instrument is set up.
Permanent adjustments deal with the fundamental lines and their relationships
and should be done once in a while to ensure that the instrument is properly
adjusted. The funda-mental lines and their desired relationships are explained
later in this chapter and the permanent adjustments are explained in detail in
Chapter 4. In this section we will discuss temporary adjustments.
The temporary adjustments are the following: (a) setting up and
centring,
(b)
levelling, (c) focusing the eyepiece, and (d) focusing the objective.
Setting Up and Centring
The
following procedure is adopted for this operation.
1.
Remove the theodolite from
its box carefully and fix it onto a tripod kept over the station where the
instrument is to be set up. The tripod legs should be well apart and the
telescope should be at a convenient height for sighting.
2.
Tie a plumb bob onto the
hook provided at the base. If there is no shifting head in the instrument,
centre it by adjusting the tripod legs and shifting the instru-ment as a whole
to bring the plumb bob over the station mark.
3. To centre the plumb bob, shift the tripod legs radially as well as
circumf-erentially. Moving any leg radially shifts the plumb bob in the
direction of the leg. This does not affect the level status of the
instrument. Moving any leg circumferentially does not appreciably shift the
plumb. However, this movement tilts the instrument and affects the
level of the plate bubbles. By moving the legs the plumb bob is brought over
the station mark at the same time ensuring that the instrument is approximately
level. This saves a lot of time for the next operation of levelling.
4.
If the instrument has a
shifting head with a clamp, first centre the instrument using legs. Make the
final adjustment by loosening the clamp and shifting the head (or the
instrument as a whole) to bring the plumb bob over the station mark. In all
operations, the starting step should be to first bring the plumb bob very close
to the mark and then make the final adjustment using the legs or the shifting
head.
Levelling
After
setting up and centring the instrument, levelling is done. Levelling has
to
be done at every station the instrument is set up. By levelling
the instrument, it is ensured that as the instrument is swung about the
vertical axis, the horizontal plate moves in a horizontal plane. The instrument
may have a three-screw or a four-screw levelling head. The levelling operations
differ slightly in these two cases as detailed in the following sections. Most
instruments have only one bubble tube, but some instruments have two bubble
tubes set at right angles over the plates.
Three-screw
levelling head
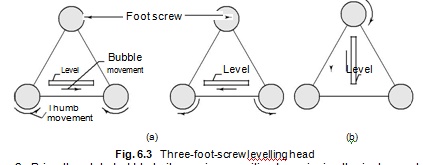
When the theodolite has a three-screw levelling head, the
following procedure is adopted.
1. Swing the theodolite and bring the plate bubble parallel to any
two of the foot
screws. Centre the bubble by rotating the foot screws. To do this, hold the foot screws by the uniband o reinge o each ch hand and rotate both either inwards or outwards [see Fig. 6.3(a)]. Also note that the bubble moves in the direction of movement of the left thumb during this operation.

Fig.
6.3 Three-foot-screw
levelling head
3. Bring the plate bubble to its previous position by swinging the
instrument back. Check whether the bubble traverses. If it does not traverse,
bring the bubble to the centre using the two foot screws as before.
4. Repeat the procedure till the bubble traverses in both these
positions.
5. Swing the instrument through 180 o and check whether the bubble traverses.
The bubble should traverse in all positions if the instrument has been properly
adjusted.
If two plate bubbles are provided [see
Fig. 6.3(b)], the procedure is the same except that swinging the instrument
through 90 o is not required. When one plate level is kept parallel to a pair of
foot screws, the other plate level is over the third foot screw (in a
perpendicular direction). The third foot screw is adjusted alternately by the
same process using the foot screws over which they are paral-lel.
Four-screw
levelling head
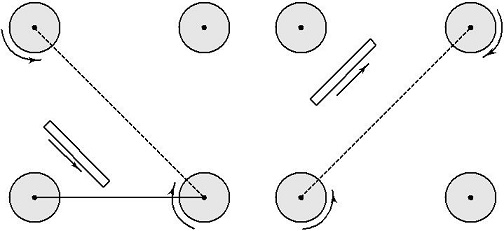
When the theodolite has a four-screw levelling head, the following
procedure is adopted.
1. After setting up and centring the theodolite, bring the plate
level parallel to any one pair of diagonally opposite foot screws. Operate these
foot screws to centre the bubble (Fig. 6.4).
2. Swing the instrument to bring the plate level parallel to the
other pair of foot screws. Centre the bubble.
3. Swing it back to the previous position. Check whether the bubble
traverses. If it does not, centre it with the foot screws to which the level is
parallel.
4. Swing it back, check the position of the bubble, and repeat the
procedure.
5. Once the bubble traverses in the two orthogonal positions, swing
it through 180 o . The bubble should traverse in this position or in any other
position.

Focusing the Eyepiece
Focusing
the eyepiece is the operation of bringing the cross hairs to focus. The
focusing position varies with the eyesight of the observer. If the same
observer is
taking the readings, this has to be done only once. To focus the
eyepiece, use the following procedure.
1. Keep a piece of white paper in front of the telescope or direct
the telescope towards a clear portion of the sky.
2. Looking through the telescope, adjust the vision by rotating the
eyepiece till the cross hairs come into sharp and clear view.
3. If the eyepiece has graduations, note the graduation at which you get a clear view of the cross hairs. This can help in later adjustment if required.
Related Topics