Air | Term 2 Unit 4 | 6th Science - Student Activities | 6th Science : Term 2 Unit 4 : Air
Chapter: 6th Science : Term 2 Unit 4 : Air
Student Activities
Activity 1: Air is everywhere
Let us take an empty glass bottle. Is it really empty or does it have something inside?
Now, shall we turn the glass bottle upside down? Can you agree that there is still something inside the empty glass bottle? Let us do the following activity to find what is there inside an empty glass bottle.
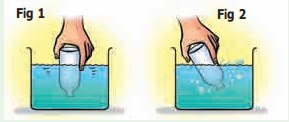
Dip the open mouth of the bottle into the trough filled with water as shown in Fig 1. Observe the bottle. Does water enter the bottle?
Now tilt the bottle slightly. Now again dip the open mouth of the bottle as shown in Fig 2. Do you think that water will enter the bottle?
Kindly observe the Fig 2 carefully. You can see bubbles coming out of the bottle.
When you perform the experiment, can you hear the bubbly sound? can you nowguess what was inside the bottle?
Yes, you are right. It is “air” that was present in the bottle.
The bottle was not empty at all. In fact, it was filled completely with air even when you turned it upside down. That is why we notice that water does not enter the bottle when it is pushed in an inverted position, as there was no space for air to escape.
When the bottle was tilted, the air was able to come out in the form of bubbles, and water filled up the empty space that the air has occupied.
Hence we can see that air fills all the space inside the bottle.
Proof for release of oxygen in photosynthesis
Activity 2: Take a healthy branch of Hydrilla and place it in a funnel. Invert the funnel in a beaker of water as shown in the figure. Invert a test tube over the stem of the funnel. The stem of the funnel should be kept immersed inside the water.
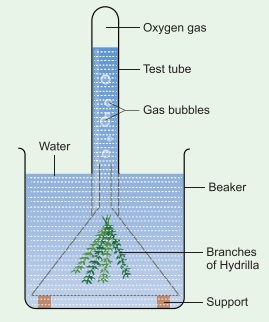
Leave the beaker in sunlight for some time. You will notice some bubbles rising in the test tube. The bubbles contain oxygen released by the plant during photosynthesis. If we show a glowing splinter to the collected air, it burns brightly. This shows that the collected gas is oxygen.
Test for the proportion of Oxygen and Nitrogen in air
Activity 3: We know that iron undergoes rusting with oxygen and forms iron oxide. This process can be used to estimate the percentage of oxygen in air, which has been removed by the rusting reaction.
Take a small portion of iron wool, press it into a 20 ml graduated test tube and wet it with water. Tip away excess of water. Take a 500ml beaker and fill half of the beaker with water. Invert the test tube and place it in air. Leave the arrangement at least for a week without making any disturbance to the test tube.
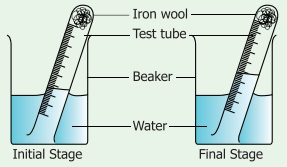
Observe the changes that had happened in the iron wool and to the level of water inside the test tube. We could see that the water level has increased inside the test tube. The rise in water is because of oxygen in air which has been removed by the rusting reaction.This will be about 20% which is approximately the percentage of oxygen in the air.
Test for Carbon-di-oxide in air
Pour some lime water in a glass tumbler. Bubble some air using a straw through the

limewater. After a few minutes, look at the lime water carefully. The lime water will produce a white precipitate and that the lime water will
Collect details from all the areas where we have kept the dust collector sheets. Tabulate the recordings in the table given below:-
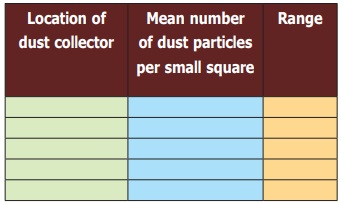
* Which area do you think will have the most dust?
__________________________________
* Which area do you think will have the least dust?
__________________________________
Test for water vapour in air
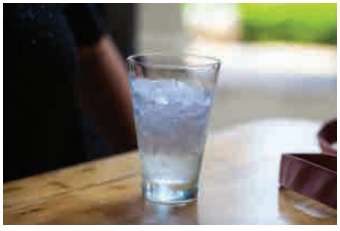
Take a few ice cubes in a glass. Keep it on the table for a few minutes. Observe what happens. You could see tiny droplets of water all over the outer surface of the glass. From where do these droplets come?
The water vapour present in the air condenses on the cold surface of the glass. This shows that air contains water vapour.
Activity 4: Oxygen is necessary for burning
Place two candles on a table. Ensure that both the candles are of same size and height. Mark them as candle 1 and candle 2 using a chalkpiece. Light both the candles. Now, cover candle 2 with glass tumbler as shown in the figure Observe the happenings at both the candles.
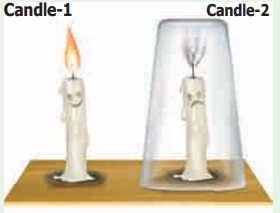
What does happen to candle 1? _________
What does happen to candle 2? _________
Can you guess why did the covered candle extinguish? _________
Let us summarize the happenings.
The candle 1 continues to burn, unless it is blown – off by strong moving air or any other external force. This is because fresh air is continuously available to the candle for its burning process.
Candle 2 glows for a while and then gets put – off. When the burning candle is covered with a glass tumbler, the candle can use the oxygen available in the air inside the glass tumbler. Since only a small amount of air is present inside the glass tumbler – only a small portion of oxygen is available for the candle to continue glowing. When all the oxygen of the air inside the gas jar is used up, then the burning candle gets extinguished.
Now, repeat the candle – glowing experiment taking four containers of different sizes. For example, you can take a 250ml conical flask, a 500ml bottle, a one – litre jar, a two – litre jar. Cover the burning candle one by one with these containers and find out how long it takes for the candle to extinguish in each case. Record your observations in the following table.
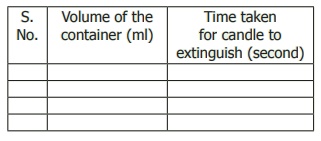
Can you write interpretation based on your observations at the table? _________
Related Topics