Chapter: Mechanical : Maintenance Engineering : Condition Monitoring
Repair Methods For Basic Machine Elements
REPAIR METHODS FOR BASIC MACHINE ELEMENTS
Repair Methods For Beds
MANY READERS must be in possession
of lathes and other machinery that have slide wear con-centrated in sections of
most use. 1 expect that some have heard of, if not come in contact with, the
old craftsman held in awe because his mach-ine is in such a bad condition that
he is the only one able to produce good work from it. How much better he could
perform on a good machine where full concentration could be given to the w o r
k p i e c e r a t h e r t h a n t h e e c c e n t r i c i t i e s a n d
shortcomings of his machine tool.
An accurate machine is a joy to use. but wear creeps in
insidiously, one foun impos day it is gibs to ful d s- ible to adjust trave and
the give l l yet b tigh enoug accurat wor in sectio e t h for e k the n mos
use. this arise it of t When situation s does not necessarily mean an expensive
regrind for your lathe bed for example, my aim is to show how small machine
tool slides may be restored by the amateur with a minimum of equipment. In this
age of enormous labour costs few reasonably priced machines have hand-finished
slides, so machines may profit from owne of rs new a little of work shall attempt
to describe. the I Rather than describe the overhaul of a par-ticular make and
type of machine 1 shall give a procedure for a 3-1/2 in. lathe, I am sure
readers will be able to apply the principles and methods involved to their own
make and size of lathe, also millers, shapers etc.
Before stripping, overhaul the headstock man-drel and
bearings. I do not intend to enlarge on this, volumes have been written on the
subject, adjustment is usually built in anyway. Good bear- ings are essential
for up the lat letting is still slides er
an the lathe new hav d intact
if bearings e to be machined. right down th
Strip the lathe bed,
now check the to e
mounting onto stan the bed is
not bench or d that twisted by dow the holding n bolts, this can be checked
with a sensitive spirit level across headstock seating and unworn sec-tions of
bed, readings should be exactly the
same, if not shim adjust jacking bolt or the s to correct. Much care be with more must
taken a bed mounted on feet at each end
than the cantilever type.
Clean the bed thoroughly with carbon tet. or similar solvent
and take a good look at it in c o n j u n c t i o n w i t h t h e s a d d l e ,
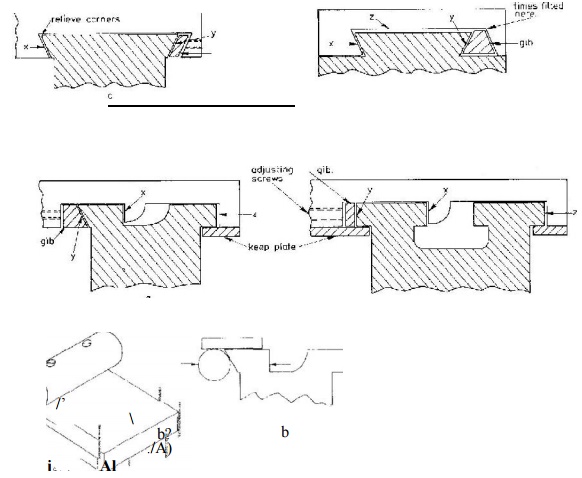
h e a d s t o c k , tail-stock and sketches Fig. 1, identify the main guide faces,
these will always be opposite the gib faces.
Now to check the wear present, I doubt if many readers have a
fishback surface plate as
long as the bed, but a 24 in.
straight-edge can, with care, be used equally well. The thick type of
straight-edge as used in combination sets is c e r t a i n l y t h e b e s t a
n d e a s i e s t t o u s e . T h e s e straight-edges can be obtained plain without
graduations at a considerable saving In cost.
Try along the top flats of the
bed with the straight-edge, if the headstock seating is on the same level as
the bed, bridge the gap from un-worn seating to bed as far back as possible and
try to insert a .0015 in. feeler gauge in worn section; unless
wear is excessive you will prob-ably find that
It won’t go. Wear will have to be
detected by holding the straight-edge firmly down on the bed
carefully keeping it vertical and flex-ing it sideways, a little practice and
you will be able to feel where the bed is hollow or worn.
Check the bed all over including guide edges in this manner,
you will probably be comforted to find that very little wear is causing all
that trouble. A check on the actual amount of wear present can be taken by
using micrometers, vernier or ordinary calipers over and between all bed
surfaces. To measure over vee slides a jig or jigs must be made as shown in
Fig. 2. Screw a 1-1/2in. length of ground stock to a piece of 1-1/2 in. x 1/4
in. flat with one face trued flat.
Before scraping the bed a good
surface plate at least 6 in. x 6 in. will be necessary and also an off
standard one about 2 in. x 1 in.
x 8 in. with one edge machined and scraped flat at about 45 degrees. a piece of
old cast iron strip from a large machine is excellent, see Fig. 3.
Cast iron tends to form a thin
but very hard skin, so a few words on scrapers and the method of attacking the
surface are in order. I have not yet found a commercial scraper that is hard
enough for use on machine slides, 1 have found the best is a good quality
parallel flat file thinned by grinding see Fig. 3 and the end hardened right
out by quenching in water; for the work in hand 3/4 in. wide is about right.
Two different methods of sharpening are used, one for roughing
and one finishing. The rough-ing scraper is flat and straight ended, not
curved, as the book says and the finishing scraper is
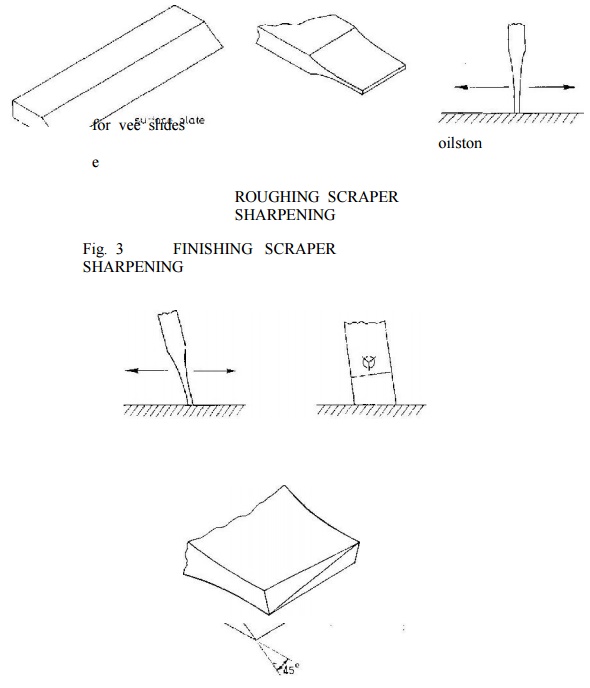
sharpened as Fig. 3. This scraper is used to remove the high
spots and is worked with a sort of forward-sideways-rocking motion, like
digging high out. sorry, but the spot I am this is the descripti I am able to
give, best on those that are able to mottle will understand what I mean and
also the difficulty of describing it, how-ever do not despair if you are not
able to mottle, a very attractive frosted effect may be obtained quite easily.
Start scraping down the top of the bed with the roughing
scraper. Work at about 45 degrees across the bed, use long even strokes and put
som pressur on, try remov met evenly e e to e al . difficul encounter breaki
the skin If ty 6 is ed ng use fin fla fil press agai at a e in. t e ed firmly,
n about 45 degrees across the bed and worked slowly and evenly. This will score
the surface to give the scraper a bite. With the skin removed use level,
straight-edge and feelers to take the high areas down evenly to the lowest
point of wear. The scraper should be sharpened frequently on a India use
anything medium stone, do not coarser as it will cause scraper score the
bed.
the to Each pass along the bed should be at 90 degrees to the
previous one.
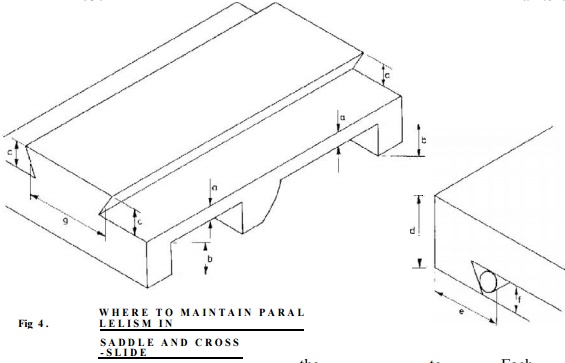
When you are satisfied the bed is dead flat t o t h e s t r a i g h t - e d g e s m e a r t h e l a r g e s u r f a c e plate with engineers’ marking blue and slide it up and down the bed a few times, the high spots revealed will probably be few and far between, but if the preceding work has been correctly carried out no perceptible rock should be felt in the plate. Still using the roughing scraper, take the high spots off and repeat a few times until a reasonable contact is shown all over the bed. By now smal! bright spots surrounded by blue should begin to appear, using the finishing scraper take these off. A word of caution. large areas of heavy blue do not mean a good bearing, it means too much blue on the plate, 1 repeat, the very high spots will show bright surrounded by blue. If you pick the high spots off with a short forward and sideways motion working at 45 degrees across the bed and the next time the plate is used, at 45 degrees the other way the high spots appea in more dense clusters and will r a very nic froste effect will take form on the e d bed. It is now up to the individual how much time, patience and dexterity he puts in to obtain a bearing surface, the more and closer the high spots, the greater bearing and flatter surface, but whenever the work is stopped the bearing should be even all over the bed. All the low areas sur-rounded the high spots are “oil wells” which will help to retain lubrication on the surface.
Locate the main guide face and carry out the same procedure on
it, if this face serves as the headsto location work this as well to ck on
obtain a flat face through. The straight right tailstock is probably guided by
the same face as the saddle but if not, this is the next for attention,
measurements must be taken from the completed face to ensure parallelism. The
secondary or gib
Related Topics