Chapter: Plant Anatomy:An Applied Approach: Practical microtechnique
Microscopy - Plant Anatomy:An Applied Approach: Practical microtechnique
Microscopy
Electron microscopy
There are two main types of electron microscope, the transmission microscope (TEM) and the scanning electron microscope (SEM). Clearly, the TEM and the SEM are now taken as being standard tools of the trade and essen-tial adjuncts to the light microscope in many anatomical investigations.
![]()
![]() Thin sections are examined in the TEM, or carbon replicas produced from specimens can be used where surface features are to be studied. Elec-trons are made to pass like a focused light beam through the section. Some parts of the specimen are electron-dense or are prepared by stains and fixa-tives to be electron-dense, whereas other parts are electron-opaque, per-mitting electrons to pass and form an image either on a special fluorescent screen, or directly on a photographic plate. The TEM uses electromagnetic lenses to focus the electron beam, which has a very much higher resolving power than a beam of light. That is, it can make distinct points which are very close together on the object. The largest commonly available microscopes can resolve between points about 20 nm apart, and have the ability to magnify above 500,000×. Naturally, at such high magnifications, only very small areas can be seen at a time. By comparison, the best light microscope using green light can give a maximum real magnification of about 1200×. Using ultraviolet light, slightly higher magnifications can be obtained.
Thin sections are examined in the TEM, or carbon replicas produced from specimens can be used where surface features are to be studied. Elec-trons are made to pass like a focused light beam through the section. Some parts of the specimen are electron-dense or are prepared by stains and fixa-tives to be electron-dense, whereas other parts are electron-opaque, per-mitting electrons to pass and form an image either on a special fluorescent screen, or directly on a photographic plate. The TEM uses electromagnetic lenses to focus the electron beam, which has a very much higher resolving power than a beam of light. That is, it can make distinct points which are very close together on the object. The largest commonly available microscopes can resolve between points about 20 nm apart, and have the ability to magnify above 500,000×. Naturally, at such high magnifications, only very small areas can be seen at a time. By comparison, the best light microscope using green light can give a maximum real magnification of about 1200×. Using ultraviolet light, slightly higher magnifications can be obtained.
Methods of preparation of the specimen for TEMs may be complex or straightforward, depending on what the investigator wishes to gain from the instrument. However, a very skilled operator is needed to produce good results. Fixation of the specimen is very critical, for example.
The SEM is used most commonly to examine the surface of specimens. Some specimens can be examined fresh for a brief time, but most are dehydrated carefully to minimize shrinkage and distortion, then coated with a very thin layer of metal, usually gold or gold/palladium alloy. This gives a better image and prevents contamination of the microscope by water.
Because of its relative ease of use, and because quite low (10×) magnifica-tions as well as those of up to or above 180,000× can be obtained on it, the instrument has a very wide use in applied plant anatomy. Currently, resolu-tion of better than 700 nm can be obtained as a matter of routine.
The specimen is bombarded with a focused ray of electrons. The elec-trons are made to scan in parallel lines over a rectangular area. Secondary electrons are emitted by the object, are collected by a series of electronic de-vices, and a synchronous image is displayed on a small cathode ray tube. Most tubes are about 10 cm square, and have about 1000 lines. The screen itself is photographed to produce a permanent record. Provided the coated specimen is kept clean and dry, it can often be used many times.
A great depth of field can be obtained with this instrument, about 500 times that of a light microscope. Many surface patterns of leaves, seeds and fruits, spores, etc., are being seen and understood properly for the first time of course. The cost will make it impossible for many people to own or even use an SEM, but some characters can be seen and illustrated or described, using other methods; it is astonishing how many can be seen with a good dark field, illuminating optical microscope, for example. It is only specimens which have to be magnified above about 1200× times that cannot be interpreted with the conventional light microscope.
![]()
![]()
Extending the use of the student’s microscope
It is unusual for the student to have access to a high quality light microscope.
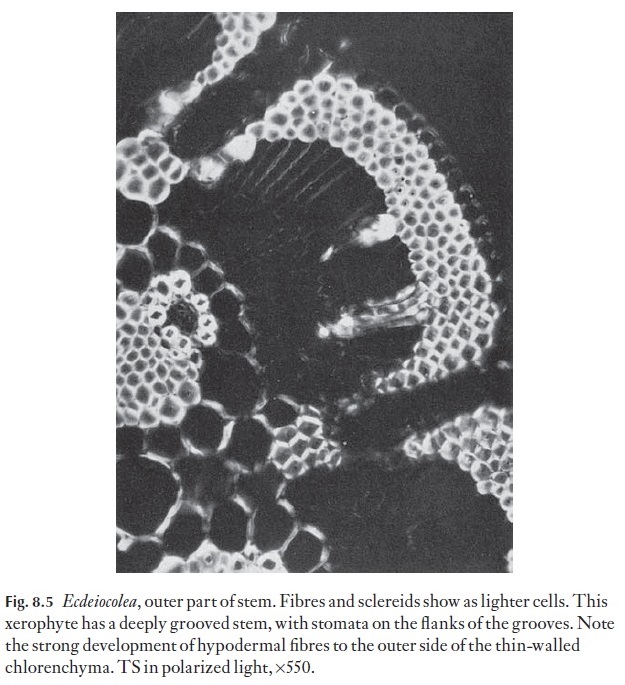
One simple way to make the microscope more versatile is to make Polar-oid attachments. A disc of Polaroid material mounted over the eyepiece, and another fitted in the filter carrier or in a holder between the mirror (or light source) and the microscope slide, will allow you to turn the instrument into a simple polarizing microscope. Crystals become more readily discernible, as do starch grains and details of cell wall structure (Fig. 8.5 shows part of a stem section in polarized light.)
Thin cellophane placed in one layer over the lower Polarized sheet (the analyser) will cause the light beam to become elliptically polarized. This phenomenon gives a coloured background against which crystals, etc. will appear a different colour. Rotation of the polarized disc over the eyepiece (polarizer) will cause changes in the colours. This technique is useful for examining unstained, macerated material, sclereids in cleared material or for looking at hairs or surface details in preparations where staining would make the subject too dense.
Other optical techniques
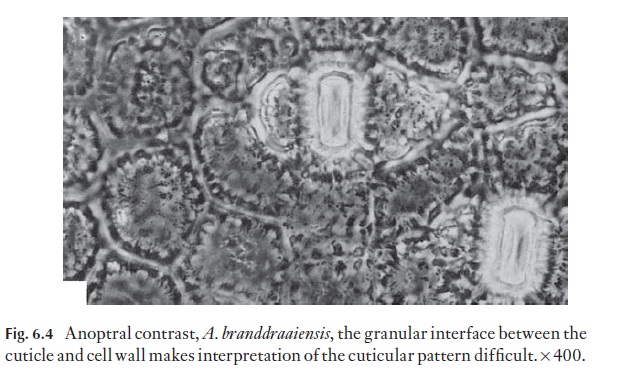
Other higher-resolution optical techniques include phase contrast, anop-tral contrast (see Fig. 6.4), dark ground, fluorescence, interference and, in-creasingly, laser scanning confocal microscopy.
The use of very thin (ultra-microtome) sections allows the light micro-scopist to see details of cell walls otherwise obscured, and the study of the wall structure of transfer cells is a case in point where the thin section al-lows observation of very fine details in such sections.
Related Topics