Chapter: 11th Computer Applications : Chapter 12 : HTML - Adding multimedia elements and Forms
Working with Forms - HTML
Working
with Forms
Forms
are used to receive information from the user. Forms are commonly used to allow
users to register on a Web site, to log in to a Web site, to order a product,
and to send feedback. In search engines, forms are used to accept the keywords
for search.
The
<form> tag is used to create a form. An HTML from starts with
<form> and ends with </form> tag. Forms contain many types of form
elements, such as text boxes, radio buttons, check boxes, buttons and drop-down
lists.
The
form has a special element, which is submit
button, which will submit the entries of a form to a server application to
process the entries. Each element in the form is assigned a name using the name attribute. Users enter values into
the text boxes, or make selections from the radio buttons, check boxes, and
drop down lists. The values they enter or select are passed with the name of
the corresponding form element to the Web server.
Attributes frequently used with <form> tag
The
important attributes used with the <form> tag are method and action
attributes.
Method
The
method attribute of the form tag is
used to identify how the form element names and values will be sent to the
server. The get method will append
the names of the form elements and their values to the URL. The post method will send the names and
values of the form elements as packets.
Action
The
action attribute identifies the
server side program or script that will process the form. The action will be
the name of a Common Gateway Interface (CGI) program written in programming
languages like Perl, JavaScript, PHP or Active Server Pages (ASP). (This will
be discussed with JavaScript in this book).
General Format of <form> tag
<Form
method=get/post action= “back_end_server_script”>
Form elements
</Form>
Form Controls:
In
HTML, there are different types of form controls are used to collect data. They
are Text box, Password, Checkbox, Radio buttons, Text area, Select box, Submit
and Reset Button.
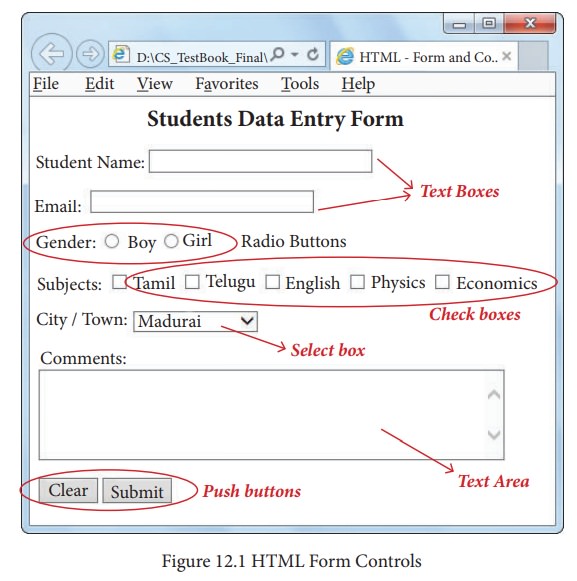
1. <Input> Tag
Most
of the form controls are created by using <input> tag. The <input>
is an empty tag used to create different form elements or controls such as text
box, radio buttons so on.
Attributes of <input> tag:
Type:
This
attribute is used define the type of control to be created by <input>
tag. The values of type attribute is listed below:
Table: 12.1
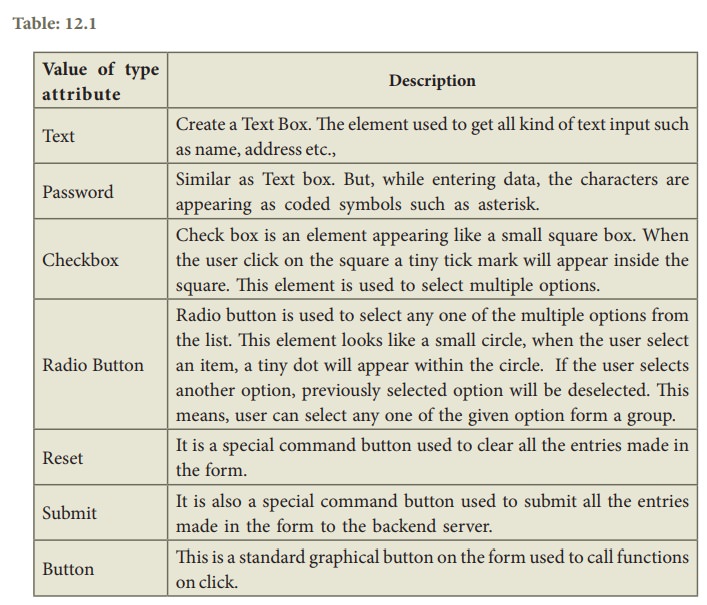
Value of type attribute and Description
Text : Create a Text Box.
The element used to get all kind of text input such as name, address etc.,
Password : Similar as Text box.
But, while entering data, the characters are appearing as coded symbols such as
asterisk.
Checkbox : Check box is an
element appearing like a small square box. Whenthe user click on the square a
tiny tick mark will appear inside the square. This element is used to select
multiple options.
Radio Button : Radio button is used
to select any one of the multiple options from the list. This element looks
like a small circle, when the user select an item, a tiny dot will appear
within the circle. If the user selects another option, previously selected
option will be deselected. This means, user can select any one of the given
option form a group.
Reset : It is a special
command button used to clear all the entries made in the form.
Submit : It is also a special
command button used to submit all the entries made in the form to the backend
server.
Button : This is a standard
graphical button on the form used to call functions on click.
Name:
This
attribute of <input> tag is used to assign a name to the input controls.
When the form is submitted, the data values are passed to the server along with
the names of the controls.
Value:
This
attribute is used to define default value to some controls.
Size:
This
is used to set the width of the input text in terms of characters. It is
applicable only for textbox and password boxes.
Maxlength:
This
attribute of <input> tag is used to set the length of the input character
(number of characters to be inputted) to the textbox and password boxes.
Illustration 12.7: An HTML code to demonstrate Form and Form controls (Login form)
<html>
<head>
<title> Login
Form </title>
<body>
<h3
align=center> TamilNadu State Council of Educational Research and Training,
Chennai </h3>
<Form Action =
"mailto:abcd.xyz@com" method=post>
<p> User
Name:
<Input type = text name="user_name"
size = 20 maxlength = 15>
</p>
<p> Password:
<Input type = password name="pass"
size = 20 maxlength = 15>
</p>
<Input type = reset value =
"Clear"> <Input type =
submit value = "Login">
</Form>
</body>
</html>
The output will be:
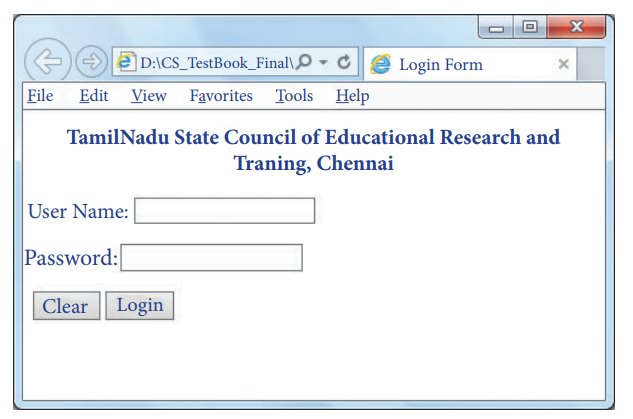
Note: Data received from the user can send
to receiver through mail using “mailto” action.
Illustration 12.8: An HTML code to demonstrate Form and Form controls (Text box, checkbox and radio buttons)
<html>
<head>
<title> HTML - Form and Controls
</title> </head>
<body>
<h3
align=center> Forms and Controls </h3>
<Form
action="mailto:abcd.xyz@com" method=post> <p> Student Name:
<Input
type=text name=name
size=30 maxlength=25></p> <p>
Gender:
<input
type=radio name=gender
value=boy> Boy <input type=radio name=gender
value=girl> Girl </p>
<p> Subjects:
<input
type=checkbox name=sub
value=Tam> Tamil
<input
type=checkbox name=sub
value=Tel> Telugu
<input
type=checkbox name=sub
value=Eng> English
<input
type=checkbox name=sub
value=Phy> Physics
<input
type=checkbox name=sub
value=Eco> Economics </p>
<input
type=reset name=reset
value="Clear">
<input
type=submit name=submit
value="Submit">
</Form>
</body>
</html>
The output will be:
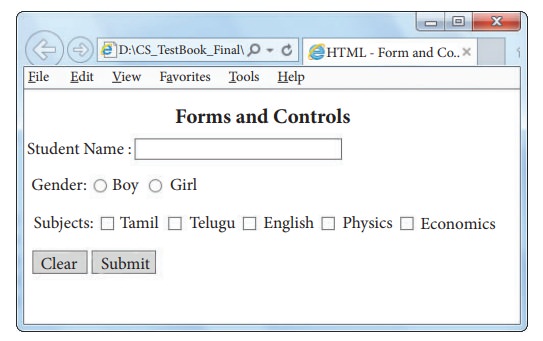
2. <Select> Tag
The
<select> tag is used to create dropdown list box in HTML. It provides a
list of various options as a dropdown list. This element is more helpful when a
number of options are to be displayed in a limited space. The <option>
tag is used to specify list items.
Attributes of <Select> tag:
Name – Provide the name to the control,
which is sent to the server.
Size – Determine the style of dropdown
list box.
Size
= 1 dropdown list box
Size
= 2 List box
Multiple – Allows user to select multiple
values.
Attributes of <Option> tag:
Selected – Indicate default selection
Value – Value to be submitted to server
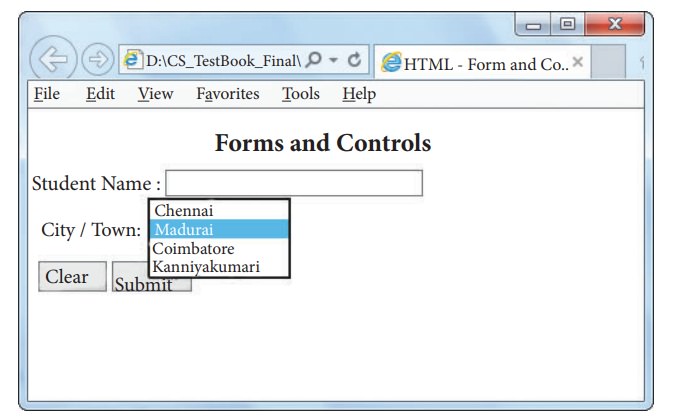
Illustration 12.9: An HTML code to demonstrate Form and Form controls (Dropdown List box)
<html>
<head>
<title> HTML
- Form and Controls </title> </head>
<body>
<h3 align=center> Forms and Controls </h3>
<Form action="mailto:abcd.xyz@com" method=post>
<p> Student Name:
<Input type=text name=name size=30 maxlength=25>
</p>
<p> City / Town:
![]()
![]()
![]()
![]()
![]() <Select
name = area size= 1>
<Select
name = area size= 1>
<option value = CHN> Chennai
</option>
<option value = MDR selected>
Madurai </option>
<option value = CBO> Coimbatore
</option>
<option value = KKM> Kanyakumari
</option>
</Select>
</p>
<input type=reset name=reset value="Clear">
<input type=submit name=submit value="Submit">
</Form>
</body>
</html>
The output will be
3. <Textarea> tag
The
<Textarea> tag used to receive multi line text data as input. It is a
container tag. The main attributes of <Textarea> are
Name – Used to define name to the control
Rows – Specifies the number of rows in
the text area control
Cols – Specifies the number of columns in
the text area. (number of characters in a
Illustration 12.10: An HTML code to demonstrate Form and Form controls (Text Area – Multiline input)
<html>
<head>
<title> HTML
- Form and Controls </title> </head>
<body>
<h3 align=center> Forms and Controls </h3>
<Form action="mailto:abcd.xyz@com" method=post>
<p> Student
Name:
<Input type=text
name=name size=30 maxlength=25></p>
<p> Email:
<input type=text
name=mail size=30 maxlength=25> </p>
<p> Comments: <br>
<Textarea rows=5 cols=50
name=comments> </Textarea> </p>
<input
type=reset name=reset value="Clear">
<input
type=submit name=submit value="Submit">
</Form>
</body>
</html>
The output will be:
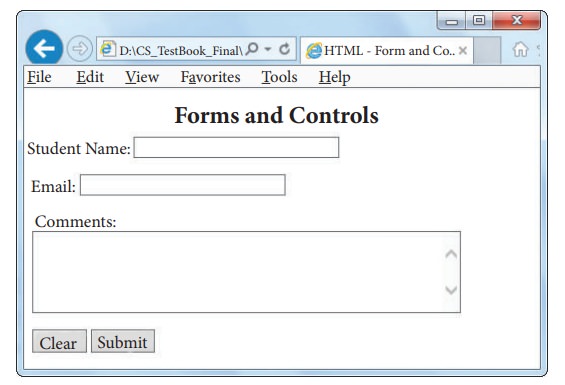
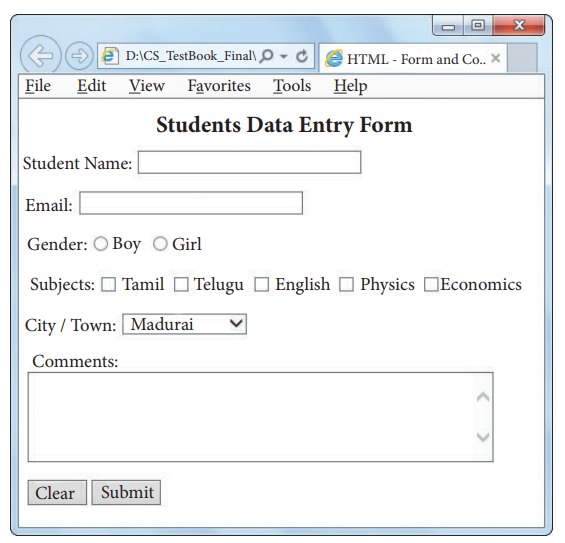
Illustration 12.11: An HTML code to demonstrate All Form controls discussed in this chapter
<html>
<head>
<title> HTML
- Form and Controls </title> </head>
<body>
<h3 align=center> Students Data Entry Form </h3>
<Form action="mailto:abcd.xyz@com" method=post>
<p> Student
Name:
<Input type=text
name=name size=30 maxlength=25></p>
<p> Email:
<input type=text
name=mail size=30 maxlength=25> </p>
<p> Gender:
<input
type=radio name=gender value=boy> Boy
<input
type=radio name=gender value=girl> Girl </p>
<p> Subjects:
<input
type=checkbox name=sub value=Tam> Tamil
<input
type=checkbox name=sub value=Tel> Telugu
<input
type=checkbox name=sub value=Eng> English
<input
type=checkbox name=sub value=Phy> Physics
<input
type=checkbox name=sub value=Eco> Economics
</p>
<p> City /
Town:
<Select name = area>
<option value =
CHN> Chennai </option>
<option value =
MDR selected> Madurai </option>
<option value =
CBO> Coimbatore </option>
<option value =
KKM> Kanyakumari </option>
</Select> </p>
<p> Comments:
<br>
<Textarea rows=5
cols=50 name=comments> </Textarea>
</p>
<input
type=reset name=reset value="Clear">
<input type=submit
name=submit value="Submit">
</Form>
</body>
</html>
The output will be:
Related Topics