PHP (Hypertext Pre-Processor) - Web Server Installation & Configuration Files | 12th Computer Applications : Chapter 4 : Introduction to Hypertext Pre-Processor (PHP)
Chapter: 12th Computer Applications : Chapter 4 : Introduction to Hypertext Pre-Processor (PHP)
Web Server Installation & Configuration Files
Web
Server Installation & Configuration Files
Web server software that runs on server hardware,
governs the server side scripting compilation into an intermediate byte-code
that is then interpreted by the runtime engine.

Web server software is available as open source or
licensed version in the market. Recent
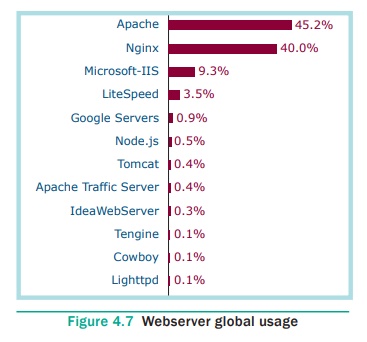
statistics of Web server usage depict that more than 130% Websites are running
under the open source Web servers such as Tomcat Apache, Nginx etc. Refer
Figure 4.7.
The following are the steps to install and
configure Apache Httpd Webserver and PHP module in windows server machine.
Step 1:
Go to Apache foundation Website and download the
Httpd Webserver Software.
https://httpd.apache.org/download.cgi
Step2:
After downloading .MSI file from Apache foundation
Website, user launches the .MSI file and clicks next and next button to finish
the installation on server machine. The software takes default port number 130
or 130130. Once the user finished, the Web server software is installed and
configured on server hardware machine as a service.
Step 3:
To test the installation of Apache Httpd Webserver,
enter the following URL from your Web browser which is installed in your client
machine.
https://localhost:130/
or https:// localhost:130130
The
output page that says “Its works”
Step 4:
Administrator user can start, stop and restart the
Web server service at any time via windows Control panel. Once the services
stops, the client machine will not receive the response message from server
machine.
Step 5:
Webserver’s configuration setting file “httpd.conf”
is located in the conf directory
under the apache installation directory. Edit this file and enable the PHP
module to run PHP scripting language.
Related Topics